 Written By :

This pedal is great for practicing, ideas, and live performances. I’ll show you everything I know about it, but first, let’s do a quick summary of its primary functions.
To use the MXR Clone Looper, power it with the included 9V DC adapter. Connect two 1/4” instrument cables to and from your guitar. Press the REC/DUB button at the same time as you start playing to record a loop. Press it again at the exact moment you would begin playing the same phrase to repeat it.
An Overview of the MXR Clone Looper Pedal
I’ve included time-stamps throughout this article that’ll direct you to the relevant section of my YouTube video.

The first thing I’ll say about the MXR Clone Looper is that it’s built like an aircraft carrier.

Here are some of the Clone Looper features. I’ll show you how to do everything in the next section.
1) Regular Looping Capability
2) Half-Speed
3) Double-Speed
4) Reverse Looping
5) Overdubbing (Unlimited)
6) Expression Pedal Functionality
7) Dial for Loop Playback Volume
I own a few MXR products now and they’re all extremely solid – but imperfect – devices that are built well but without a ton of extra features.
I’ve got the MXR Clone Looper, a 10-Band EQ, as well as an MXR Isobrick M238. And they all share this feature in common with each other – which is a solid steel, sleek-looking, housing for all of the electronics.
The Clone Looper also has a 88.2kHz sampling rate. This means its playback recordings are high quality. Your loops won’t sound distorted, muddy, or low-quality.
The Clone Looper is no different. Compared to the Boss RC-5, it doesn’t have nearly as many features (it’s also cheaper though), but there are also fewer things likely to go wrong with it.
How to Set Up the Clone Looper
1) Connect A 1/4” Cable to the Output And Another 1/4” Cable to the Input

Plug your 1/4” cable from the amplifier’s input into the output of the pedal. Then, connect another 1/4″ cable from the Pedal’s input to the input of your guitar.
2) Place the Clone Looper at the End of your Signal Chain
A) In Front of the Amp

In terms of where I would put it in the signal chain, I would almost always put it near the end of the chain in the FX Loop, or at the end of the chain in front of your amp (if your guitar is the start) – I showed this in my video (00:54)
B) In the FX Loop
I prefer to put it in the FX Loop (the Send and Return) of the amplifier. This allows you to record a loop that’s drenched in effects, and then play dry over top of it – or vice versa.
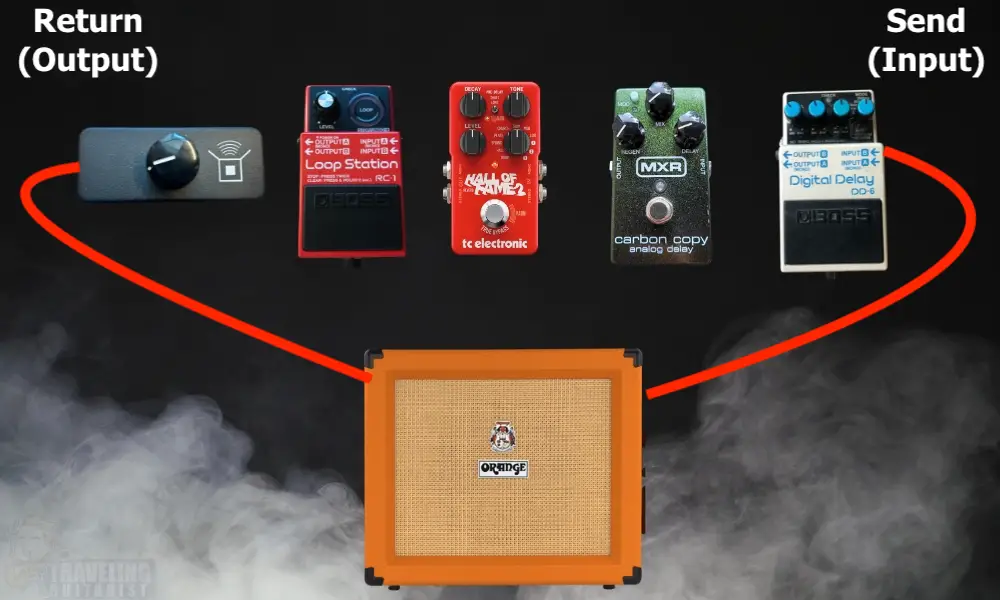
I’m going to show you my preferred method of putting the Clone Looper into your signal chain, which involves the amplifier’s Effects Loop (FX Loop).

Additionally, you can jam over the loop whether dry or wet.
This gives you way more control over your sound, and it’s a superior way to use the looper pedal, in my opinion. I’ve noticed that almost no one recommends this, but I think it’s the best way of going about it.
And you could continue putting your delay, reverb, and other modulation effects in the FX loop for total control of your sound, while also being able to use your looper in whatever way you want.

3) How to Power the MXR Clone Looper Pedal
Connect the 9V DC Adapter to the Top of the Clone Looper

The MXR Looper should come with the 9VDC adapter to power the unit. On the top of the unit, it says “+9VDC”. Plug your cable into the designated port using a wall outlet.
I recommend a surge protector like the Furman PST-8 because they protect electronics from power surges and they also act like really convenient extension cords.
The MXR Clone Looper has a current draw of 225mA according to the Dunlop manual which you can find here.
There are plenty you can get online, including basic ones on Amazon.

The reason is I find the cheap ones either get too hot or exhibit some other unforeseen problem.

An “AC” adapter (one that feels alternating current into your device, instead of direct current, ie, “DC”) won’t work, and you risk frying, melting, or possibly shorting your unit.

Like I said in my other article on using the Isobrick, as long as the mA power rating of the pedal doesn’t exceed the output on the Isobrick, you’re in the clear.
I emailed the guys from Dunlop and they confirmed this with me.

How to Use All the Functions/Features of the MXR Clone Looper
1) How to Record A Basic Loop With the MXR Clone Looper

I show this in my video here: 01:51
2) How to Playback the Loop

To get into Overdub mode, press on the record button again. We’ll talk about this in more detail in a second. I showed this in my video at 02:37.
3) How to Clear A Loop with the MXR Clone Looper

Recording and clearing loops is fairly similar to how it’s done on the RC-5 from BOSS, however, I would say it’s just slightly more streamlined and faster than the RC-5.
I also talk about how to silent delete here: 04:01.
4) How to Use The Overdub Feature in the Clone Looper Pedal
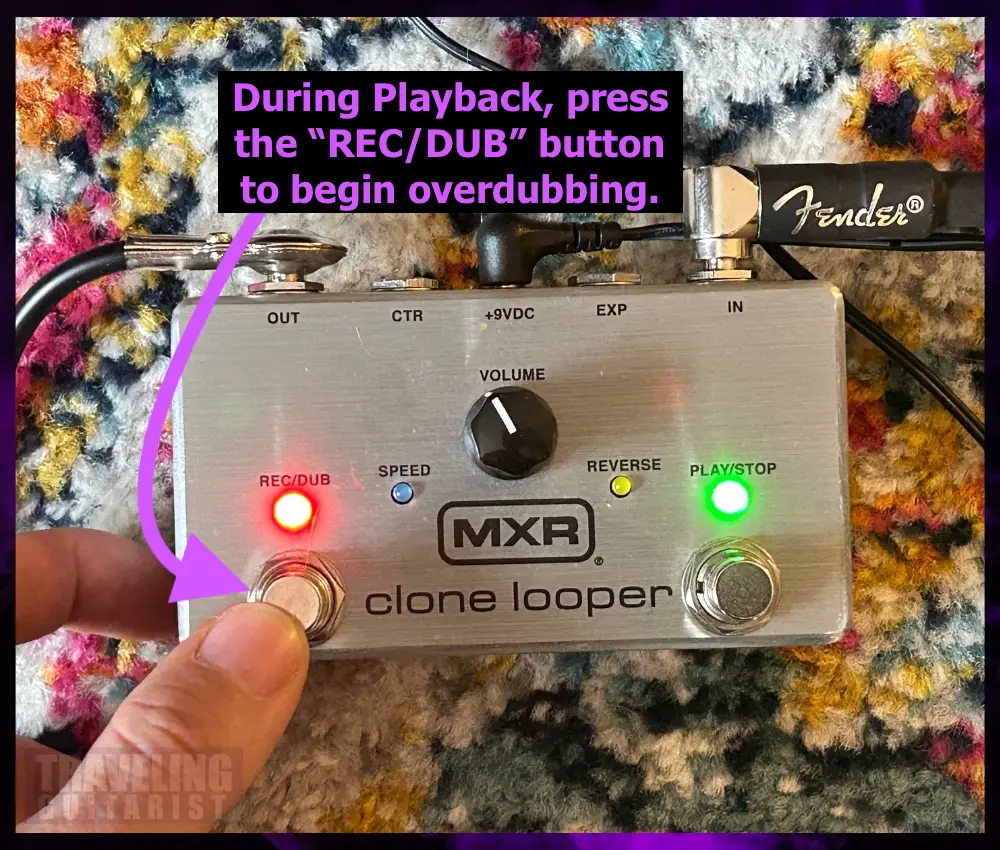
The Rec/Dub button will flash red while the Play/Stop button will continue flashing green.
The “PLAY/STOP” footswitch will give you a green 4 count to indicate when the loop is reaching its starting point again, so you can always know where you are in the loop. I showed this at 04:54 in my video.
The BOSS RC-5 has a similar feature, however, it uses an LED screen with bars on it to show you how long your loop is. It also counts the beats.

I should also mention that the Clone Looper can record as many overdubs as you’d like, which is an important feature that a lot of people will find attractive.
In other words, you can use this to record as many parts as you want (and even different instruments).
5) How to Delete A Dub and the Dub Only
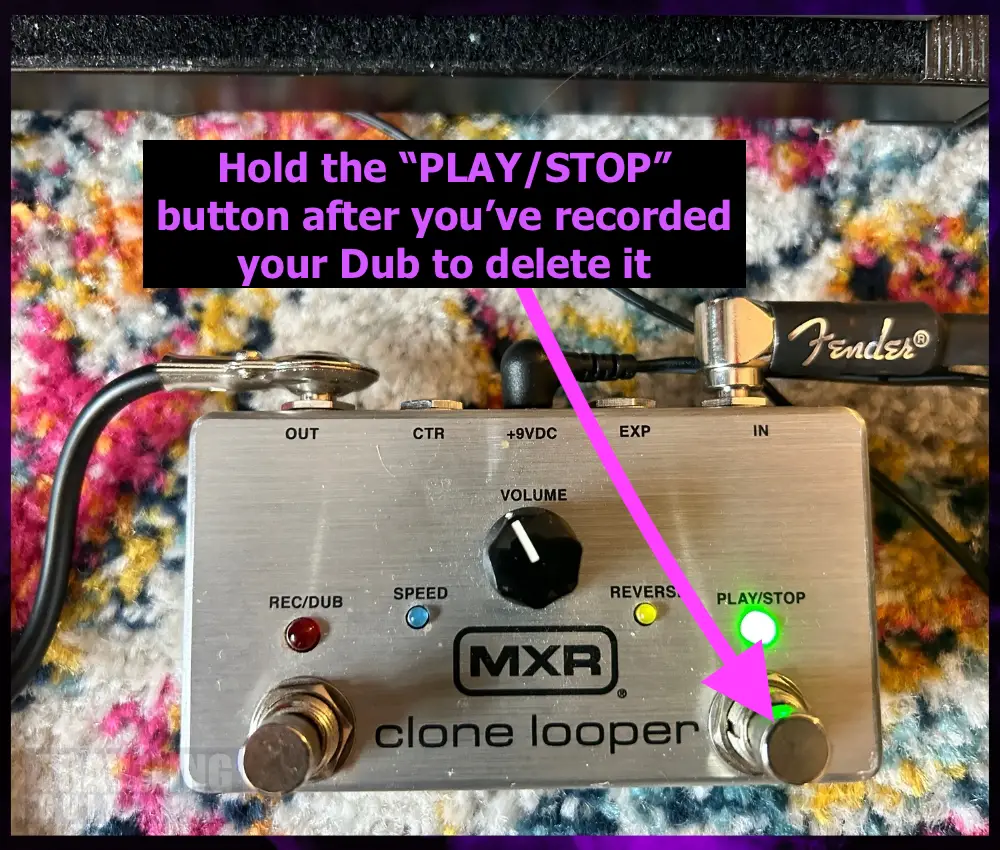
You do this, as opposed to holding the REC/DUB button to clear the entire loop 03:23.
6) How to Return A Deleted Dub with the Clone Looper
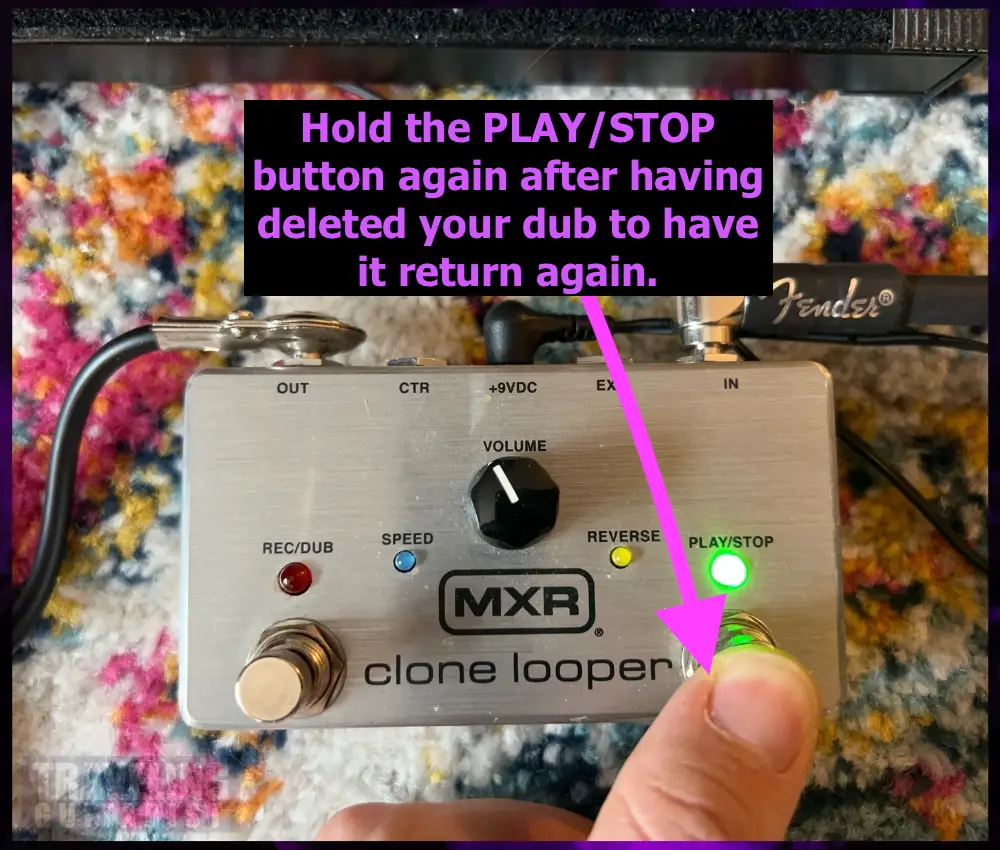
You can do this repeatedly if you’d like. However, you CAN’T go back into the Looper and find loops that you deleted previously. Only the last one 03:40.
7) How to Use the Reverse Feature on the Clone Looper

To undo reverse, hold the volume knob for 2 seconds again as shown here 07:34.
8) How to Use the Half-Speed Function on the Clone Looper

To undo half-speed, press the volume button again 08:07.
9) How to Use the Double Speed Feature on the Clone Looper

To undo double speed, press the volume knob again twice in a row 08:31.

10) How to Clear the Loop Quietly (Without Playback)
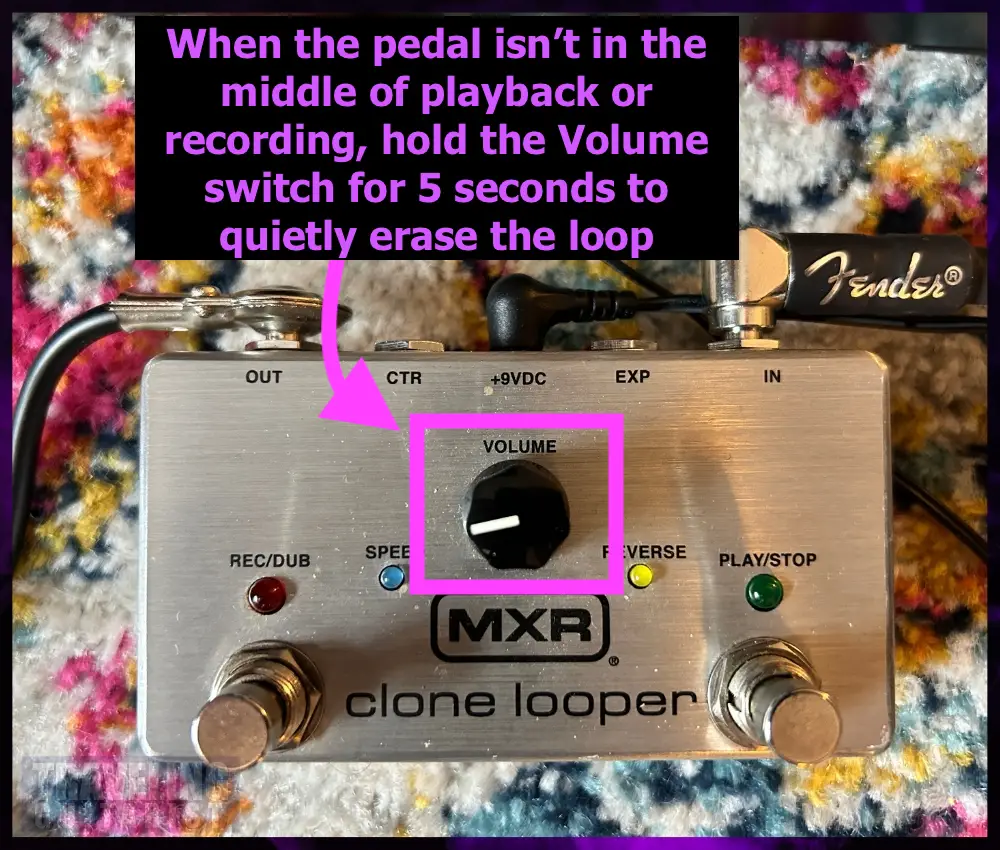
You have to hold the Volume knob for 5 seconds, and then after that time has passed, the REC/DUB button will flash red. Press the REC/DUB button, and it’ll quietly clear the loop.
I was trying to use the Volume knob to clear the loop while the loop was in the middle of playback. This doesn’t work – it’ll put the looper into reverse first.
11) How to Adjust the Loop’s Volume
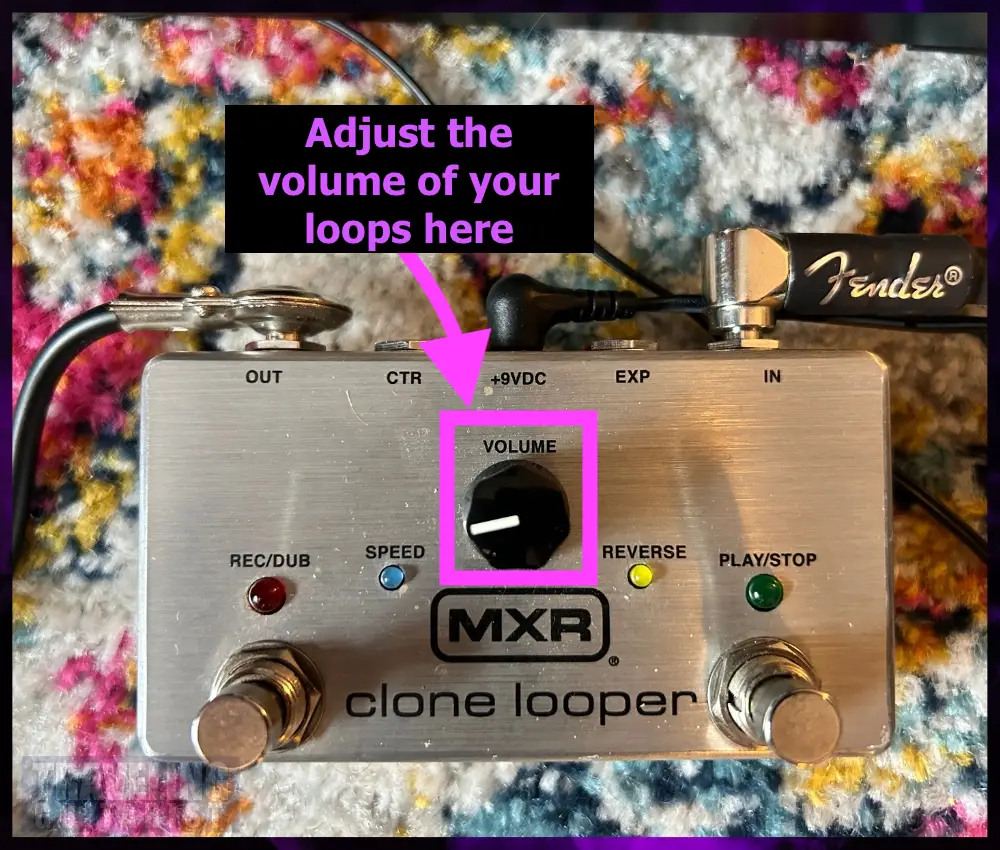
Obviously, you turn it to the left to decrease the volume and to the right to increase it 01:45.
12) How to Use the Control & Expression Jack
![Control and Expression Jack MXR Clone Looper - How to Use the MXR Clone Looper Pedal [Full Tutorial]](https://travelingguitarist.com/wp-content/uploads/2022/03/Control-and-Expression-Jack-MXR-Clone-Looper-How-to-Use-the-MXR-Clone-Looper-Pedal-Full-Tutorial-.webp)
For example, you can connect a volume pedal to the expression (EXP) jack to control the looper’s volume 05:56.
And you can connect the MXR tap tempo switch to the control (CTR) jack to control the speed externally 06:41.
A) EXP
For the reasons mentioned above, I would look for a different pedal to control the Looper externally.
B) CTR

If you wanted to control the Clone Looper’s other functions, you’ll probably need to use their proprietary switch. I tried using the M-Audio EX-P but it didn’t work properly.
13) How to Enable True Bypass Mode
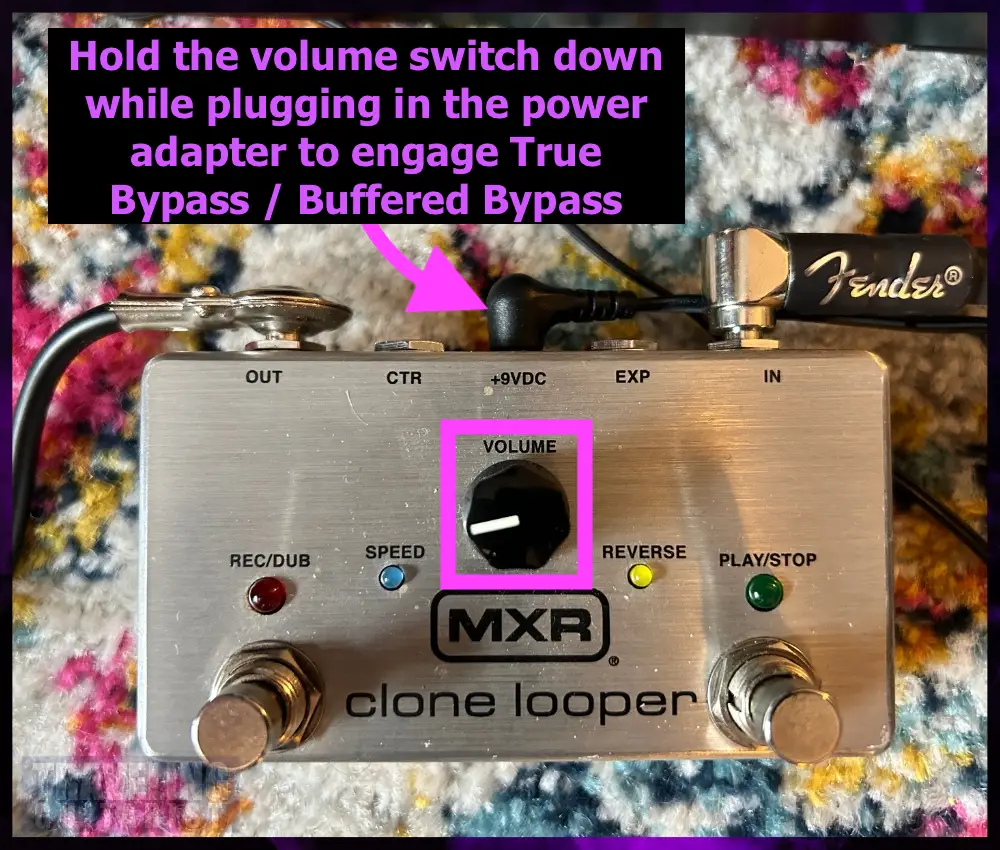
This is a nice touch 08:45.
Troubleshooting Questions and Answers
1) Why Isn’t My Clone Looper Pedal Working?
There are a few things you can do to fix your Clone Looper pedal if it’s not working. Like I’ve said in other articles, I once spilled coffee on my Clone Looper but then I had the foresight to turn it off and let it sit for a few months.
I went out and bought the RC-5 because I thought the MXR looper was done, but as it turns out, it’s completely fine. I was happy about that, and now I’ve got two looper pedals. But I digress. If your pedal is not working, try these fixes.
A) Make Sure the 9VDC Cable is Completely Connected
Sometimes these cables can come unplugged although it’s not particularly common. I find a bigger culprit is just not pressing it into the pedal hard enough the first time you did it.
B) You May Have the Input & Output 1/4” Cables Switched
You may have the input and output 1/4” cables switched. Additionally, ensure that you’re using a proper cable. D’Addario makes great cables for pedals.
C) Make Sure You’re Using the Right Kind of Charger
Like I said earlier, the Clone Looper uses a 9VDC adapter and it has a current draw of 225mA. This means most chargers will work for it, however, it’s possible some out there don’t have the ability to supply enough mA.
Use one of the adapters I linked to earlier, or just use the one that came in the box if you still have it.
D) Not Enough Power Draw Due to Daisy Chaining

If you’re daisy-chaining 8 pedals with a 9V DC adapter that has a 1.0A capacity (1000mA), it’s possible that you’re running too many for that particular adapter. So pay attention to the power drawn (in mA) of all the pedals, and see if that’s the culprit.
If you’re struggling to get your pedal to work, you can also check out this video here to learn more, because they have a good troubleshooting section.
2) Can You Use A Battery for the MXR Clone Looper?

According to the Jim Dunlop instruction manual, the MXR Clone Looper pedal cannot be powered by a battery. You can only use a 9V AC to DC power adapter.
It’s best to use a power adapter anyway because as I’ve explained in other articles on the site including my looper guide, most 9V batteries don’t last very long in the pedal anyway. So you’ll find yourself reaching for the power adapter after 6 hours ~ of playing.
3) How to Record A Seamless Loop With the MXR Clone Looper?

To record a seamless loop with the MXR Clone, I recommend using a metronome to produce the most accurate timing with your loop. If you would rather feel it out, that is great too.
To record a seamless loop, you have to press the “REC/DUB” button at the exact same time you start playing your instrument. To stop the recording of the loop, you have to press the “REC/DUB” button at the exact moment you would like the loop to start playing again 02:08.
4) Reach Out to Jim Dunlop Support for Troubleshooting Tips
I recommend reaching out to Jim Dunlop to troubleshoot how the unit can be repaired if it does not turn back on. Sometimes guitar pedals can be fixed by the right pedal guru or by someone who really knows their stuff.
Other Articles You May Be Interested In
- MXR Clone Looper vs TCE Ditto X2 (An Owner’s Comparison)
- MXR Clone Looper vs The Boss RC-5 [A Real Comparison]
- How to Use the MXR Isobrick (With A Demonstration)
- I Bought & Tested The MXR Dyna Comp (Here’s How to Use It)
- How to Fix A Wet Guitar Pedal [Dead SIMPLE]
Any questions, thoughts, or concerns? Be sure to ask me in the comment section down below.
I’m curious to know your opinion of the Clone Looper, or maybe you have an interesting way of using it. Let me know.
Important Things to Note About the Clone Looper
1) The MXR Clone Looper is Equivalent to the BOSS RC-3
The MXR Clone Looper is a fantastic pedal to start with if you are new to looper pedals. But if you find that you are searching for more features, there are plenty of options for upgrading. I recommend the BOSS RC-5.
It’s a bit more money than the Clone Looper but it has a couple more features that make it more versatile and flexible.
2) The Clone Looper Isn’t As Stable As It Could Be
Despite the fact it’s built like a tank, I find that the MXR pedal isn’t as sturdy as it could be. If you were to put it in a pedalboard, the problem would be solved.
However, if you don’t have a pedalboard, stomping on the controls awkwardly will flip or push the pedal into an uncomfortable position. You’ll have to stop what you’re doing to put it back to where it was, or push it back with your foot while you’re playing.

