 Written By :

Since its inception in 1951, Fender’s Squier Telecaster has been making waves in the music world. Players like Keith Richards, Muddy Waters, and Tom Morello have all famously used a Tele.
It’s a very versatile guitar, but that doesn’t mean you can neglect a proper setup. Whether you’re unboxing this classic or you’re blowing off dust from your high-school band days. With just a few tools, you can have your Telecaster sounding its best with every note.
To set up a Squier Telecaster
1) Take the strings off
2) Clean the guitar
3) Put new strings on
3) Measure the relief with feeler gauges
4) Adjust the truss rod with a 5/32″ Allen wrench
5) Raise or lower the saddles with a 0.050″ Allen wrench
6) Adjust the pickup height with a 1/4″ screwdriver
Regular maintenance will keep your Squier Telecaster’s action, intonation, and tone playing and sounding great. I think the biggest advantage of a properly set up guitar though is that it makes playing the instrument a lot more fun. Without further ado, let’s really dive into how to set up a Telecaster.
Setup Guideline for a Squier Telecaster

Similar to the one I did for my PRS setup article, the chart I’ve included below is a quick and easy guideline for setting up your Telecaster. On the left, you have your set-up parameters which include the truss rod relief, string height, and pick-up height.
The fretting category refers to the way you have to fret the strings while taking the measurement, ie, you must fret the 21st fret while measuring the pickup height to get a proper measurement.
The category, “Measurement,” is my personal recommendation for setting up the guitar, whereas the Factory Specifications on the far right are what the manufacturer recommends on their website.
| Set-Up Parameter | Fretting | Measurement | Factory Specification |
| Truss Rod Relief (at 7th fret) | 1st (capo) and 19th (with finger) | .005″ – .008″ | 0.010″ |
| String Height (at 17th fret) | N/A | 3.5/64” on Treble Side 4/64″ on Bass Side | 4/64″ on Treble and Bass Side |
| Pickup Height | 21st (fretted) | Bass: 5/64” Treble: 4/64” | Bass: 5/64” Treble: 4/64” |
Source for Squier Telecaster Factory Specifications.
What Tools You Need to Set Up a Squier Telecaster
Every guitarist’s toolkit may be slightly different, but it’s always better to have and not need than it is to need and not have. One way to get a lot of the things you need in one go is to buy MusicNomad’s set-up kit.
1) Pliers
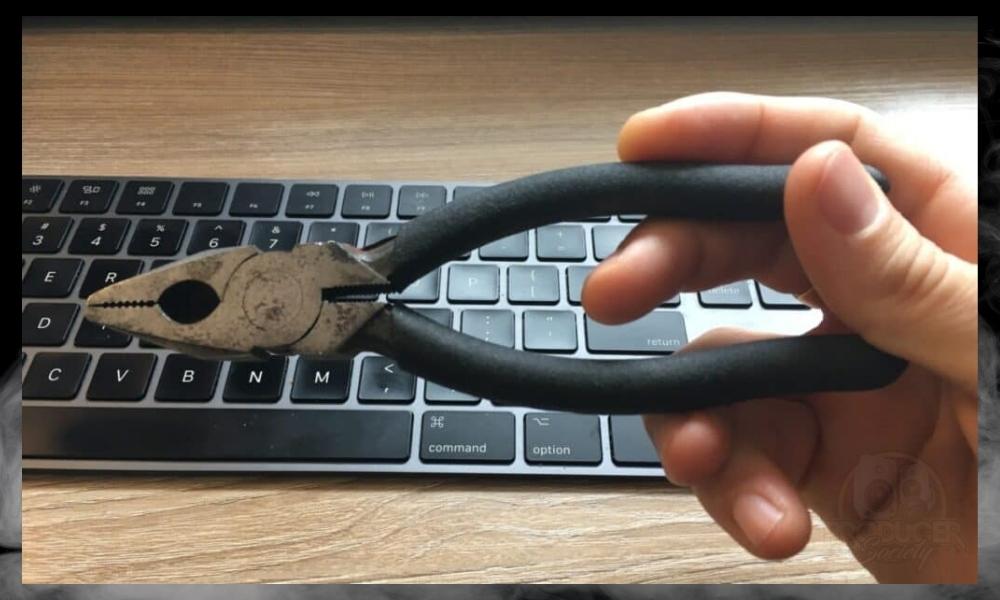
A pair of needle-nose pliers like these can prove to be a versatile tool. You can often find pliers that double as wire cutters, saving you space and money.
Pliers help save your fingers by prying out resilient strings that may catch in your bridge or tuning pegs. However, be careful not to nick the body or head of your guitar while wrestling out the strings.
Additionally, you can use pliers to tighten the tuning pegs at the head of your guitar should they start to come loose. A proper wrench is usually best for this though.
2) Wire Cutters
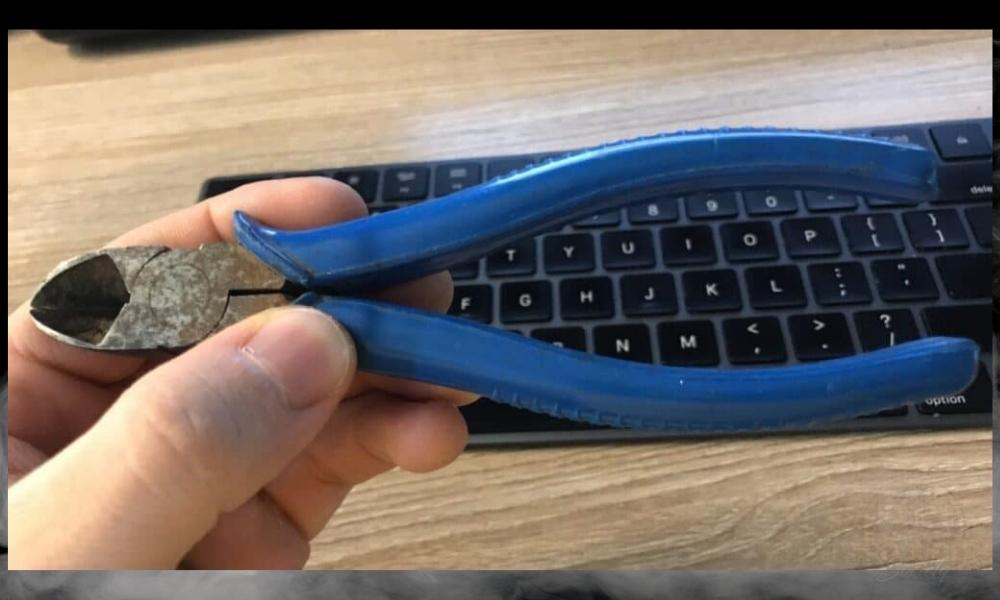
When restringing your guitar, wire cutters are essential to expediting the process. Simply loosen each string, then snip them behind the nut or near the bridge.
Ensure that there isn’t excess tension on the strings before you cut. It only takes getting sliced in the face once by a guitar string to learn this lesson, although, as I’ve said before, this probably won’t happen.
Additionally, I like to cut up the long strands of my old guitar strings to make disposing of them less of a hassle.
While it’s not uncommon for pliers to have their cutter built right into them, an actual set of wire cutters is a good thing to have around if you want to get real surgical with cutting the ends off of strings. I do this on the headstock especially.
3) Screwdriver
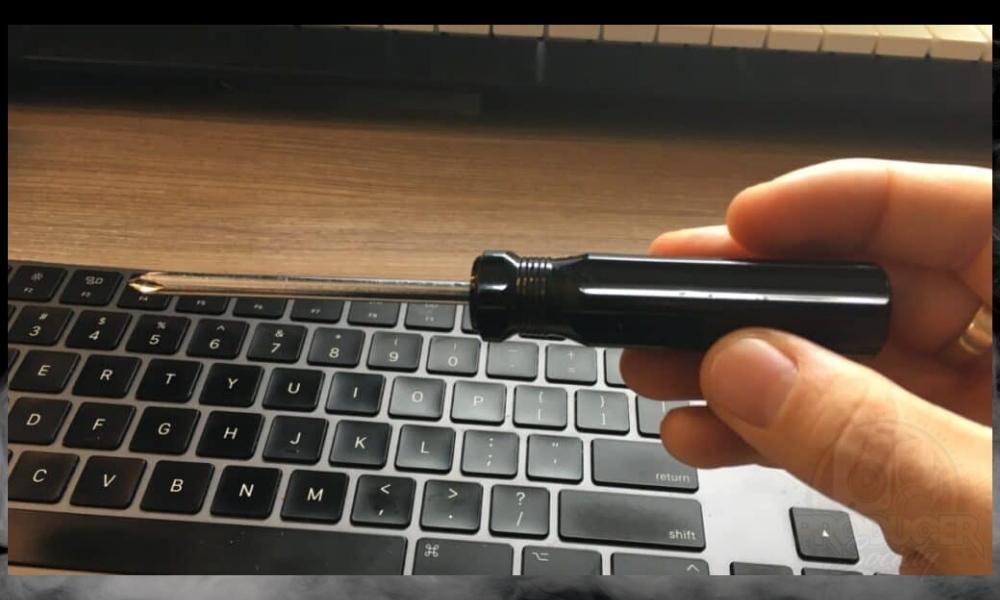
You’ll need a 1/4″ Phillips-head screwdriver to adjust and access various parts of your Telecaster. The bridge saddles for adjusting the intonation and the pickups need a 1/4″ Philips screwdriver.
We’ll mainly use the screwdriver to shorten or lengthen our guitar strings by moving the saddles forward or back. Additionally, we can raise or lower our pickups similarly.
4) 5/32″ Truss Rod Wrench (4mm)
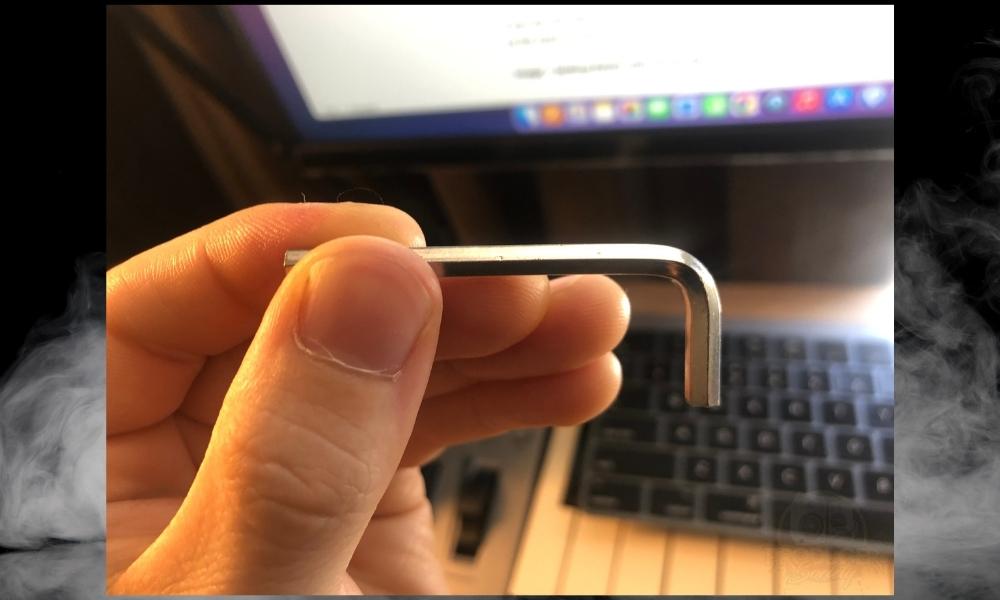
Depending on where it was manufactured, the Squier Telecaster requires a 5mm or 4mm Allen wrench to adjust the truss rod. Find what size you need online by clicking here.
In my case, a 5/32″ Allen wrench works just great, but not all Telecasters are the same.
Fender has released many models with different setup parameters over the years, ie, some of them have truss rods that must be adjusted where the neck and body meet.
By altering your truss rod’s settings, you affect the curvature of your guitar’s neck. This is essential to keeping your instrument in optimal performing condition.
5) Tiny Allen Wrench 0.050″
You’ll need a very little, 0.050″ Allen wrench like this one on my Product Page to raise or lower the bridge saddles. We’ll use this to adjust the distance between the strings and the fretboard. This is called the “action.”
Most people prefer an action that is as low as possible. This tool will likely come with the guitar if you buy it new. However, you can purchase a set of Allen wrenches and have both your truss rod and saddle adjustment needs covered.
6) Cloth
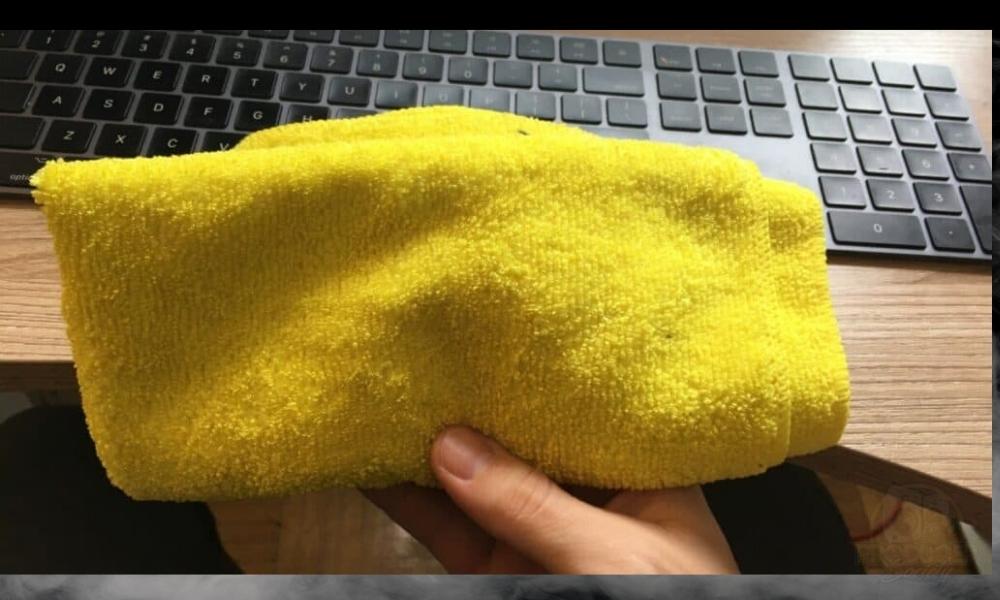
Whenever you’re cleaning your guitar, the quality of the rag you use is nearly as important as the cleaning solutions themselves.
Lint-free microfiber cloths ensure a gentle cleaning job across all of your guitar’s surfaces. Plus, you know that there aren’t any materials present in the rag that could potentially scratch your Telecaster’s finish.
7) Guitar Polish & Cleaner
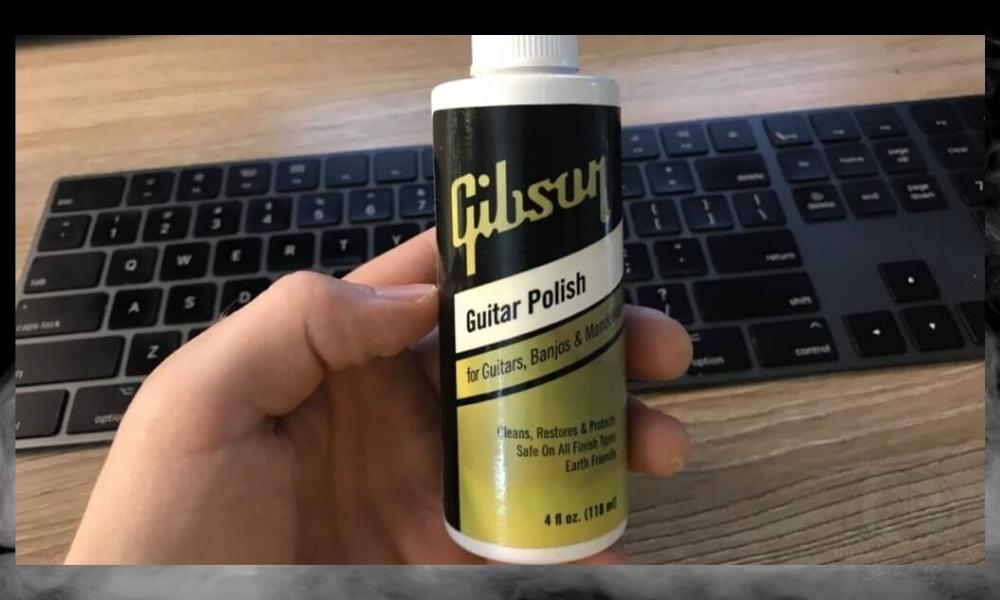
As you look for the right solution to preserve and protect your instrument, you’ll generally find a lot of different brands with supposedly specific purposes. I think, in reality though, most of them are the same.
One thing I will say though is that you’re apparently not supposed to use lemon oil on a maple guitar neck, which is what my Telecaster has. I use this Gibson polish at the moment, but I normally grab the Dunlop 65 from the store if I see it.
Either way, keeping your guitar clean is an essential step in retaining its longevity. Oils from your skin naturally accumulate on the guitar’s surfaces as you play. Allowing them to dirty can lead to tarnishing and nasty gunk.
Luckily, the right cleaner and polish could restore your guitar to its former glory with consistent application. Wiping down the fretboard every once in a while really does help with how the guitar plays, although, it could just be psychological.
8) Fretboard Conditioner
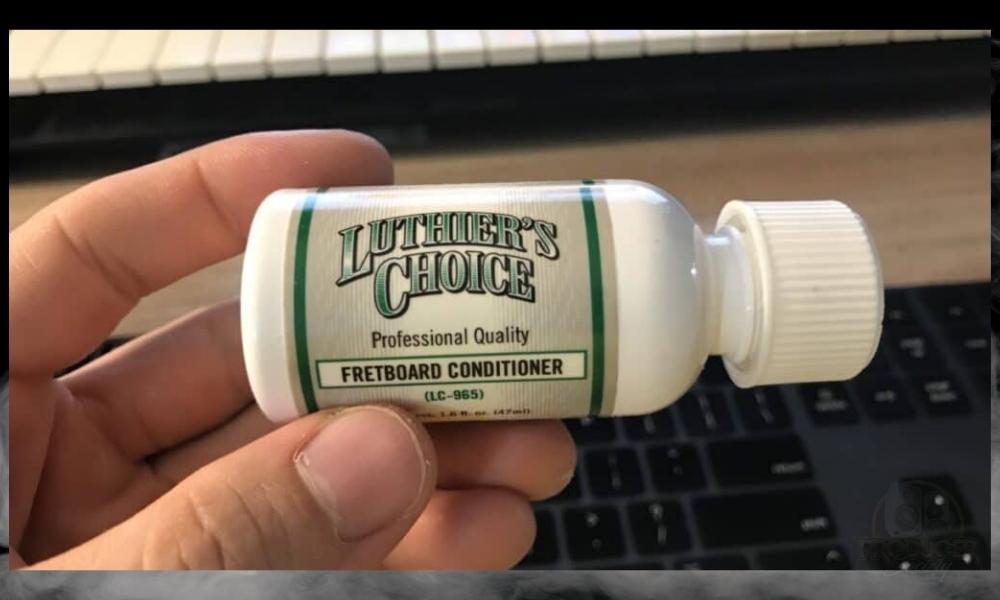
Like the majority of a guitar, the fretboard is made of wood. However, some fretboards may not have a coated finish. After some time, unprotected fretboards will dry out and lose their smooth, lustrous quality.
Applying fretboard conditioners like this or wood oils to your Telecaster’s fretboard will help retain its quality and provide you with a more enjoyable playing experience.
That said, you should do a quick Google search to ensure the stuff you’re using won’t cause any problems.
9) Mitutoyo Straight Ruler
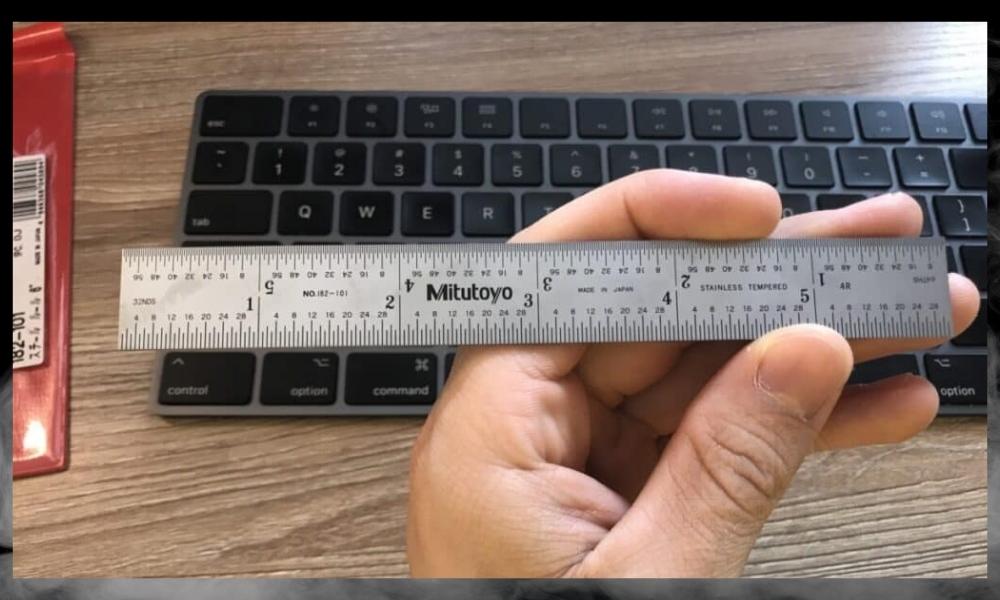
The key to finding a ruler that will work well for setting up your guitar is to ensure that it features small enough measurements. When we measure our truss rod relief and string height relative to the fretboard and pickups, every 64th inch matters.
Generally, you won’t need a ruler longer than 6 inches. In some cases though, having a long straight edge will be helpful for more advanced guitar tech work, ie, doing fretwork or determining the curvature of your neck in a more surgical fashion.
You can check out Dan Erlewine’s book on guitar setups if you want to read more about how surgical you can get with guitar setups.
10) Snark Tuner
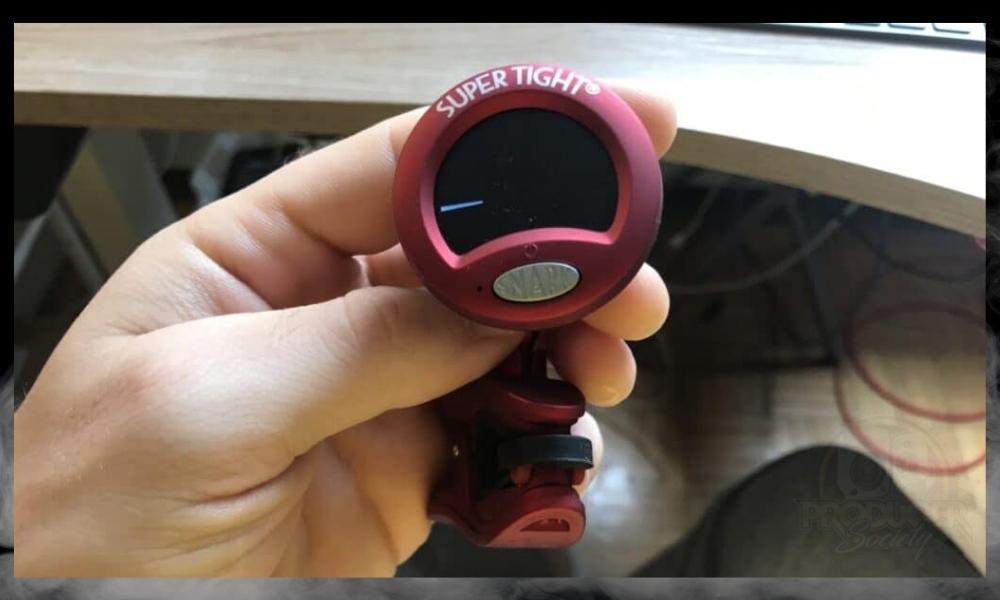
Clip-on tuners are ideal for making quick tuning adjustments without unplugging your guitar. Additionally, these compact pieces of equipment are more convenient and easy to use than other tuning options should you need to tune your guitar acoustically.
Since electric guitars don’t produce much sound when unplugged, having a reliable Snark tuner in your gig bag or workshop is a great move. You’ll need to replace the battery every 6 months or so. In that case, it’s just a standard watch battery.
11) Capo
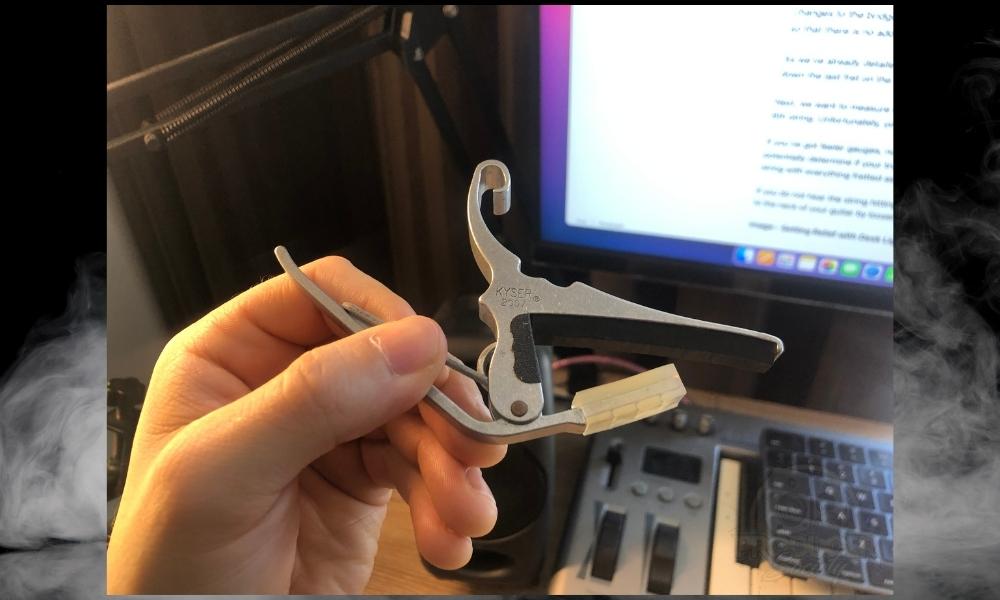
Setting up your guitar’s action and truss rod relief doesn’t necessarily require a capo. However, having one handy could mean the difference between a good time and a headache.

A capo acts as a third hand which depresses one of the strings at the nut and turns the length of the string into a fret edge that we use to figure out the relief or curvature of the neck. Coupled with a feeler gauge, we then have an idea of how to adjust the truss rod.
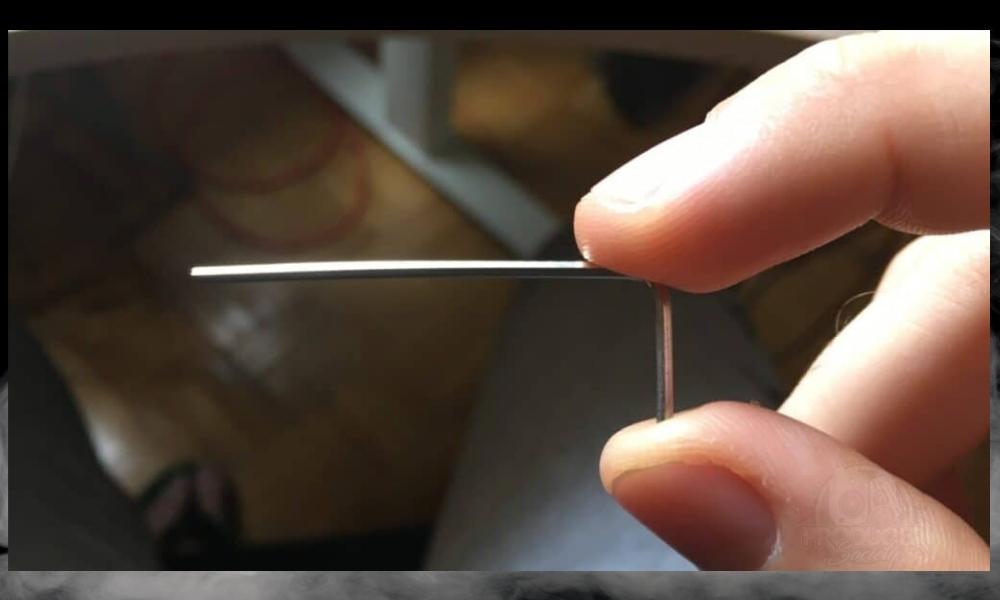
12) Feeler Gauges
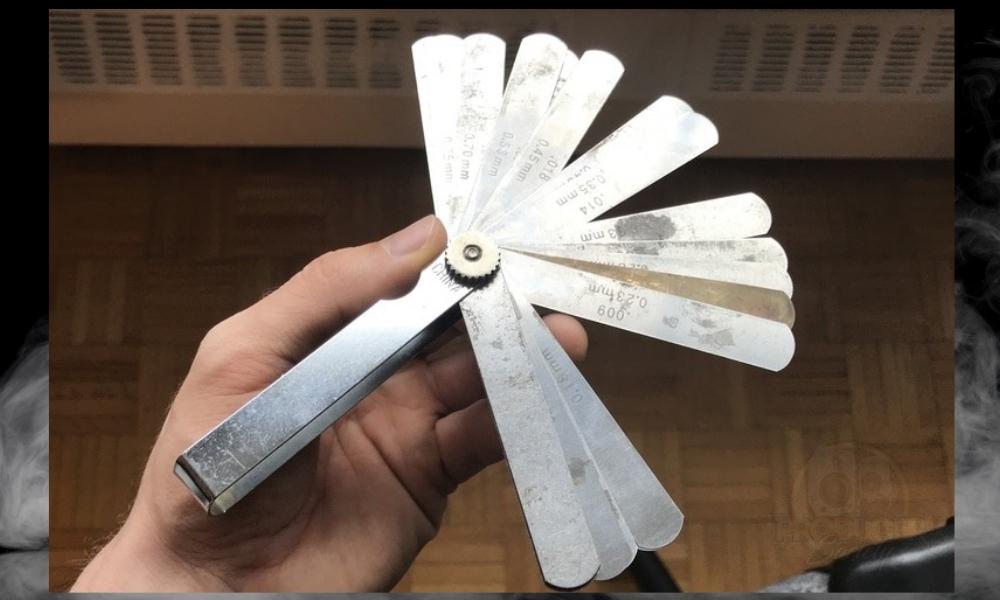
You also want to make sure you own a set of feeler gauges because these are going to make your life a lot easier when measuring the relief.
I’ve had these feeler gauges for ages now, and they work well. However, if you can find premium feeler gauges like from Stew-Mac or maybe Mastercraft, I would go for those instead.
The ones I linked to on Amazon are Starrett, which are premium gauges. I wish I had gotten those instead of the ones I bought years ago.
How to Set Up the Squier Telecaster
Now that you’ve assembled your toolkit, we’re ready to set up our Telecaster. Ensure you’ve got enough space on a clean, flat surface to work on your guitar.
Having some kind of light will also prove useful too, so find one and use it. Most smartphones have a light on them now.
Additionally, you may want something soft like a foam block to rest your guitar’s neck on as not to affect the tuning keys. I find that a rolled-up towel also works nicely for this purpose.
1) Taking the Strings Off
Firstly, we want to remove the strings from the guitar. A fresh set of strings is essential to ensure that we get our intonation right.
As a matter of fact, I changed strings for this tutorial and this was the culprit in terms of my guitar’s intonation issue. It just needed new strings badly, but I digress.
Detune each string until they’re exerting little or no tension on the neck of the guitar. Next, we’ll take our wire cutters or two-in-one pliers and cut the strings.
You can cut the strings nearer to the bridge or behind the nut at the head of the guitar. I find that cutting nearer to the head makes pulling out the wound-up ends of the string easier.
Don’t forget to utilize your pliers during this step if you’re having trouble pulling the strings through the bridge or the tuning pegs.
After taking the strings off the guitar, check that the tuning pegs don’t feel too loose. Use your pliers to tighten a peg’s bushing as needed. Also, ensure that you’ve found all the leftovers and thrown them away because you don’t want to step on them.
2) Cleaning the Guitar Before Setting It Up

You’ve got optimal accessibility for cleaning your guitar with the strings off. If you’re a visual learner, check out this video by Fender on how to clean your Telecaster.
Ensure that your hands are dry and free of dirt and excess oils to prevent adding grime to your instrument’s surfaces.
Dab a small amount of your cleaning solution onto your cloth, or lightly spray your cleaner directly over the body of your guitar. Gently work the solution evenly over each area of the instrument, including the neck, head, and rear side.
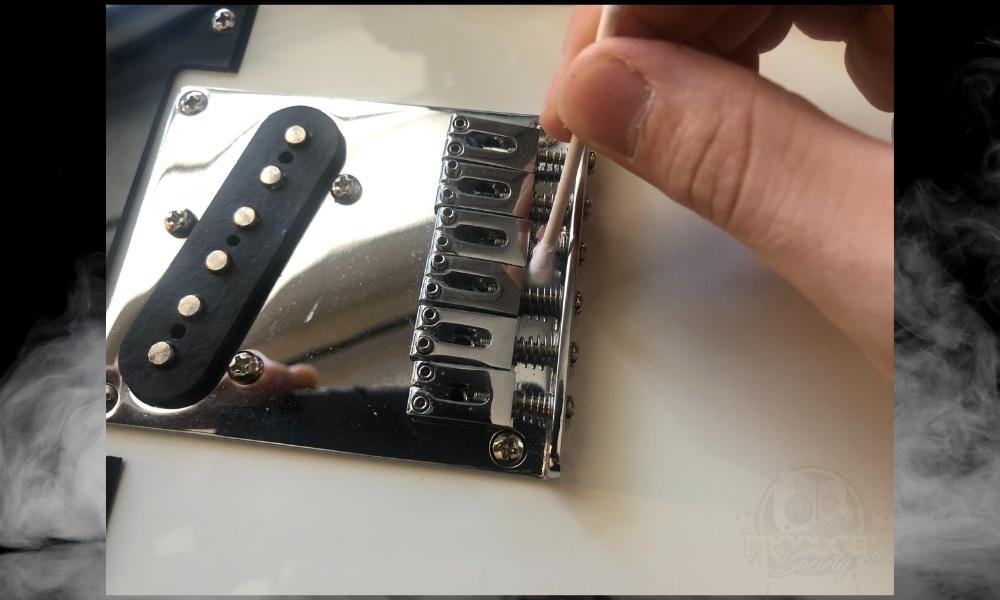
Next, use a dry section of your rag to wipe down every surface you applied cleaner to. This will ensure no unwanted residues settle on the guitar and attract more dirt.
We’ll want to utilize another unused portion of our rag or a separate, fresh cloth to apply the conditioner to the guitar’s fretboard.
Again, simply apply a small amount of solution to the cloth or lightly spray the fretboard. Then, evenly disperse the conditioner so that it reaches the whole surface.
Unlike the cleaning solution, we want to allow the fretboard conditioner to soak into the wood and dry on its own. You usually only have to condition a fretboard probably once a year, so if you’ve done it recently, then don’t worry about it.
3) Stringing the Guitar Back Up

Your package of fresh strings should include a key that will help you discern which gauge each string is. The order in which you restring your guitar doesn’t matter, so progress in a way that feels natural to you.
However, there is a proper way to feed, measure, and wind up your strings. When feeding your string through its corresponding tuning peg, send it through so that the string points outward from the guitar.
In other words, send the string through so that it comes out on the same side as the tuning keys on your Telecaster. Especially on your higher-gauge strings, there will be more length than you could feasibly wind around the tuning peg.
While exact measurements are hard to pin down, you can usually get a good size using your hand as a reference. With the string fed through, hook it with your index finger at the center of the fretboard.
Lengthen or shorten the string until you can touch the fretboard with your thumb while keeping the string pressed against the top of your palm. Now that we’ve found our string’s length, I find it helpful to bend it around the peg to prevent it from slipping.
The Telecaster’s tuning keys face upwards relative to you holding the guitar. Turning the tuning key counter-clockwise should tighten the string whenever this is the case. You can think of it as turning the key away from you or to the left.
Do not clip the extra length off until the strings have had time to settle, even after winding them. If you make a mistake, it’s nice to be able to re-string it as well. For example, if you’ve put the wrong string in the wrong place.
4) Tuning It
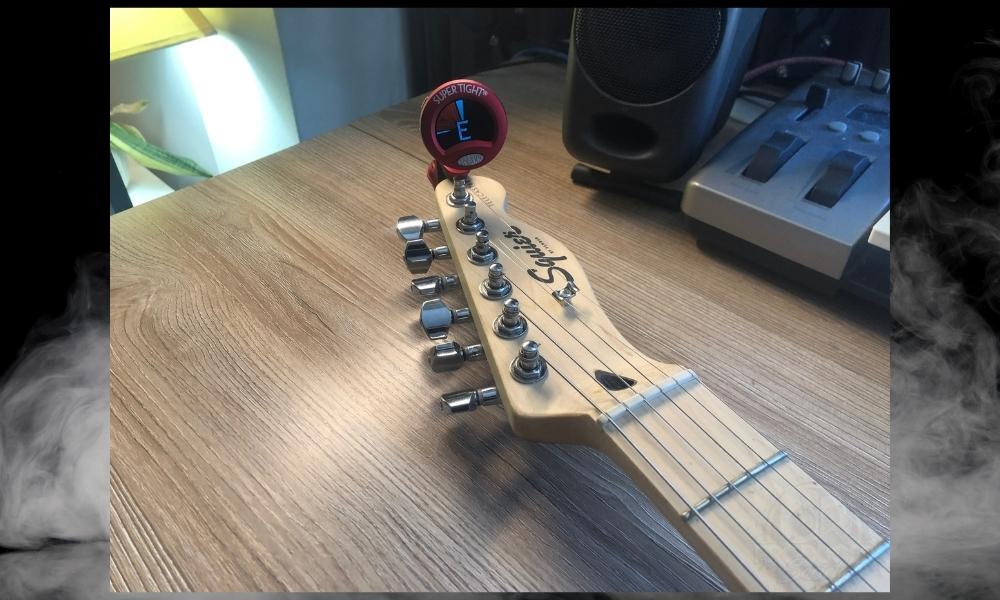
Unless you’re gifted with perfect pitch, your instrument is grossly out of tune. If you haven’t done so already, clip your tuner onto the head of your guitar and configure each string into E standard tuning.
Inevitably, your strings will fall out of tune for the next several hours, whether or not you’re playing them. We’re going to be making a lot more adjustments, so the only thing that matters is getting the strings in the right ballpark.
5) Adjusting the Truss Rod
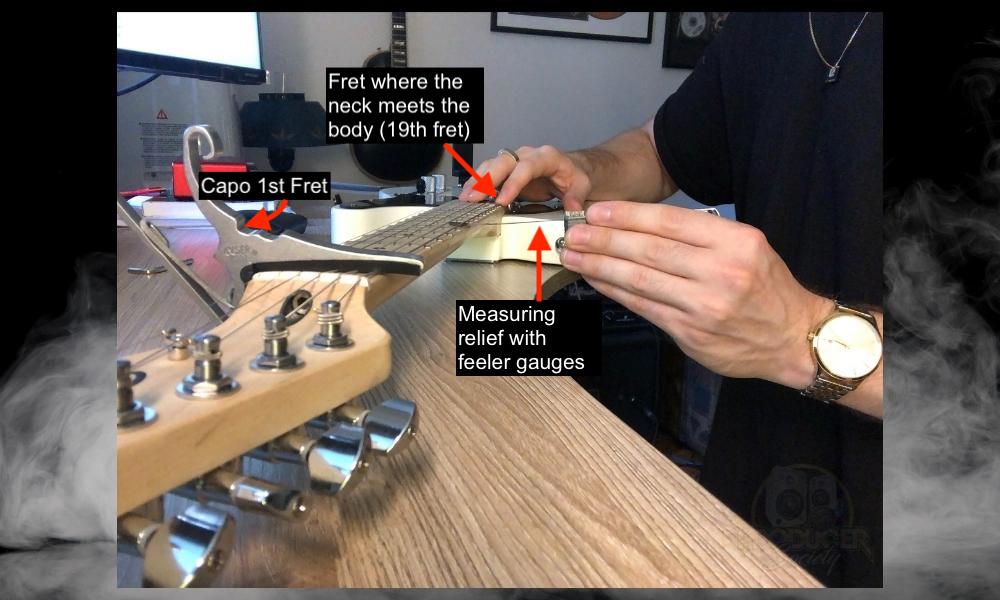
Once you have each string holding its tune in the open position, it’s time to ensure we’ve got a proper truss rod relief measurement. Take your capo and attach it to the neck at the first fret.
Then, hold down the low E string on the 19th fret with one hand while you measure the distance from the 7th fret to the sixth string with the other. Put feeler gauges underneath the string to find out the distance between the string and the fret.
Your ruler won’t have a measurement small enough to accurately discern whether your relief is exactly a one-hundredth of an inch, so this is why feeler gauges are necessary.
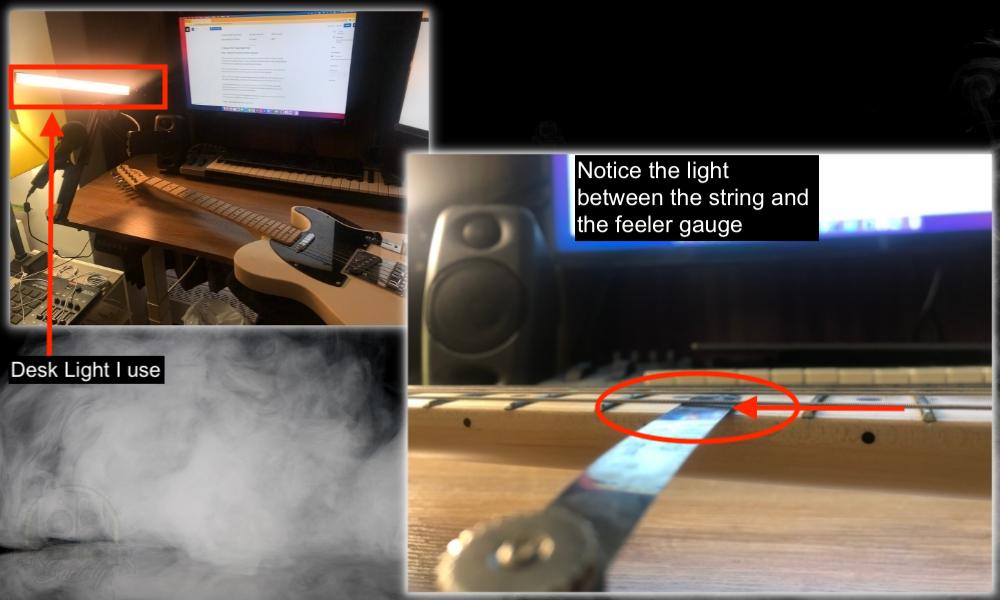
Through a process of trial and error, continue using smaller and smaller feeler gauges until you find one that fits perfectly underneath the string and between it and the fretboard.
For example, start at 0.015,” then go down to 0.012,” then 0.009,” etc, until you finally get to one that fits underneath without touching the string. Once you’ve found the right measurement, we can decide what to do with the truss rod.
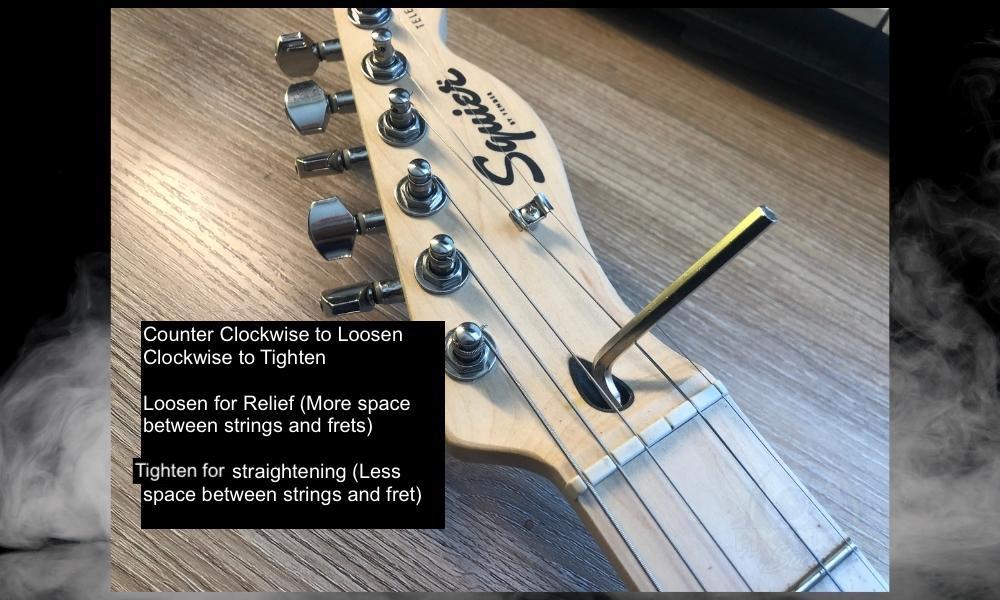
Before you do that though, you’re going to need to detune the G string so you can actually get the 5/32″ Allen wrench into the nut without doing damage or stripping the nut. This is a mistake you don’t want to make because stripping the nut can be problematic.
If there is a large gap between the string, fret, and feeler gauge, this means you have too much relief. In this case, you can tighten the truss rod by turning it clockwise.

If there is zero space between the string and fret, you have too much bow, and you can turn it counter-clockwise to loosen it. Another trick is that you can probably start your turn-off by first loosening it.

In other words, turn it slightly counter-clockwise when you first start making an adjustment, then tighten it if you need to. This makes the whole process go a bit smoother, at least if you need to tighten.
Sometimes, it feels like the truss rod nut is just a bit stiff. Very minor increments will make a large difference when adjusting your truss rod, so don’t make more than one 1/4″ turn at a time.
Once you’ve tightened or loosened it proportionally, we can move on to the next step which is setting the action.
6) Setting the Action
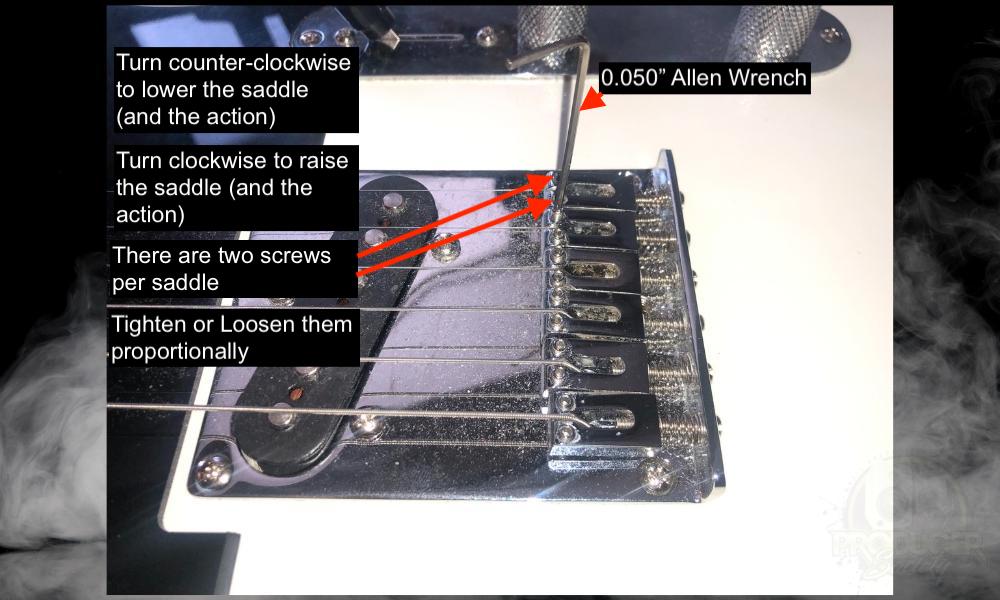
The guitar’s action refers to the distance between the string and the fretboard. In other words, higher action setups will require more effort to fret a note.
Your Telecaster should come with Fender’s recommended string height settings, which is an even 4/64″ for each string. This is just the common measurement that many manufacturers tell you to go with.
As I explained in my guide dedicated to the Telecaster’s action, to measure the action, use the Mituyoto 6″ ruler to measure the distance between the 17th fret and the bottom of the string.
If it appears that any string’s action is too high or low, use your tiny Allen wrench to adjust the saddles. Each bridge saddle has two hex screws that can raise or lower the saddle’s position.
When making adjustments, it may be best to write down how many turns you applied to each saddle and in which direction. Unless you’re familiar with making these alterations, it’s best to make only minor adjustments at a time, then re-measure.
Now that we’ve got the truss rod relief set and the action adjusted, we have to tune the guitar once again so it’s perfect, and then get ready to set the intonation.
7) Setting the Intonation
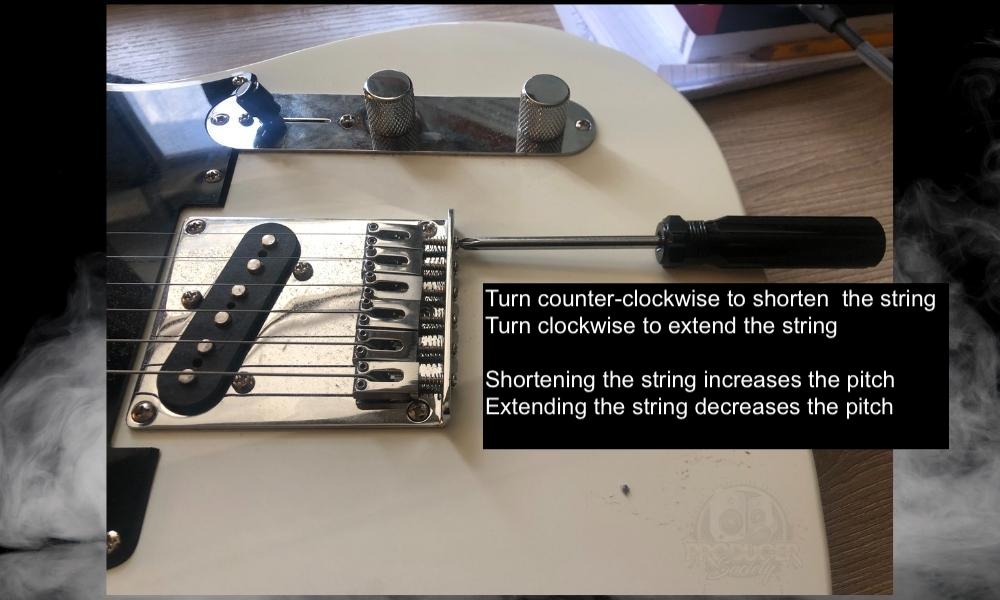
Your Telecaster’s bridge saddles move back and forth to either shorten or extend the string. This is how we adjust the intonation which is really just a way of describing a process whereby we get the guitar to be in tune with itself.
First, ensure that each string is in tune. As you can see in this video by Paul Davids, we want to make sure that our octave note at the 12th fret also matches the harmonic note located there.
We want to shorten the string if the note played at the 12th fret is flat compared to the harmonic. Use your screwdriver to move the saddle towards the neck of the guitar. Likewise, we’ll move the saddle backward if the note is sharp.
When setting the intonation, it’s super important to get the guitar as in-tune as you possibly can. You can either use harmonics or you can actually fret the note. I commonly use harmonics, but sometimes use the regular fretted way.
8) Setting the Pickup Height
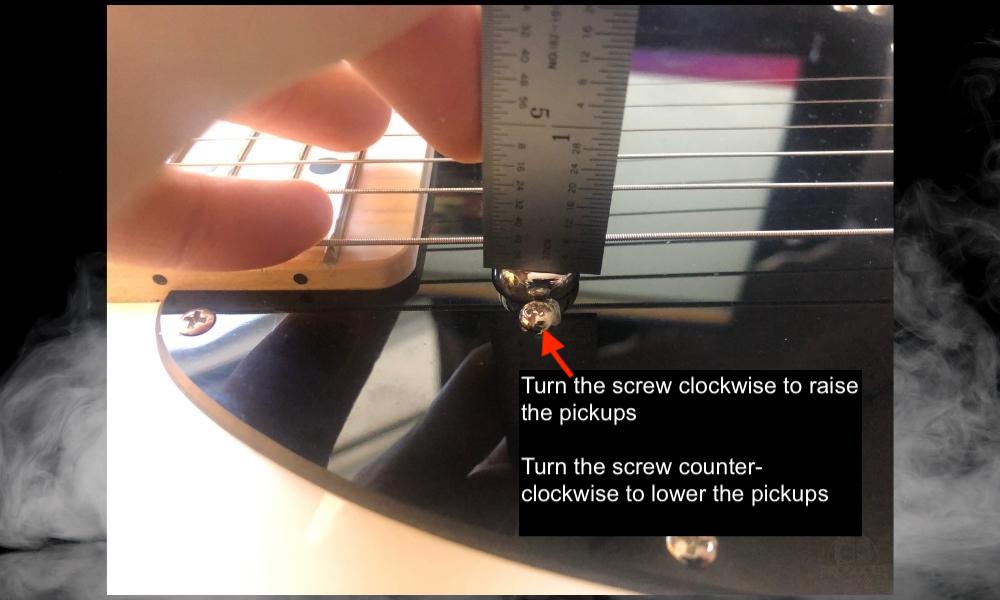
The closer your pickups are to your strings, the more they’ll amplify vibrations. In other words, if your pickup height is high, the guitar will be louder. It’ll be quieter if the pickup height is shorter.
As with action settings, your pickup height can conform to your personal tonal preferences. However, Fender recommends that the bass side of the pickup measure 5/64″ and the treble side measure 4/64″.
I’m not much of a guitar nerd in this way, so I’m totally fine with the regular pick-up height recommended by manufacturers. So how do we do this exactly?
To obtain this measurement, place your pinky finger on the 21st fret of your Telecaster. Then, measure the distance from the pickup to your low and high E string with the 6″ ruler.
Once I’ve found the measurement, I’ll use the 1/4″ screwdriver to raise or lower the pickup accordingly.
Tip
When you press on the string, the furthest side of the pickup will be further away from the bottom of the string then the closest side. Measure the string from the point where it’s closest to the string which will be closer to the guitar body.
Your Telecaster features screws on either side of the pickups that serve to raise or lower their position. Use your screwdriver to make these adjustments until your guitar’s tone is how you want it.
As with every other aspect of our guitar setup, we want to be making very slight adjustments to the pickups. Although, it’s pretty easy to adjust the pickups because they won’t mess anything up which is the case with setting the action or the truss rod relief.
Important Things to Mention About the Squier Telecaster Setup
1) Follow the Proper Order of Guitar Setups
Progress through the steps above as they are listed each time you set up your guitar. It’s important that you do things in the proper order because otherwise, you’ll find yourself messing up the results from the previous step.
For instance, after you’ve put the strings on your guitar and cleaned everything up, you’ll want to approach the set-up in the following order: truss rod > action and string height > intonation > pickup height.
2) Setup the Guitar Again the Following Day
Often, you’ll find your settings have slightly changed once you’ve given the guitar time to settle. While it sounds like nonsense, where you live and the climate there plays a huge role in this.
For instance, if you live in a climate where the humidity and temperature jump around a lot, you’ll probably need to set up your guitar every so often. When the humidity and temperature drop down at night, your guitar will respond to that.
3) Most Measurements Are Just Guidelines
Feel free to experiment and customize your guitar so that it feels right for you. The measurements I’ve provided are just jumping-off points. I’m not a luthier, but I’m competent at getting a guitar set up nice.
4) Measurements Are Always Made from the Bottom of the String
You always want to measure from the bottom of the string, and not the top. Don’t worry about accounting for your string’s thickness when measuring.

