 Written By :

The RC-5 is a great but somewhat challenging pedal to use. I own 5-6 looper pedals and this one has the most features out of all of them. Here are the basics of using it.
To use a BOSS RC-5 Loop Station, use a 1/4″ guitar cable to connect Input A to your guitar and output A to your amplifier. Use a center-negative 9V-DC power supply. Press the footswitch to record, and press it again to replay the loop. Press once more to overdub, and press it twice to stop playback.
An Overview of the BOSS RC-5 Loop Station

| Feature | Details |
|---|---|
| Looping Capacity | Memory and Duration: The RC-5 offers up to 13 hours of stereo recording time, allowing for extensive looping sessions without the need for constant overwrites. Tracks and Storage: It can store up to 99 onboard memories for saving loops, making it ideal for live performance and practice. BOSS Tone Studio: This application allows you to upload custom backing tracks & sounds. You can upload any audio sample you’d like to the Looper via the connection between the RC-5 and your PC. |
| Audio Quality | 32-bit AD/DA Conversion: High-quality conversion ensures that your loops are crystal clear, with every detail of the original signal preserved. 24-bit Processing: The internal processing is 24-bit, providing a high-resolution sound and maintaining the nuances of your performance. |
| Advanced Rhythm Features | Rhythms: Comes with 57 preset rhythms with A/B variations, providing a wide range of drum patterns and beats to accompany your loops. Time Signature Support: Supports multiple time signatures, making it versatile for various musical styles and compositions. |
| Display and Controls | LCD Display: Features a backlit LCD that shows loop status and parameters clearly, making it easy to use on dark stages. Multi-Function Control: A multi-function parameter knob allows for quick adjustment of rhythm types, system settings, and more. |
| Connectivity | Stereo Operation: Offers stereo inputs and outputs, making it compatible with a wide range of instruments and setups, from electric guitars to keyboards. MIDI Capability: MIDI I/O via TRS connectors for syncing with other MIDI devices, controlling start/stop, and accessing memories remotely. USB Connectivity: A USB port allows for backing up your loops to a computer, updating firmware, and importing/exporting WAV loops. |
| Additional Features | Reverse and One-Shot Effects: Enhance your performances with built-in effects like reverse playback and one-shot playback for added creativity. External Control: Supports external footswitches or expression pedals for hands-free control over various functions, including undo/redo, rhythm start/stop, and memory selection. Battery or AC Powered: Can be powered by a 9V battery or an AC adapter, offering flexibility for different playing environments. |
A lot can be accomplished with the BOSS RC-5 but there is definitely a learning curve to it. Not only that, but you need a lot of other equipment and cables to use it to its potential.
We’ll talk in more detail later about the recommended gear that I mentioned earlier. But first, let’s talk about the basics of setting it up.
How to Set Up the BOSS RC-5 Loop Station
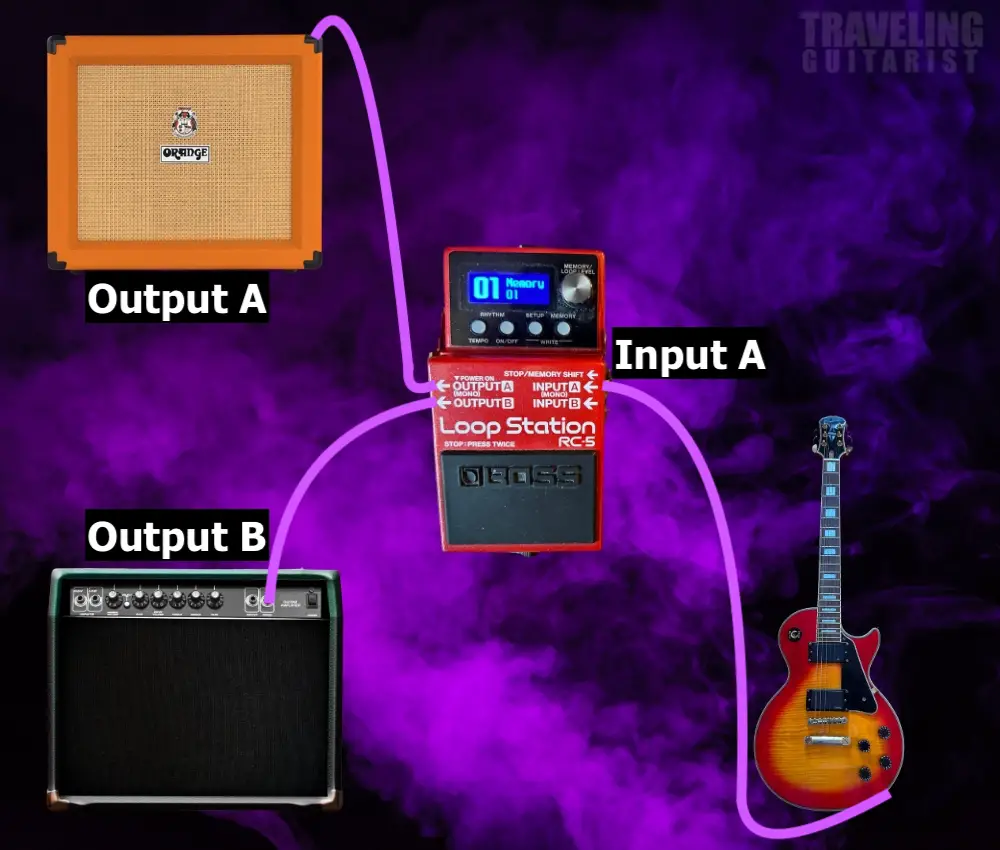
The BOSS RC-5 Loop Station will need 2 1/4″ jacks inserted into the Output A and Input A to work. If you’re using just a guitar, the RC-5 looper, and an amplifier, it’s quite easy.
1) Connect An instrument Cable to Output A

Connect your 1/4″ guitar cable to Output A on the left. If you’re using a stereo setup, you can connect the Input B as well (for example, if you wanted to hook it up to a second amp).
The Output A jack is the one that needs to be used in order for the pedal to turn on like what’s shown in the image below.
2) Connect Another Instrument Cable from Your Guitar to Input A

A great rule to remember is this:
The Output always goes in the direction of the Amplifier and the Input always goes in the direction of the guitar.
Where to Put the BOSS RC-5 In My Signal Chain?
1) At the Very End Of Your Signal Chain
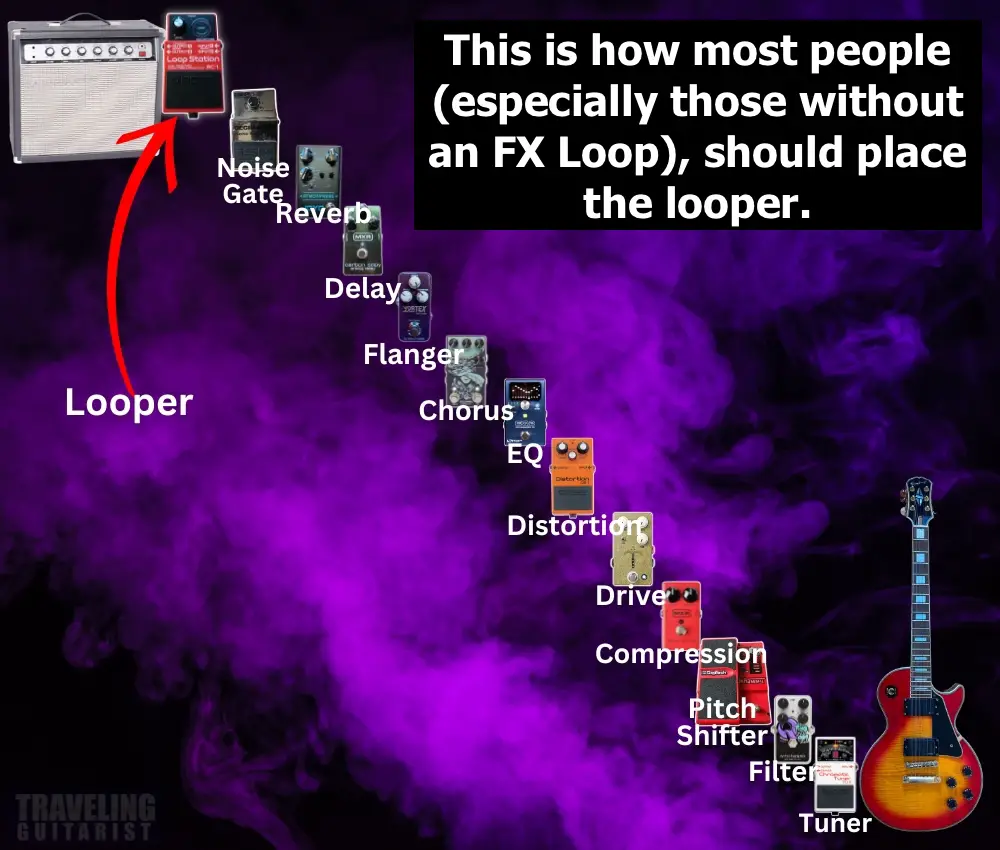
The most common way is to put the pedal at the very end of your signal chain similar to reverb or chorus.
2) In the FX Loop (Also At The End)
My personal recommendation is to put it in your FX Loop. Here’s how it would look:
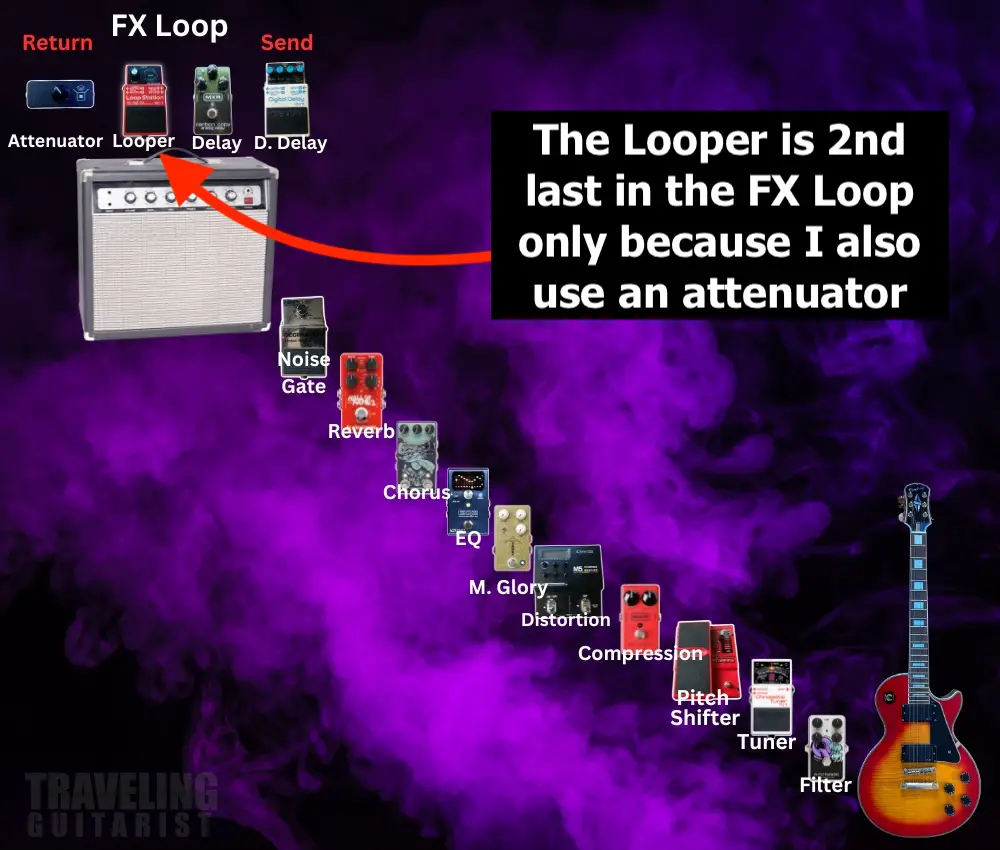
When connected this way, the looper will record the complete sound with all the effects, and then it won’t change even if you change the effects while overdubbing.
For example, you could record a clean guitar rhythm, loop it, and then switch on overdrive and delay to do a solo over that.
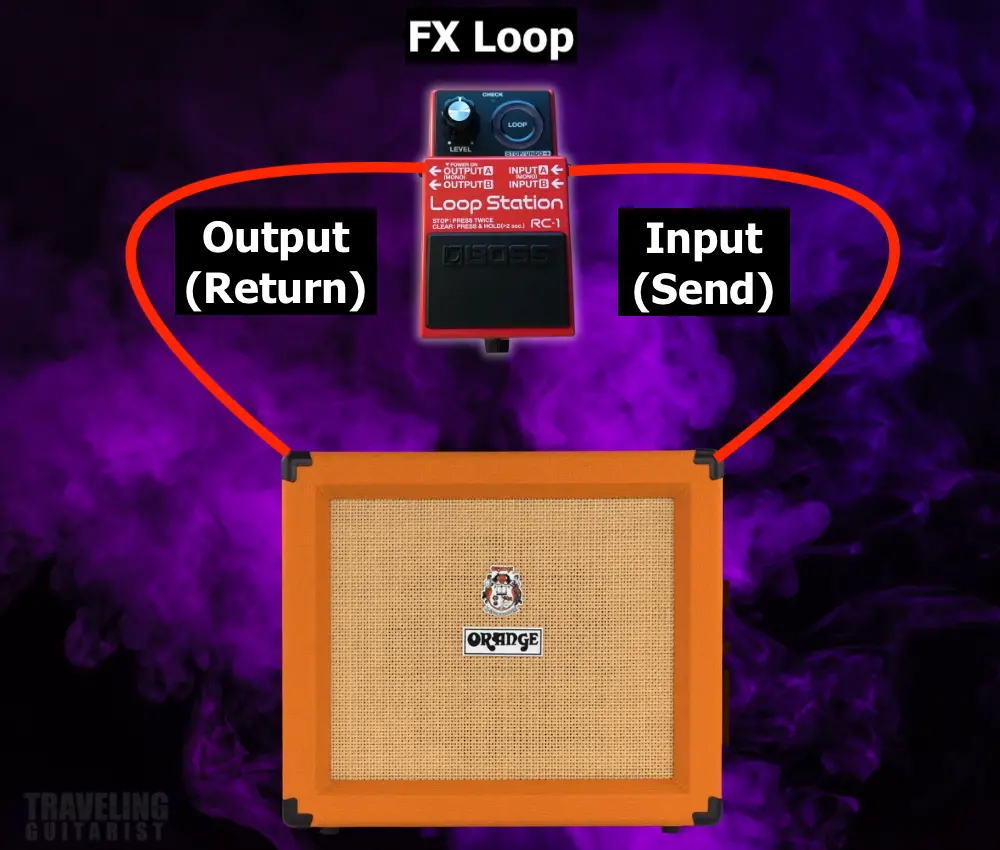
If you’re not sure what an FX Loop is:
An effects loop allows you to insert effects pedals or units between the amplifier’s preamp section and power amp section.
This enables you to add effects to the signal after it has been pre-amplified but before it is amplified and played through the speakers.
Here’s a much simpler way of depicting how to set up a looper pedal in your FX Loop:

While I don’t recommend putting the Looper at the beginning of your signal chain, there are definitely use-cases for it.
If you’re in the process of crafting a tone, putting a looper at the very beginning of your chain (directly connected to your guitar) is a great way to modify the rest of your pedalboard while having a constant reference melody/riff.
How to Power the Loop Station
1) With A Power Supply
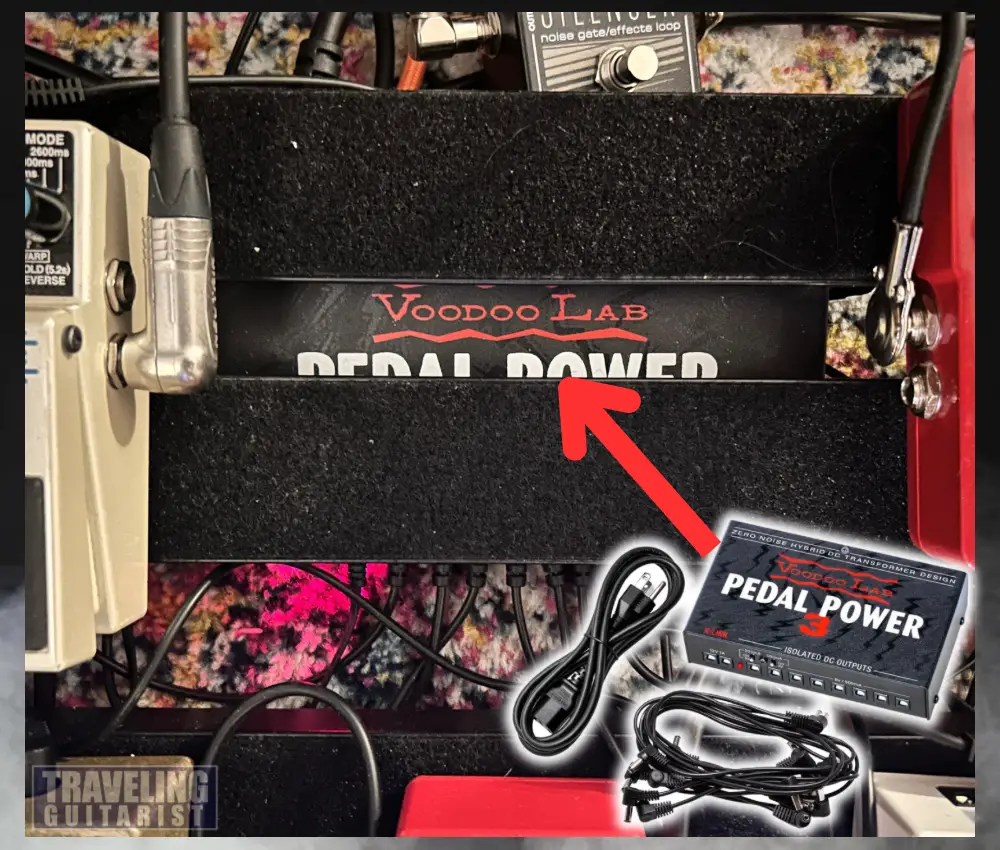
The BOSS RC-5 has a current draw of 170mA. This means it’ll eat through a 9V battery quickly which I demonstrated in my experiment on this very subject.
The reason I recommend a brand-name power supply from zZounds is that no-named power supplies – like the ones on Amazon – are precarious, in my experience.

You don’t know what you’re getting. They could overheat, stink, or maybe not work at all. In worst-case scenarios, they might even start a fire.
BOSS, of course, recommends using their PSA-series adapter to avoid any power issues, however, I haven’t run into any issues yet using one from Dunlop.
2) With A 9V Battery

If you don’t have a suitable power supply get this one, you can also use a 9V battery although I wouldn’t recommend it because of the reason I mentioned earlier.

That said, I could imagine there are cases where the 9-Volt battery option is convenient. It’s up to you.
I believe a big part of the reason why the RC-5 eats batteries so much is due to the Display and LED, rather than its functions.
It’s honestly crazy how short of a life 9V batteries have in the average pedal, with the exception of low current-draw pedals like overdrives.
How to Use the Primary Features of the BOSS RC-5
1) How To Create A Simple Loop

To make a loop, press on the footswitch just once so the red recording bar flashes across the screen.
Make sure to press the footswitch at the same time as when you start playing that way you get a seamless loop.
2) How to Stop Recording A Loop

When you want it to stop recording, you have to quickly press the footswitch twice. In other words, double-tap the footswitch (within one second).
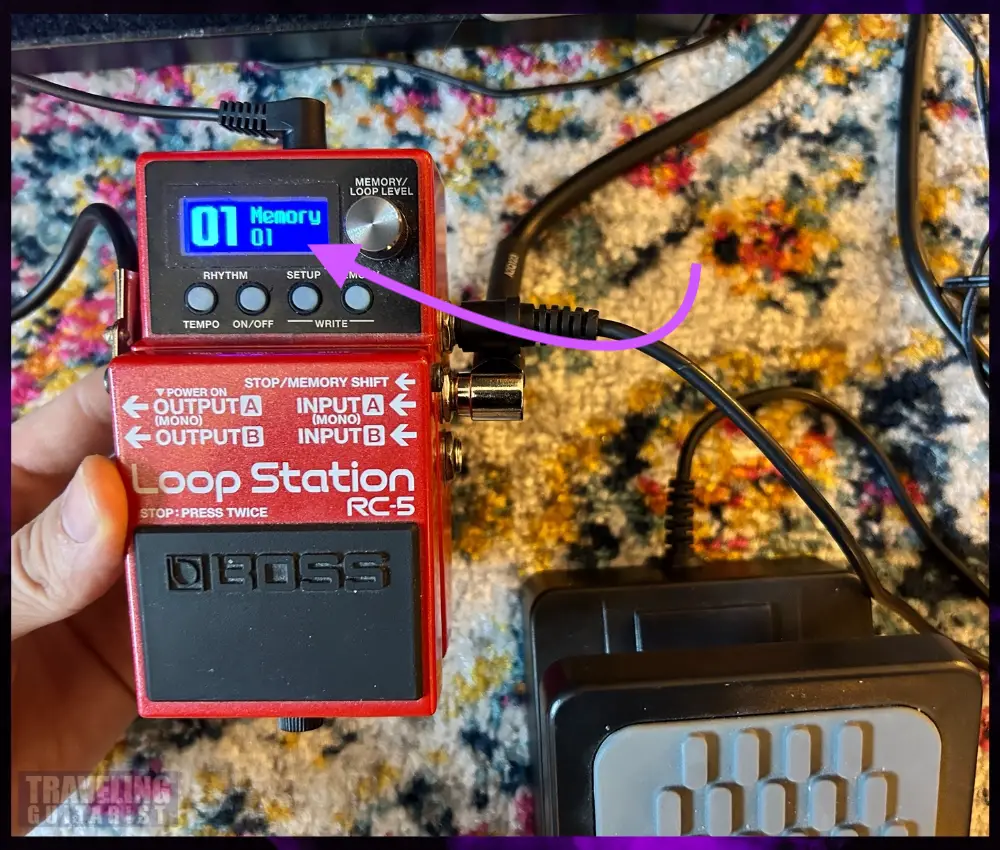
It’ll turn back to the normal home screen that indicates which memory bank you’re in.
The instruction manual takes it even further. It says that you have to press once on the last beat of the measure, and then once on the first beat of the following measure.
I never had any issues without knowing that, but now you know.
3) How to Begin Playback

Now, if you want the pedal to start playing back everything you just recorded, you have to press it once. It’ll turn the LED display a green color instead of red.
If you want to record your loops perfectly, you have to double-tap the footswitch right as the lick you’ve made is about to repeat itself for the second time.
Explained another way, you want to kick the footswitch as a replacement for playing the riff the second time.
I recommend starting with short, simple chord rhythms or a simple arpeggio and timing your footswitches right.
You could also practice by just playing quarter notes (1 on each beat), hit the footswitch, and then count to four afterward. You can do this until you master the proper timing.
As I wrote in my other guide on how to jam by yourself, pedals are more for creative purposes and practicing for me, rather than for performances considering I’m not a live/performing musician.

If you’re struggling with getting the loop timing right, you could always just use the Auto-Record feature which I’ll talk about later in the article.
4) How To Overdub Loops

A lot of people think the overdubbing feature is one of the cooler things about loop stations. You can layer multiple loops on top of each other to create complex soundscapes and textures.
To overdub a loop using the Boss RC-5 Loop Station, simply press the pedal while the previous loop is playing, ie, while the LED screen is lit up green.
The LED will turn yellow to indicate overdubbing, and the RC-5 will record over the existing loop in the same memory slot.
Once the loop is complete, it will playback along with the original loop. Remember that green means “playback,” red means “recording,” and yellow means “overdubbing.”
But what about if you want to delete the overdub?
5) How to Delete the Overdub
A) Press the footswitch once to begin playback.
B) Press the footswitch once more to bring up the overdub indicator which is the yellow recording bar.
C) Hold it until it turns the colour green again.
But if you have multiple overdubs, you’ll have to start the recording from scratch as there’s no way to select which overdub you can UNDO (it only works for the last recording).
6) How to Redo The Overdub
If you accidentally deleted an overdub, just hold the footswitch for two seconds again to REDO, and it’ll be restored.
7) How to Use the Drum Machine
The drum machine on the RC-5 is a handy tool for creating rhythms and beats to accompany your loops. To access the drum machine, press the ON/OFF button under RHYTHM.
This will ‘arm’ the drums to play. Press it once more to play the drums, or you can use the footswitch.
This will instantly start playing the standard groove at a default tempo of 120 beats per minute.

Watch the volume though because it can actually be quite loud.
If you press the footswitch with the drums on, it will record your loop, but you can choose to turn the drums on and off. I’ll cover changing the tempo and drum kits next.
8) How to Change the Tempo

The tempo on the Boss RC-5 can be adjusted to fit your needs. This is a great way to change the feel of your loops and create new rhythms.
A cool feature that not a lot of people know about too is that you can tap the tempo button according to the BPM that you want to set it at.
For instance, if you tap the button at 120 BPM, the RC-5 Loop station will set the BPM to 120.
The button LED will blink accordingly to indicate your set tempo, and it will be displayed on the screen.
For more accurate tempo changes, you can also press TEMPO, and then rotate the MEMORY KNOB to change the tempo value.
By pressing the knob, you can change the incremental values and use fractions like 100.5 BPM. The LED will blink to reflect your changes.
The new tempo will now be applied to all of your loops and samples.
9) How to Change Drum Loops
Watch the volume at first because it can be quite loud by default. The first tip at the end of the article addresses this.
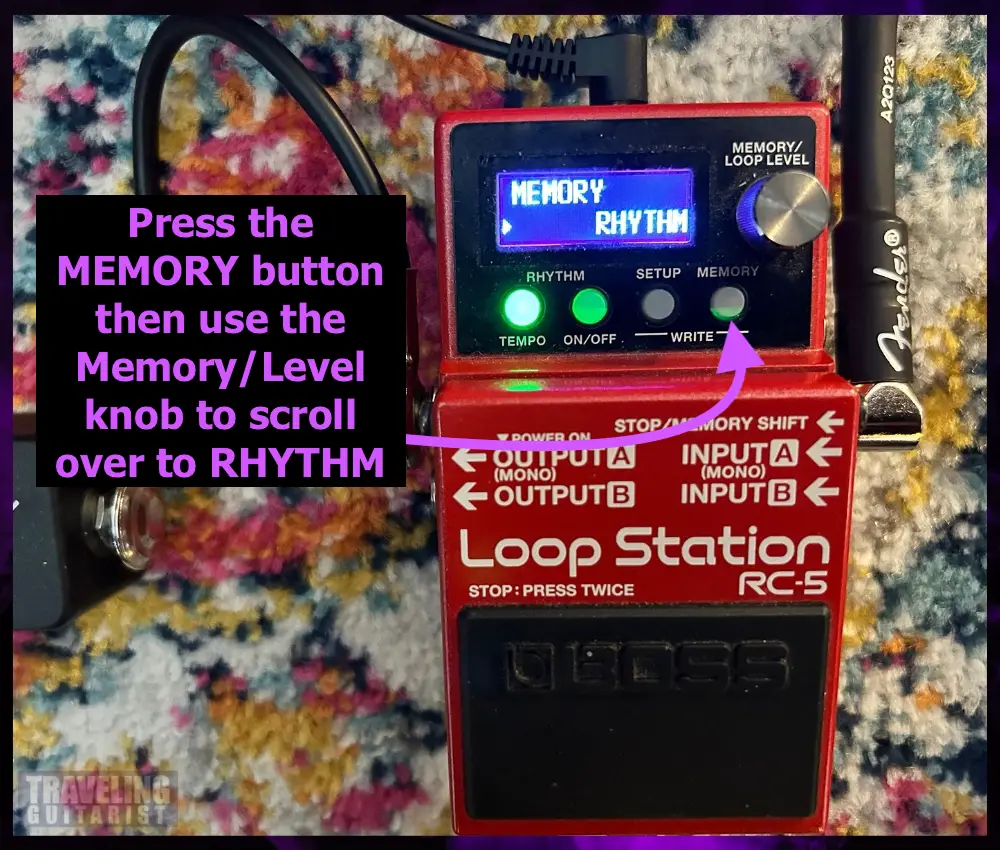
A) Click Memory > Scroll to Rhythm > Click the Scroll Wheel

Click the MEMORY button > scroll right to Rhythm, and then click the scroll wheel.
To navigate to and from certain headings, you have to click on the scroll wheel. I would first change the volume Level though.
B) Adjust the ‘Level’ Setting to Change the Volume from 0 to 200

It will start with ‘Level’, where you can adjust the volume from 0 to 200 and mix it with your own loop.
C) Flip Through the ‘Pattern’ Settings to Find Different Drum Patterns

For clarification’s sake, to bring up the drum patterns on the RC-5 Loop Station, press the MEMORY button, scroll to the right to RHYTHM, click the Memory/Loop Level button, and then scroll to the right again until you get to the patterns.
You can rotate it and enter all the different menus for adjusting your rhythm, which includes ‘Reverb’, ‘Pattern’, ‘Variation’, ‘Kit’, and a few more like ‘Variation Change’, ‘Beat’, and ‘Start’.
You can flip through all the different grooves available under the ‘Pattern’ setting. I personally liked the ‘Shuffle4’ groove a lot. Each pattern has an A/B variation that you can select in the next menu.
D) Choose Kit to Change the Style of Drum Kit

And the ‘Reverb’ setting lets you add or remove reverb from the rhythm sound.
E) Use the ‘Beat’ Setting to Choose the Time Signature

And you can use ‘Var. Change’ to automatically variate the rhythm from A to B based on one measure or one loop.
You can use ‘Start’ to change when the groove kicks in. I like to set it to ‘Before Loop’, then when I press the footswitch, it’ll play the drums without recording.
This way, you can practice your loop to the rhythm, and then hit the footswitch again to start recording.
That helps me catch the downbeats more accurately, so my loop always stays in time, and I can record a full phrase with no issues.
If you want to dive deep, there are a few more options in the RHYTHM menu you can explore. You can turn off individual parts of the drum kit like the kick and the snare, or add fills to your grooves.
All of this is great for practicing in addition to creative purposes. I’ve written a guide before on how to play along with drums, and I think that’ll help you with this.
10) How To Store Many Loops & Samples
The Boss RC-5 Loop Station has built-in memory with 99 slots that can store a total of 13 hours of audio.
That should be more than enough to store a host of loops and phrases for different genres on your device, so you can jam along wherever you go.
A) Press SETUP AND MEMORY Together

To save your recorded loop, press the SETUP and MEMORY buttons together (you’ll see ‘WRITE’ written underneath the word Utility).

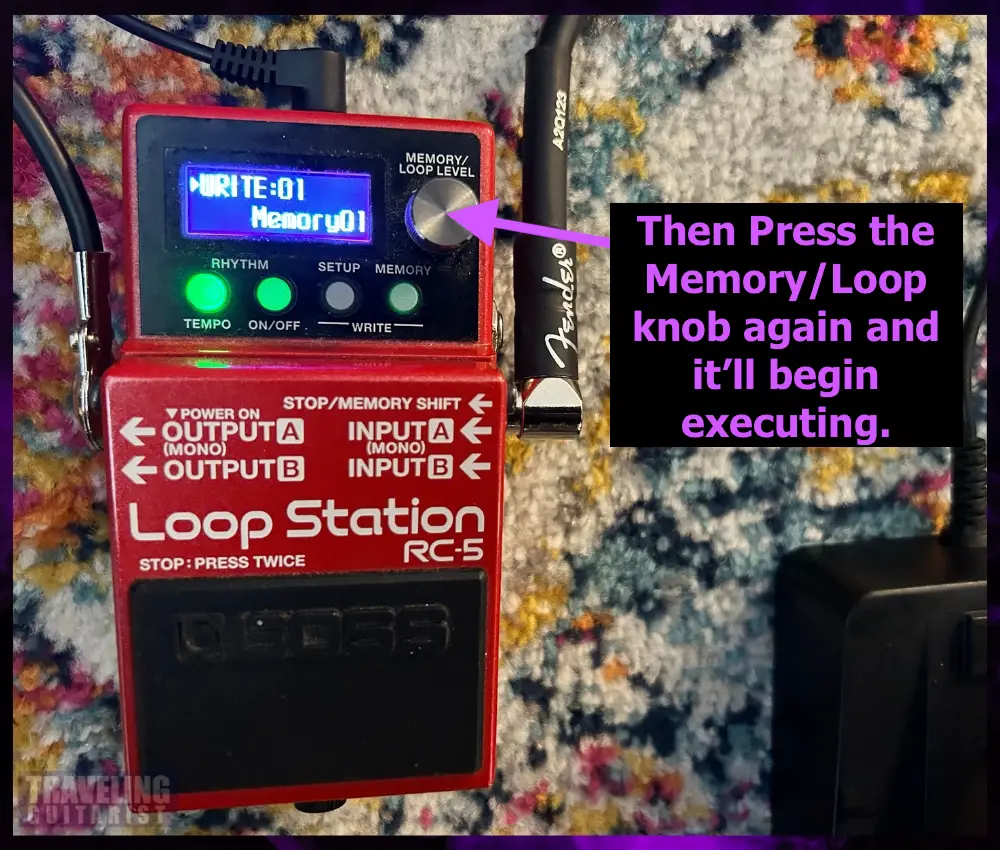
B) Press the Knob to Write the File to Your Selected Memory Slot

Then, press the knob to write the file to your selected memory slot. You can also choose a different slot by rotating the knob.
One track is limited to 1.5 hours of audio, but that should be enough for most loops. You can easily save different loops across the 99 memory slots available, and this will include the overdub settings.
11) How to Erase Old Loops
If you want to erase a loop from the Boss RC-5 the process is similar to storing loops and samples.
A) Press SETUP and MEMORY Together As You Did for Saving
B) Instead of Clicking on ‘Write’, Turn the Knob Until It Says ‘Clear’

Press the knob to clear the currently selected memory slot. You can also choose to clear a different slot with the knob. Note that you shouldn’t power off the unit during this time or some data might get corrupted.

12) How To Start A New Loop (Without Overdubbing Or Deleting the Old One)
A) Double-tap the Footswitch to Stop Playback
Once you want to stop looping or playing back whatever your loop is outputting, you’ll have to navigate to a new memory slot which is easy to do.
B) Navigate to a new Memory Slot with the MEMORY Dial

Rotate the MEMORY dial to the left or to the right to select an empty slot to record in. Any unsaved changes in the previous memory will be deleted.
C) Press the Footswitch to Record a New Loop

Note, while recording a loop, you can hold the footswitch for two seconds to UNDO the recording (in case you made a mistake). This also works for overdubs, so you can undo an overdub.
And if you accidentally undid a good loop, just hold the footswitch again, and you can REDO it. It works just like Ctrl + Z and Ctrl + Y on your laptop but with a loop station instead.
How to Connect the Boss RC-5 to Your Computer
1) Use a USB Type-A to Type-B Cable (aka, Printer Cable)

You can connect the RC-5 to your computer if you’d like to transfer recordings between the two devices, but you’ll need a USB Type-A to Type-B cable like the one shown in the image.


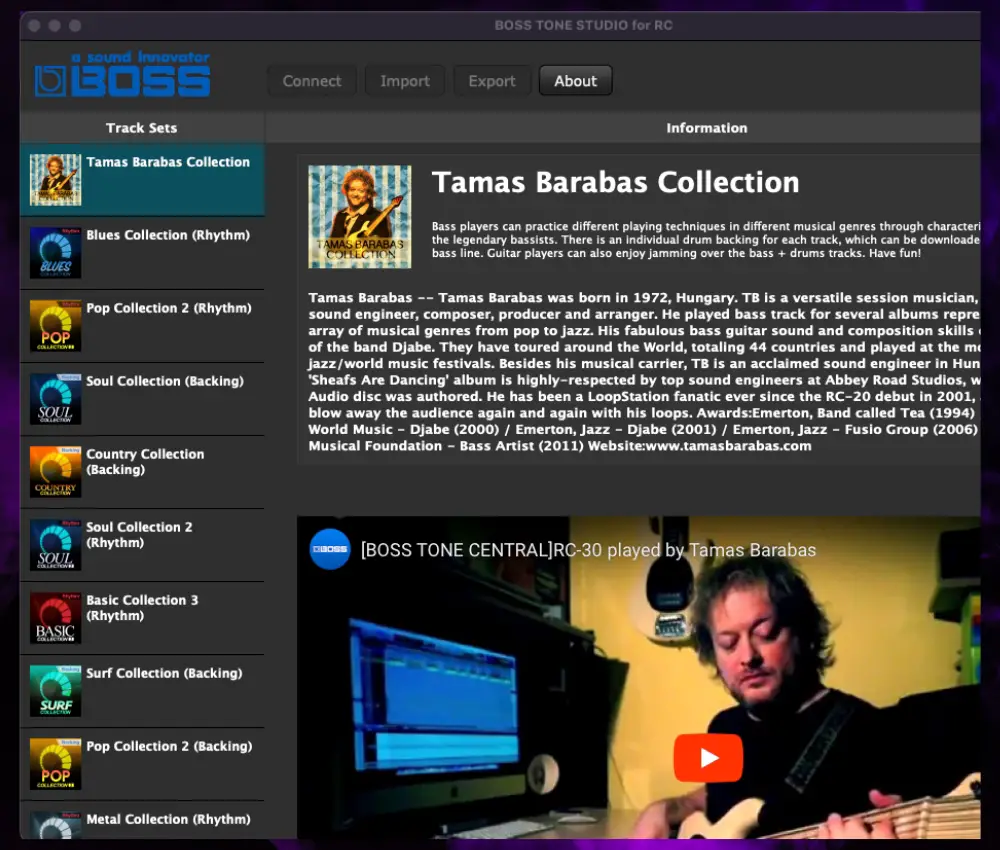
2) Download the BOSS Tone Studio

Once the pedal and computer are connected and configured, you can download and use BOSS Tone Studio.
This will allow you to backup your RC-5 data, restore it in the event of data corruption, and transfer audio recordings both ways.
You can delete and import files from the RC-5 this way, but you can also do it just with the file folders which I’ll show you in a second.
First, let’s show you how to actually configure the pedal so you can get the BOSS Tone Studio to work the way it should.
3) Set Up the Pedal for Storing

To set up the pedal as a storage device, you’ll have to go into the SETUP settings, navigate to ‘Storage’, and then select it to turn it on. After that, your pedal will show up as ‘Boss RC-5’ on your file explorer.

You can use this to import loop phrases stored on your PC. Use them for anything you want really. What’s cool about this is that you can save a lot of loops. There’s no reason to delete things.
Another interesting thing about this is that you’ll be able to use the Loop Station as an idea recorder, that way you don’t forget. An iPhone is good for this too, but the Loop Station will be higher quality.
How to Use The Hidden Features Of The Boss RC-5
There are some additional features within the MEMORY settings.
To navigate to these additional features on the RC-5 Loop Station, you have to click the MEMORY button, and then press on the Loop/Level knob.
This will allow you to scroll through each feature and turn it on and off.
1) Reverse Loop
You can use this to reverse the audio stored in the selected memory slot. This is one of my favourite features of any looper pedal (and delay as well).
You could, for example, create a spacey soundscape with multiple overdubs, and then reverse it for some fun experimentation.
2) 1-Shots
Turn this option on if you only want the looped recording to playback once. It’ll stop the loop after one pass.
However, you can’t overdub in this mode. Not sure why anyone would want this setting, although, it’s a possibility it could be used for live shows.
3) Record → Overdub
If you’d like to switch to Overdub mode immediately after recording a loop, use this option instead of the default ‘Record→Playback’.
In other words, when you double-tap the footswitch, you’ll begin overdubbing right away, instead of playing back what you just made. I imagine this would come in handy during live performances.
4) Dub Mode

Instead of overdubbing multiple times, you can set this to ‘Replace’, and it will replace the existing loop when you press the footswitch.
In effect, you’ll essentially turn off the Overdub feature by turning this on.
5) Auto Record

This could be the handiest feature on the RC-5 because it helps people who might be having trouble hitting the record button at the right time.
Instead of recording immediately after you press the footswitch, it will only record when sound is detected.
6) Start & Stop Immediate/Fade-In
This control determines whether the track will fade-in or start/stop the moment you engage the loop playback.
7) Fade Time
Determines for how long the fade lasts if you decide to use “Fade-In” instead of Start and Stop Immediate.
8) Measure Free
You can specify the number of measures for your track. Free means it’ll respond automatically to however long your recording is.
How to Understand the Display of the BOSS RC-5

One thing that took a minute for me to fully understand was the Boss RC-5 Display. The display, for a second, I thought was just a neat little pattern of colours to look cool, but that’s not the case at all.
The display of the RC-5 Loop Station essentially functions as a visual metronome and count-in feature.
The bars on the top represent the beats, and then the bar on the bottom tells you how long the loop is. Additionally, these bars change according to the BPM and time signature as well.
How to Use an Expression Pedal With the BOSS RC-5
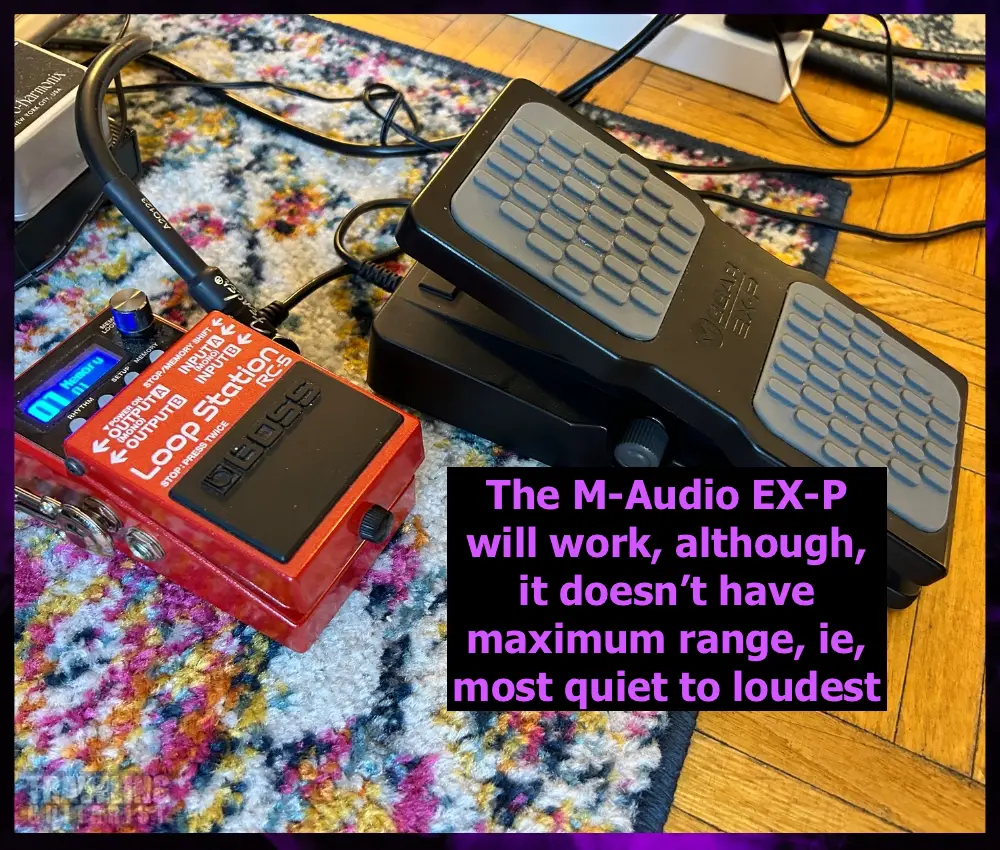
1) Connect Your Pedal to the STOP/MEMORY Shift Jack
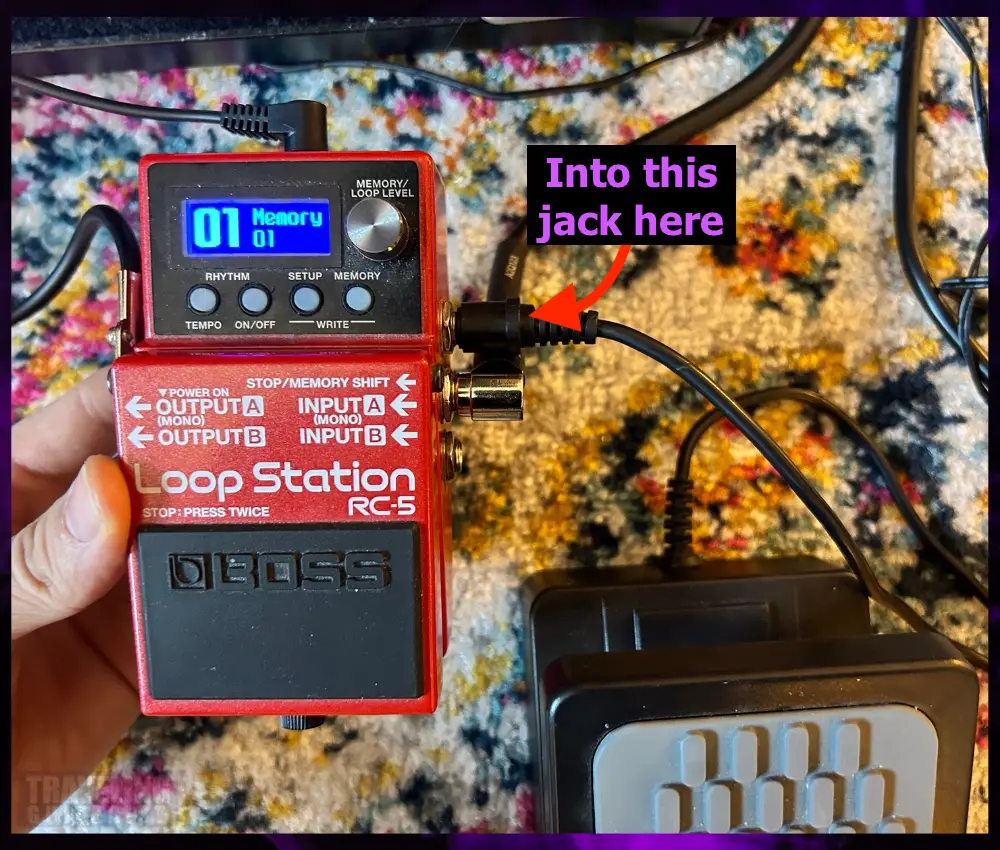
This jack is where you’ll plugin certain footswitches and expression pedals.
2) On the RC-5, Select “SETUP”
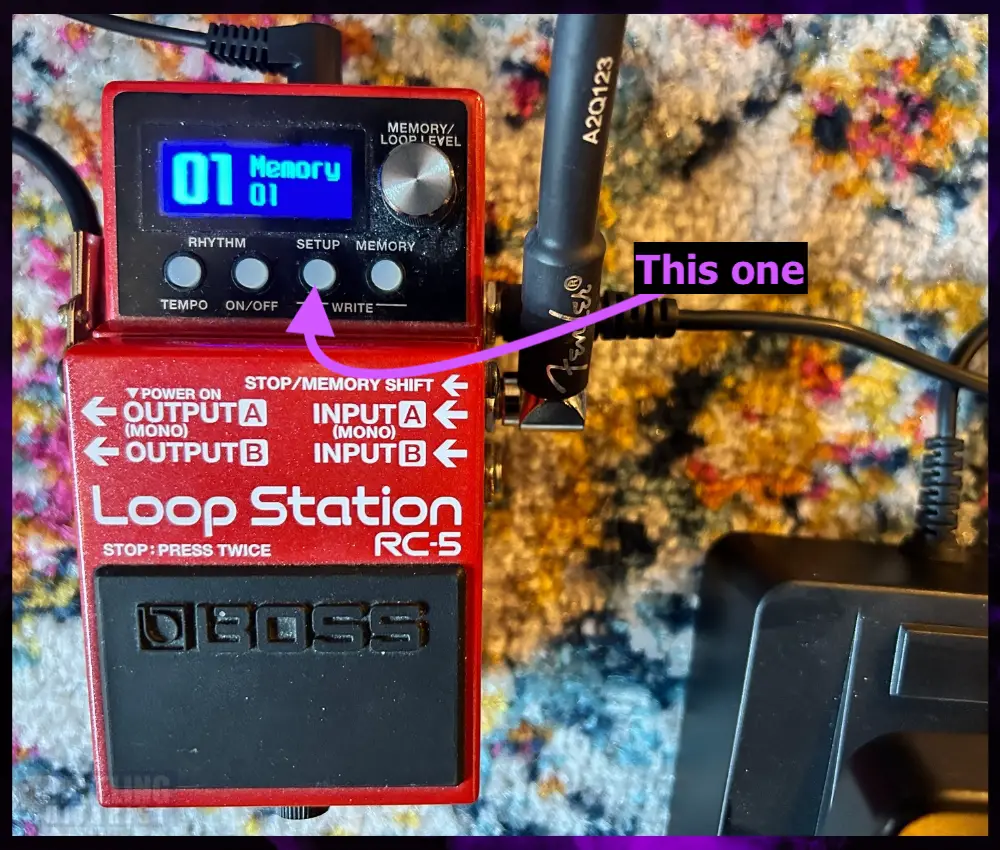
3) Scroll to “Control” and Press The Loop/Memory Button
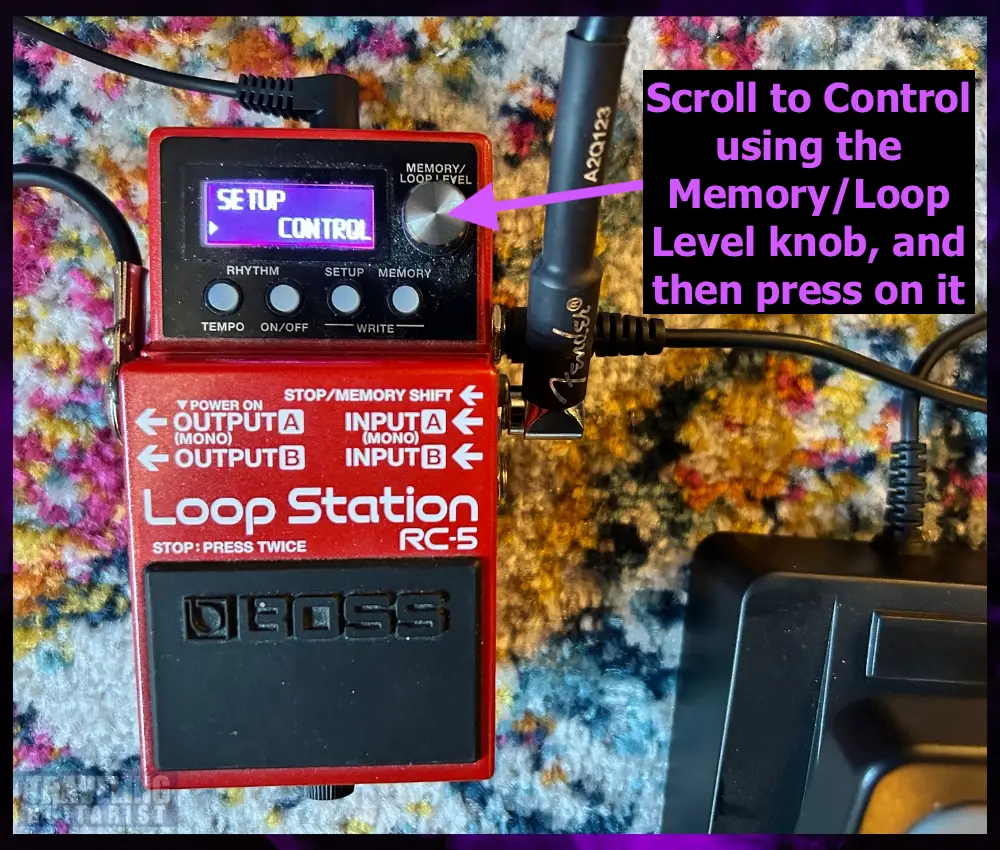
This is the area of the pedal where you can also change the order of looper pedal functions:
Record > Overdub > Playback
Record > Playback > Overdub
4) Scroll to “EXP FUNC”
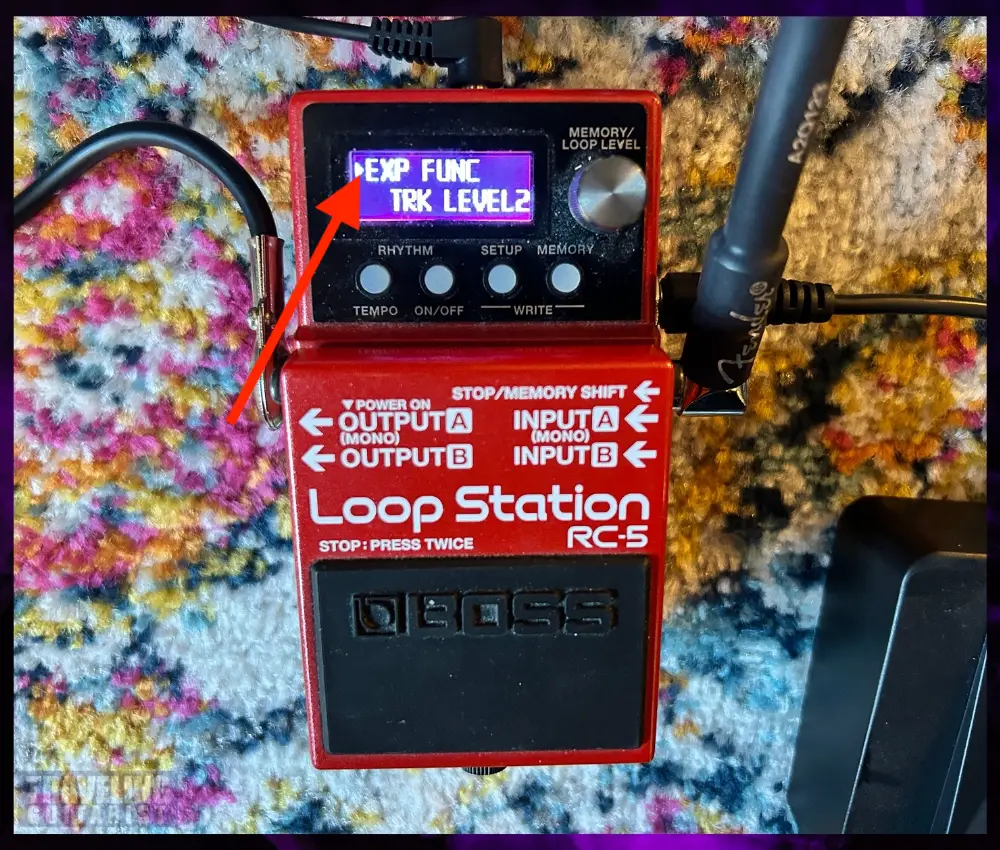
EXP FUNC is short for “Expression Function.” This is the setting you’ll use to determine what the expression pedal will control.
5) Scroll to Rhythm Lev1 (As An Example)
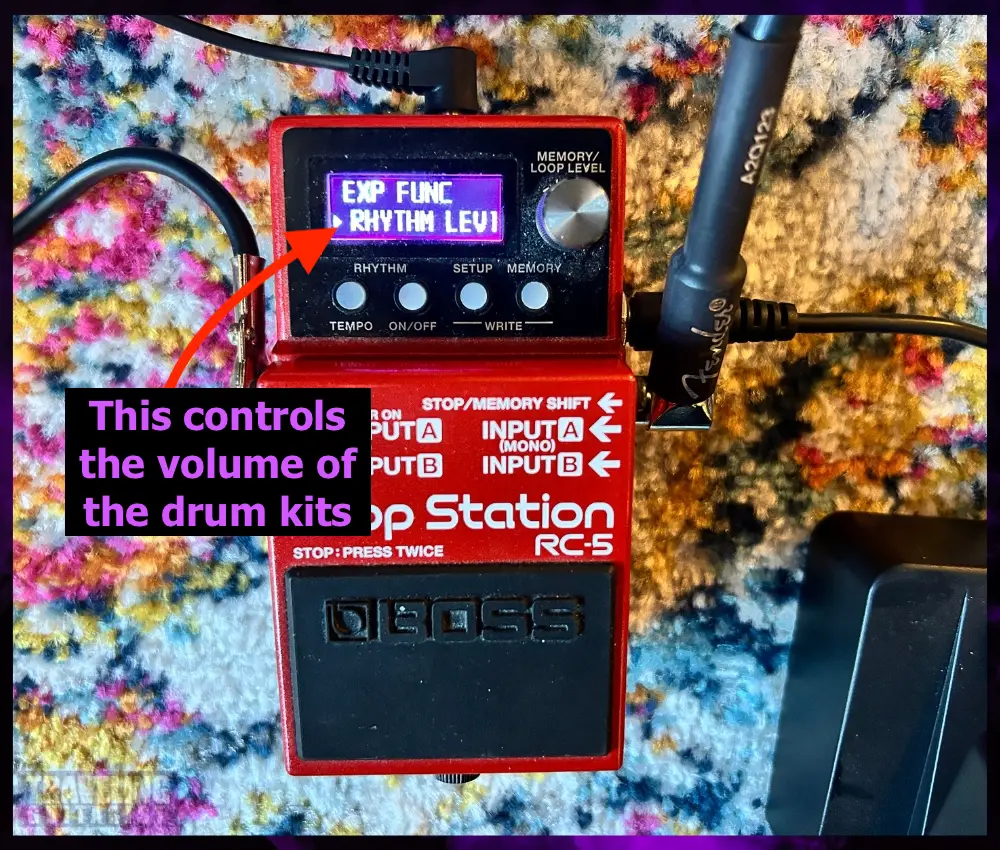
This will make it so the expression pedal will control the volume of the drum kits.
6) Press SETUP Again And You’re Done
You don’t have to do anything from here, except exit out of the menu and settings.
Now the expression pedal and RC-5 are set up so that the pedal will act as a volume control for the drum kits.
If you want the expression pedal to control other parameters, you simply choose a new setting instead of “Rhythm Lev1.” For example, you could use it to control the volume of your loops instead.
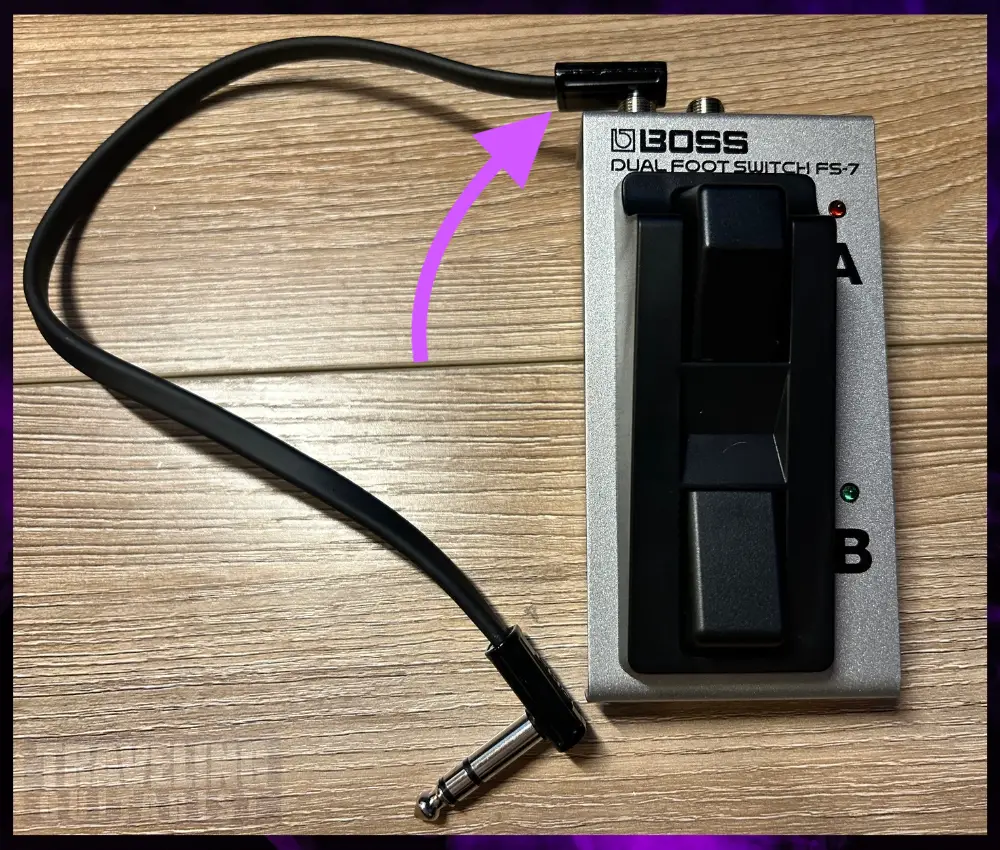
How to Set up and Use the FS-7 With the BOSS RC-5
The first thing you need to do is connect your RC-5 to power and plug an instrument cable into Output A so it’ll turn on and be able to drive the FS-7.
Another thing you need to know about the FS-7 is that it doesn’t need power. It only needs to use power if you plan on driving its LEDs beside the A/B switches.
For this section, we’re going to set up the RC-5 so it can control the drums and the tap tempo feature.
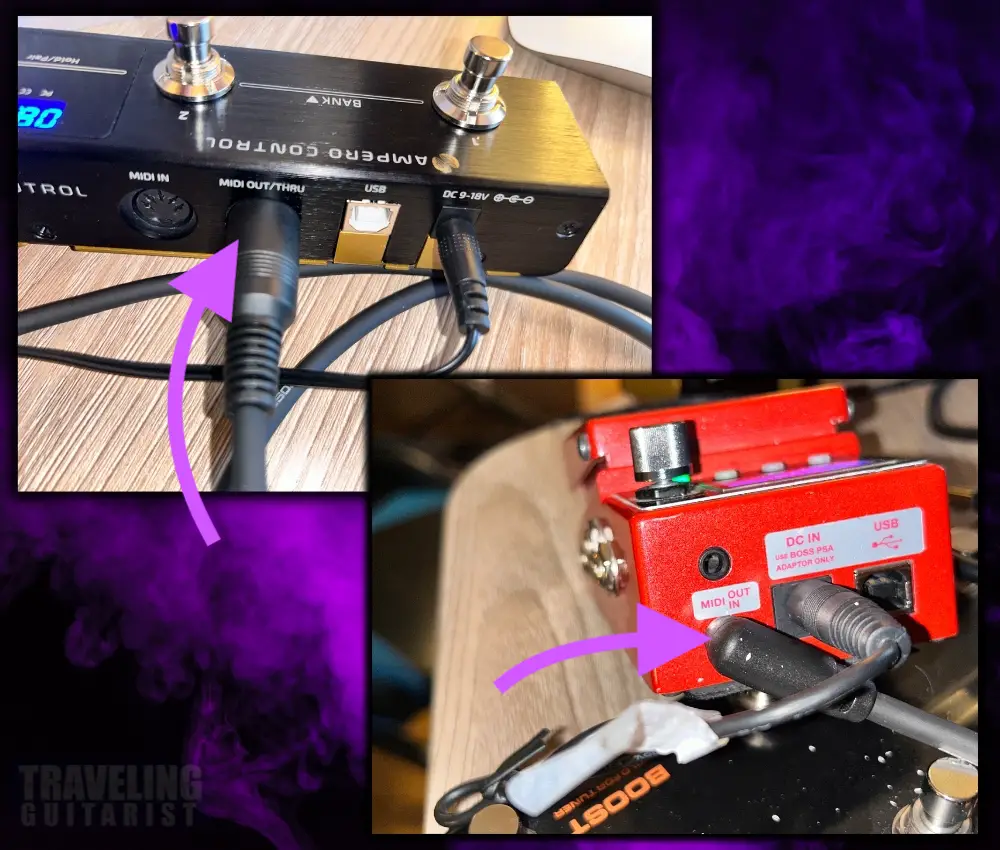
1) Connect A Stereo Cable to the A/B Port on the FS-7
2) Plug The Stereo Cable Into the RC-5’s “Stop/Memory Shift” Port
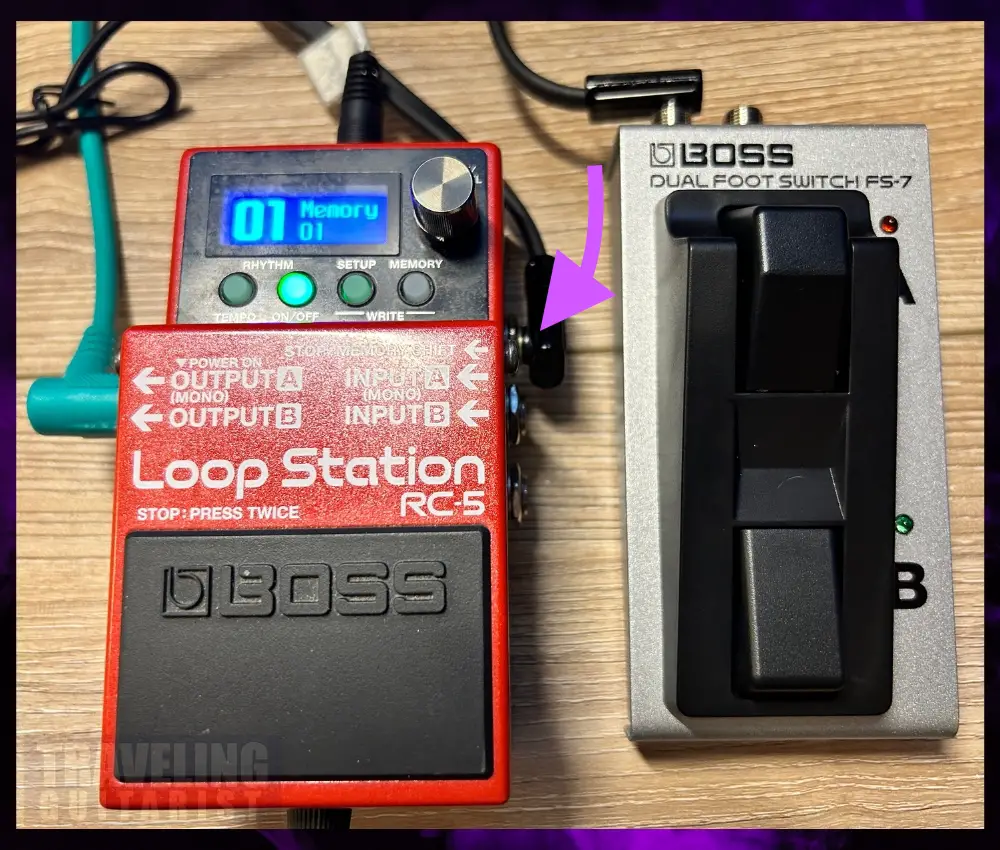
The STOP/MEMORY Shift port gets its name from the fact that when you connect the FS-7 to it, those are the functions it’ll control by default.
3) Press “SETUP” and Scroll to CONTROL
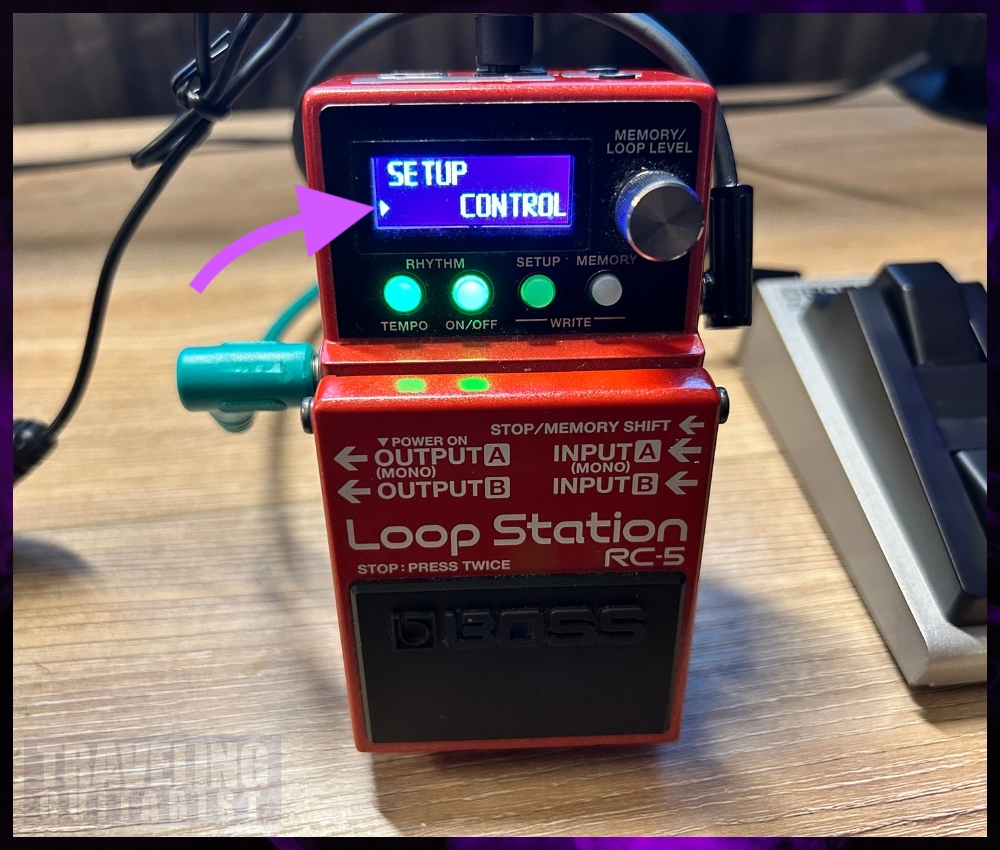
Click on it, and then you can move through the various parameters.
4) Scroll to CTL 1 Function & Choose “RHYTHM P/S”
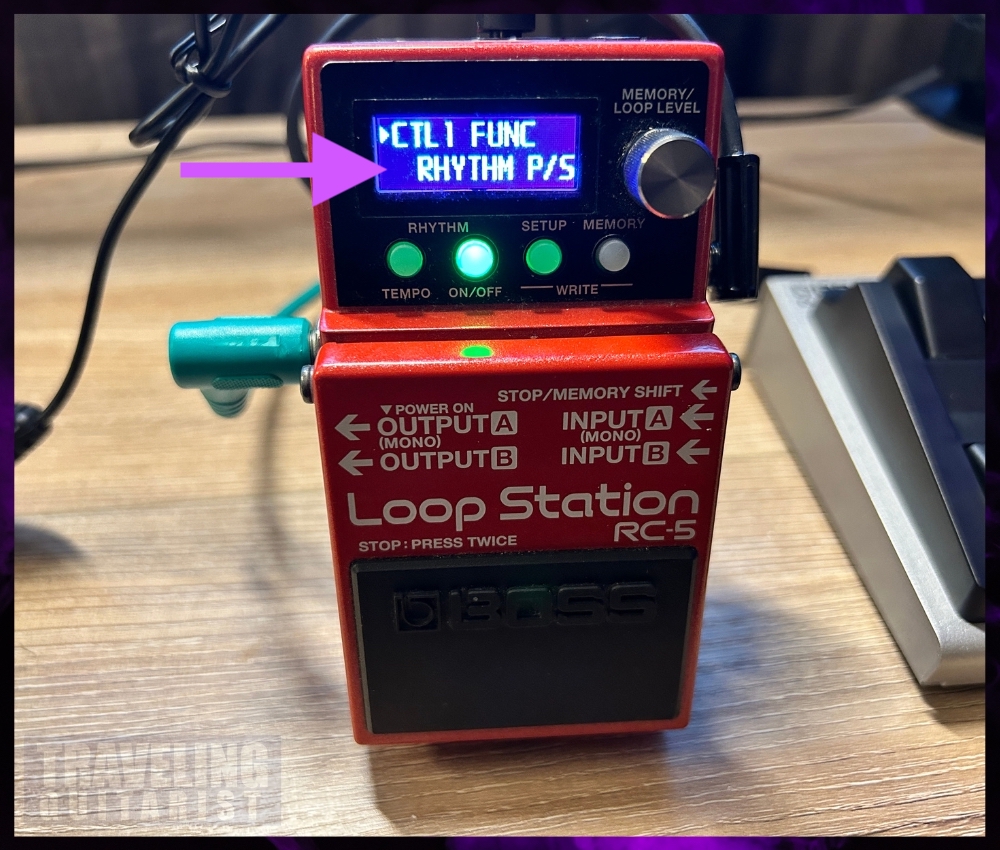
This means the FS-7’s “B” switch will control the drums turning on and off.
5) Scroll to CTL2 FUNC and Choose TAP TEMPO
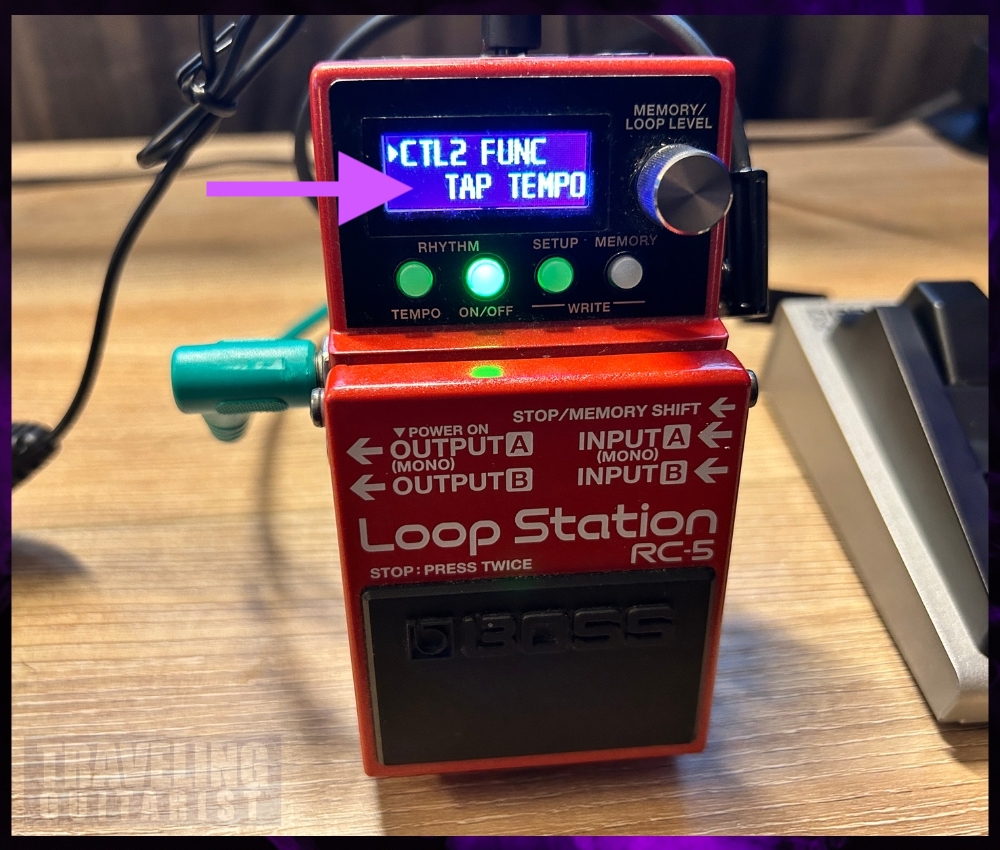
This means the “A” switch on the FS-7 will act as a TAP TEMPO button. Pretty cool stuff.
Now you don’t have to reach down and press a bunch of different buttons to get the drums to work, nor do you have to tap the little button with your finger to use TAP TEMPO.
How to Set Up the MIDI Foot Switch – (Part 1)
How to Set Up A MIDI Footswitch (CC#) – (Part 2)
Using a more sophisticated MIDI foot controller means you can control additional parameters on the RC-5 with the press of just one button.
Some examples could include ON/OFF for Drums, TAP TEMPO, Different Kits, Variations, and other settings unrelated to the drums if you wanted.
The first thing you’ll need to do here is ensure the switches on your MIDI footswitch are programmed to the following CC parameters: CC#80, CC#81, CC#82, CC#83, CC#84, CC#85, CC#86, CC#87.
Then you can go into the settings and program the RC-5 so those controls will trigger its features.
1) Press SETUP and Scroll to CONTROL
And then click on the MEMORY/LOOP level button.
2) Scroll to the CC Numbers (CC#80, CC#81)
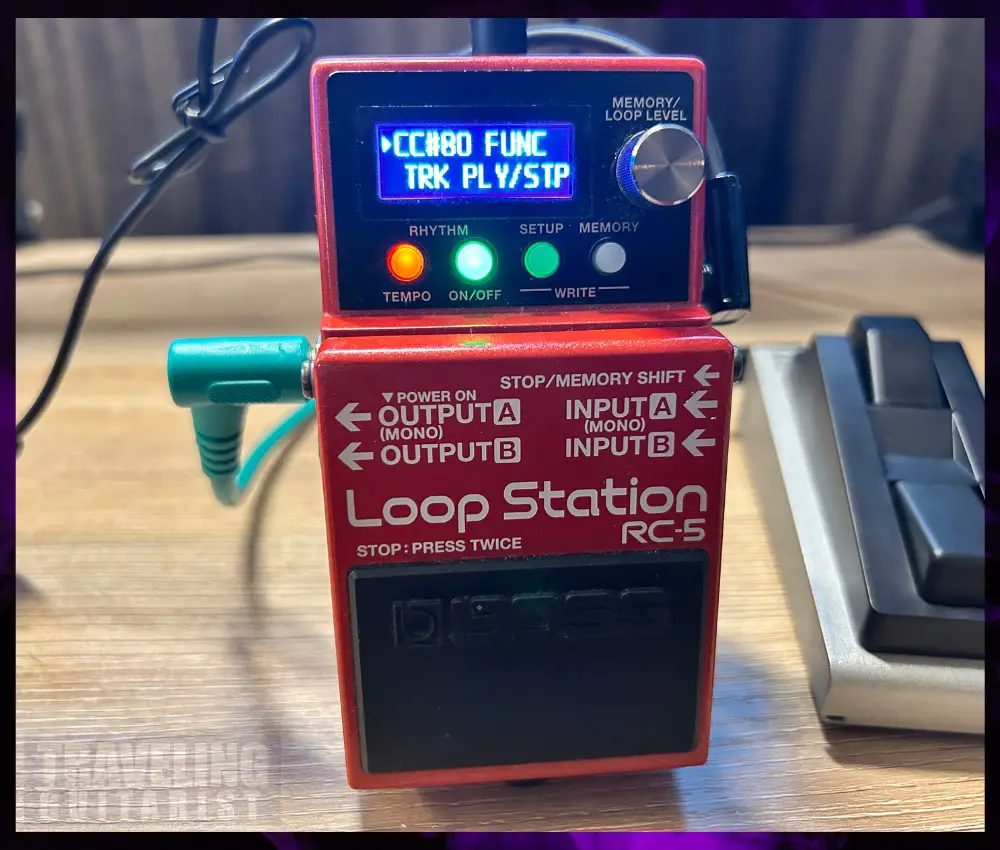
3) Select A Feature for Each CC Control (TRK PLY/STOP)
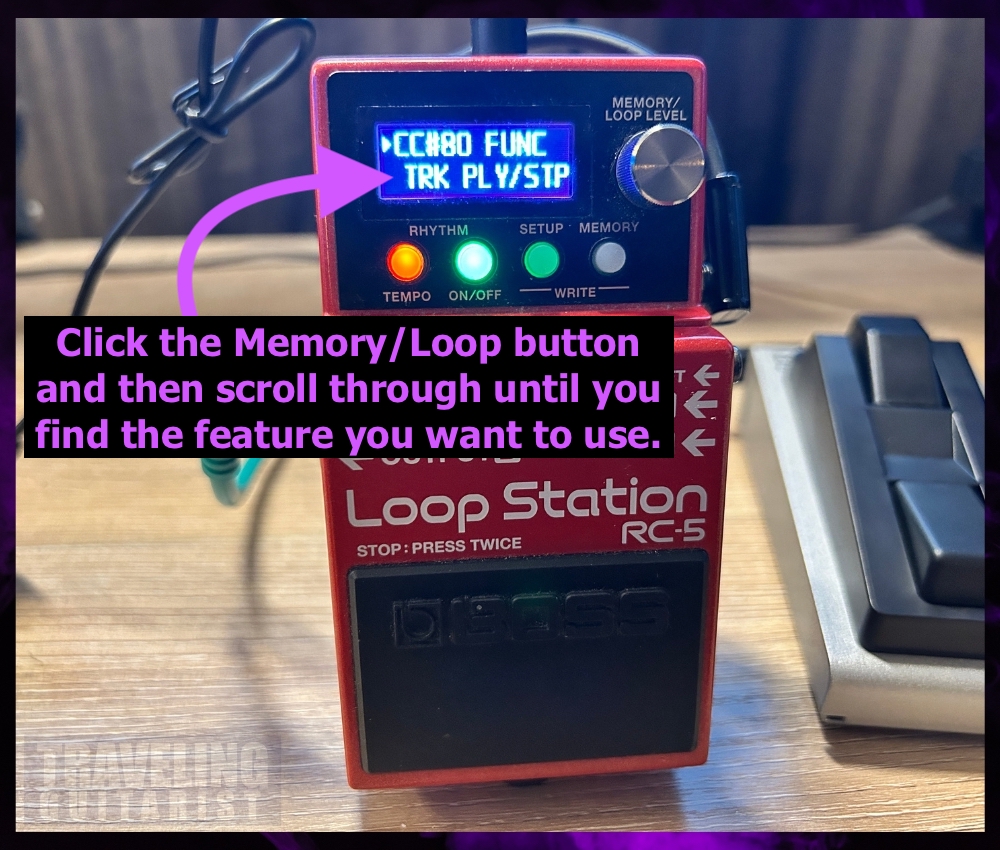
I would choose something like REC/DUB, PLAY/STOP, RHYTHM P/S, TAP TEMPO, VARIATION, LOOP LEVEL, REVERSE, and then MEMORY LEVEL.
It also depends on how many switches your MIDI device has.
4) Scroll to CC#81 Then Choose A New Feature (TRK CLEAR)
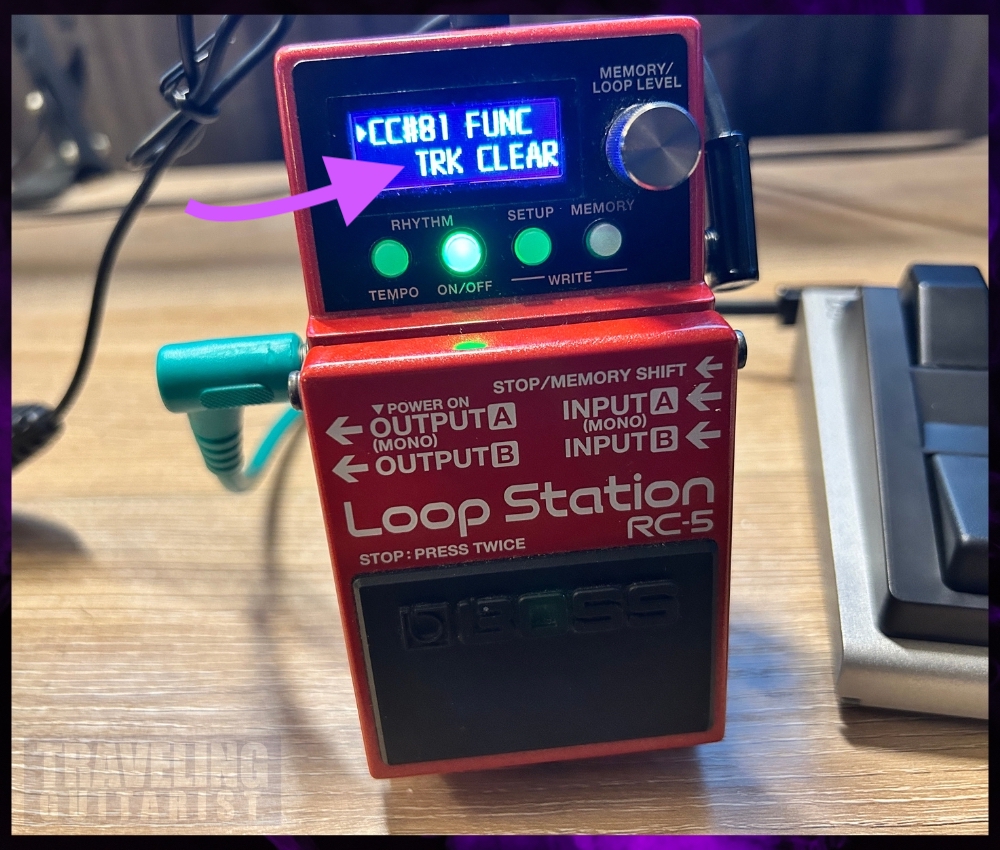
5) Repeat the Process Until You’ve Gone to CC#87
Set your CC controls to the following parameters so you can follow along with the next example:
CC#81 – TRK PLY/STP, CC#82 – MEMORY INC, CC#83 – RHYTHM P/S, CC#84 – TAP TEMPO
How to Set Up the MIDI Footswitch – (Part 3)
After unsuccessfully trying to use the BOSS ES-5 (an effects switcher, and not so much a MIDI Controller), I ran into the Hotone Ampero Control. Here’s how to set it up with the BOSS RC-5.
When you first get the Ampero Control, go to your App Store/Google Play and download “Ampero Control.”
For this example, I’m going to set it up so that the Ampero Control utilizes:
1) Records, Plays, and Stops (FS-1) & (CC#81)
2) Increases the Memory by 1 (FS-2) & (CC#82)
3) Plays the Drums (FS-3) & (CC#83)
4) Uses Tap Tempo (FS-4) & (CC#84)
1) Open Ampero Control and Click “Edit”
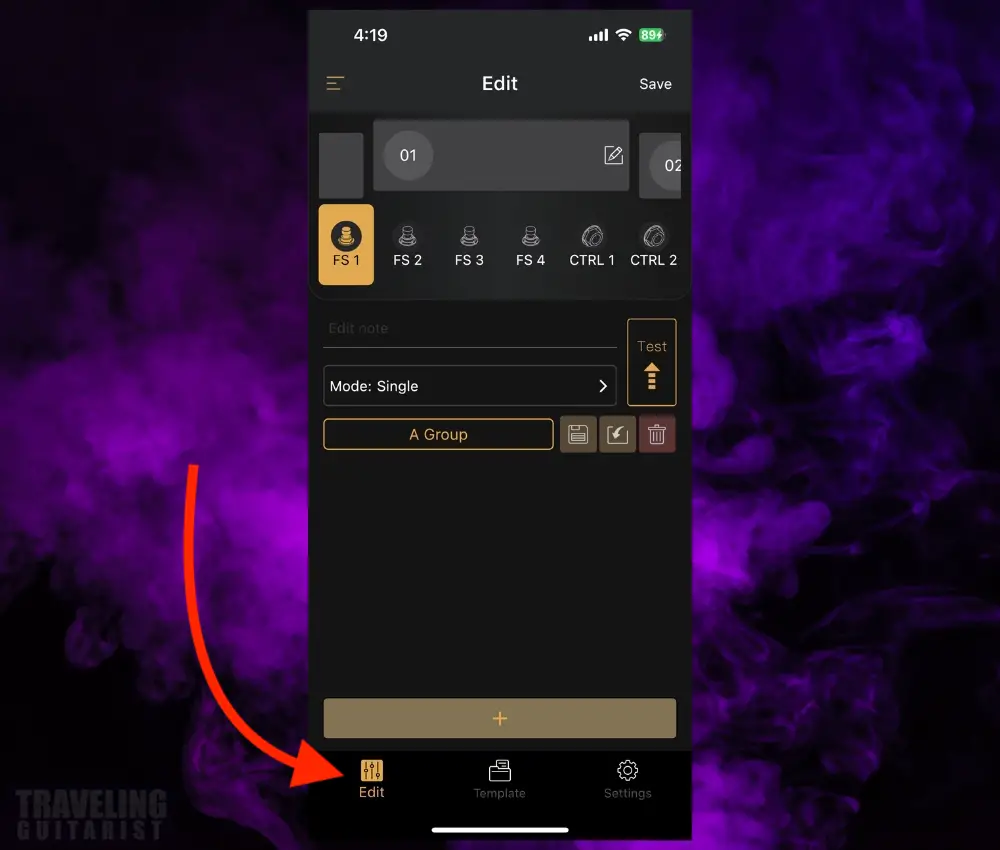
2) Set the Mode to “Single.”
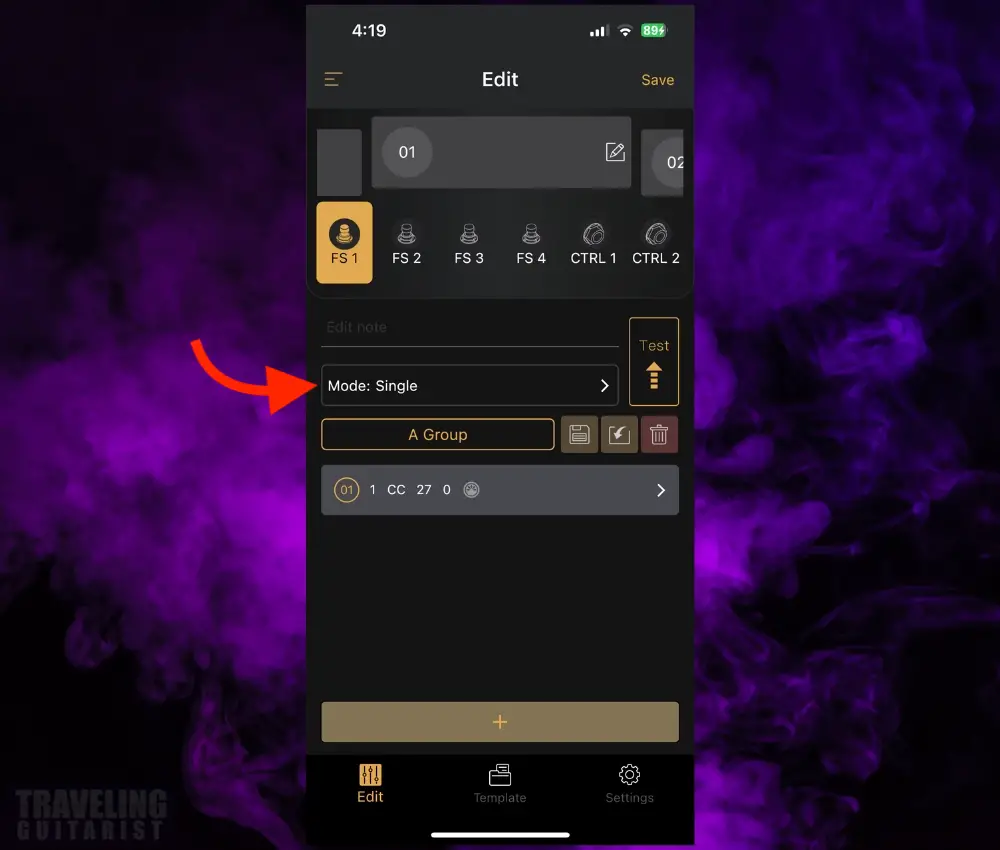
Single mode means that the footswitch or button triggers an action only once for each press.
3) Click the Arrow and Set Data 1 to 81 & Data 2 to 127
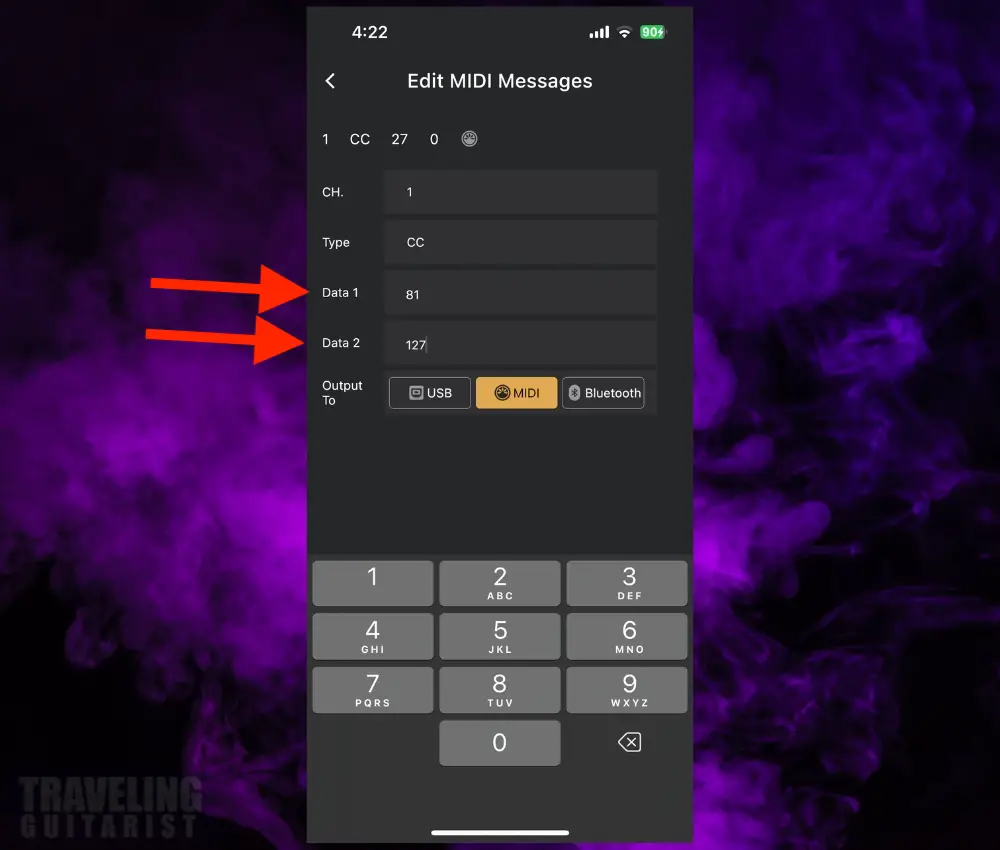
This is where you specify which control change (CC) number you’re sending. Setting Data 1 to #81 tells the Ampero Control that you want to send a MIDI message using CC#81.
Setting Data 2 to 127 effectively tells the RC-5 to execute or turn on the function associated with CC#81.
4) Press the “+” Button Again & Set Data 1 to 81 and Data 2 to 0
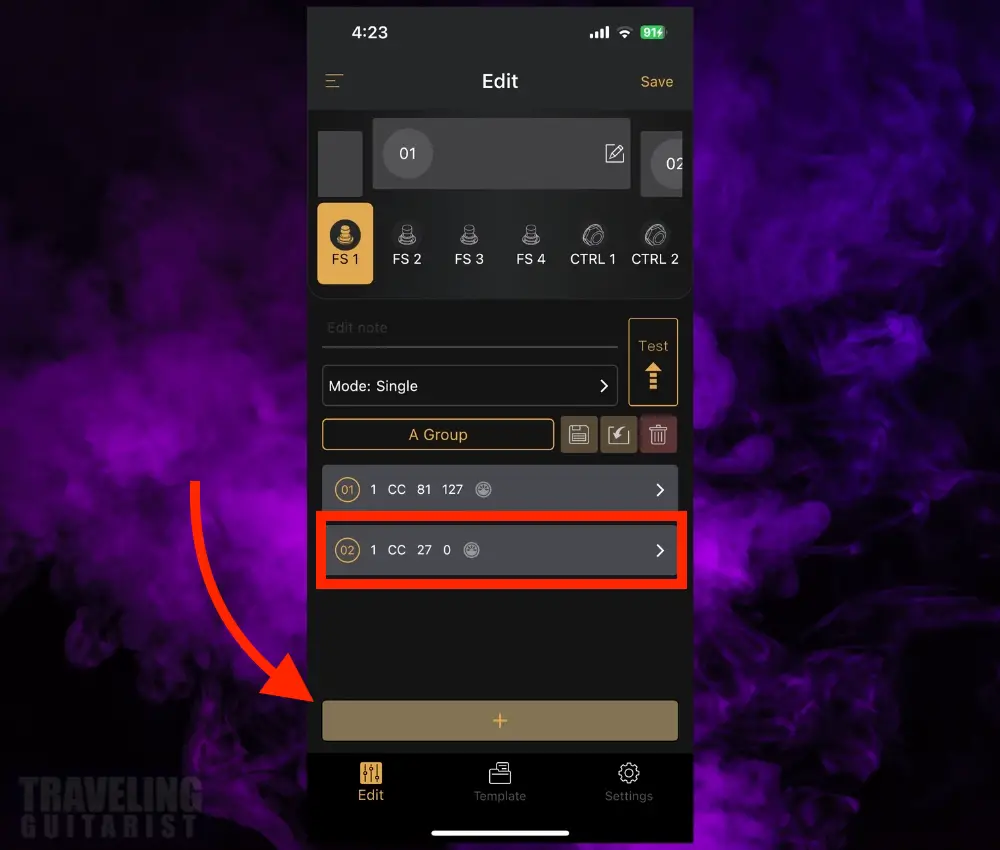
5) Set the Data 2 to 0
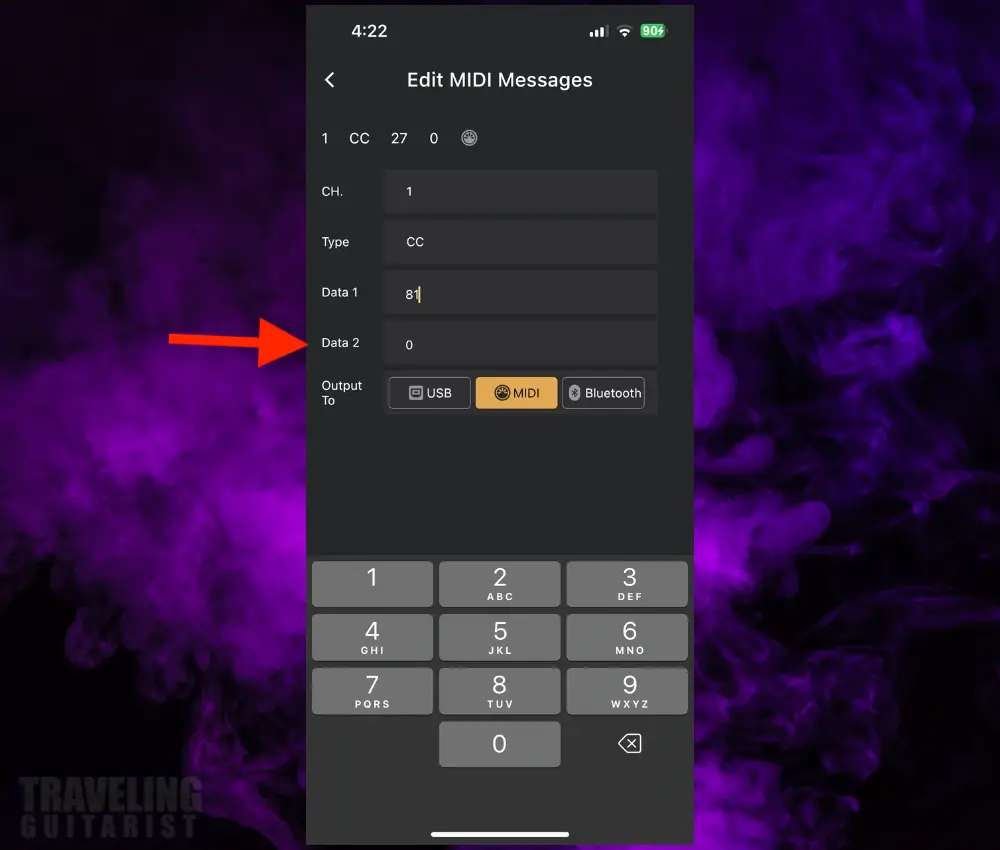
6) Repeat the Process for Each CC#
The end result of the setup will look like what the video down below shows.

And that’s it. I hope it was helpful to you. It took me all day to figure out.
How to Set Up the BOSS RC-5 in Stereo
And it’s easy as that. I tested this on on my miniature Fender Twin Reverb. It worked fine, although, as you may know, miniature amplifiers don’t sound the best but they’re useful for demonstrations.
4 Tips That Are An ABSOLUTE MUST for the RC-5
1) Use the Utility/Write Feature to Set the Drum Kit Volume
This feature will be your best friend. The reason is it provides the means for saving particular settings for each Memory Bank.
For instance, if you want the Loop Level to be a certain volume on Memory 5, you can set it with this setting. This is how we’ll fix the pesky Drumkit volume problem.
In case you don’t know, the drum kits are extremely loud by default. You’ll want to turn them down before continuing with the pedal.
A) Select Your Memory Bank
B) Select the Memory Button & Scroll Over to Rhythm
C) Press the Memory/Level Knob and Set the Level (Vol) to 60 or 70
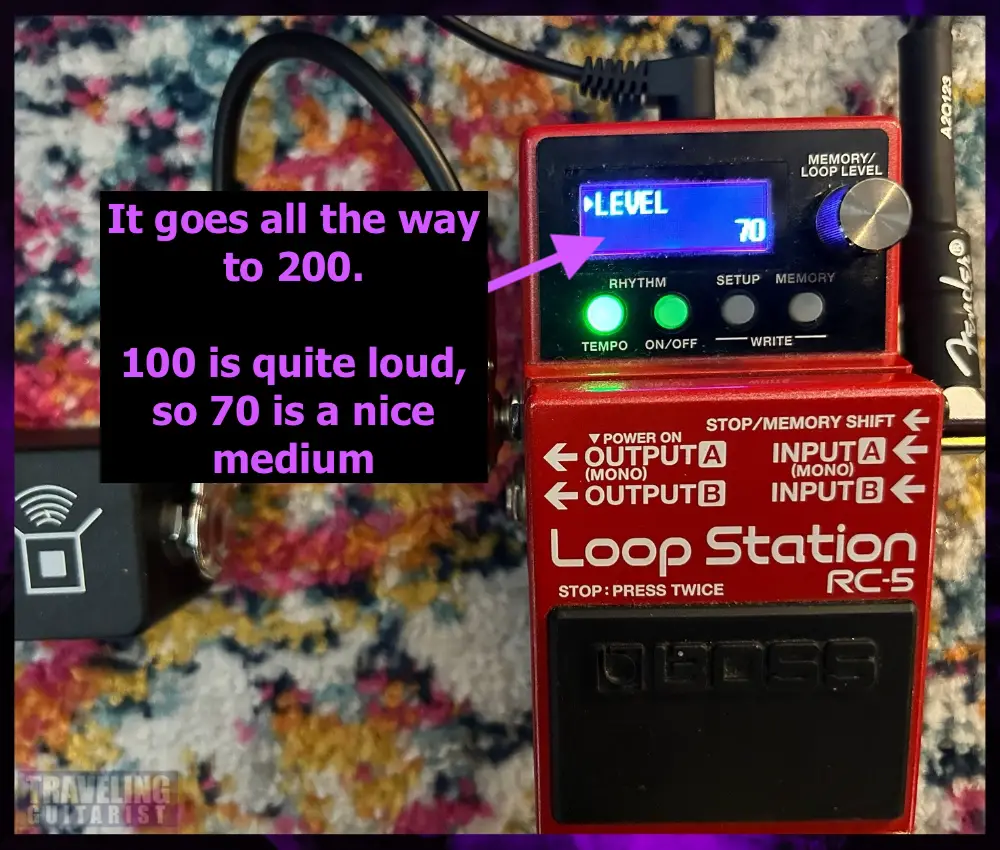
I guess it makes sense to call it LEVEL though because it’ll control a lot more than the volume depending on the setting.
D) Press SETUP and MEMORY Buttons Simultaneously
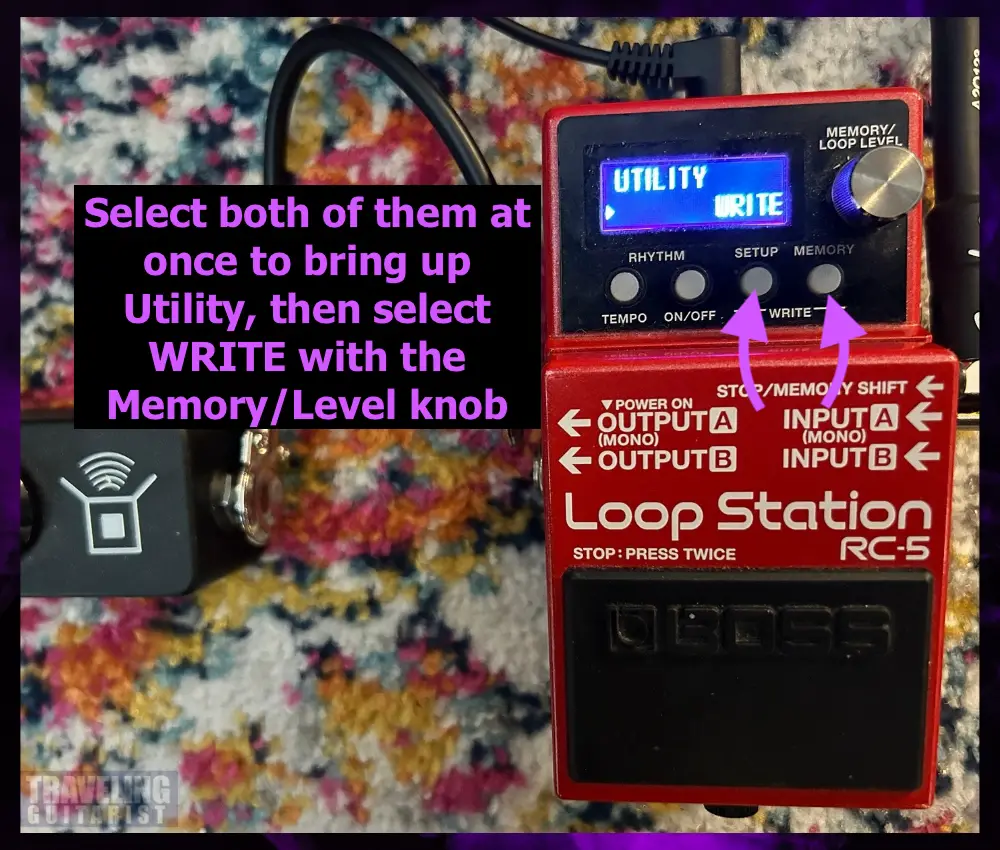
You’ll notice how it says “WRITE” underneath “SETUP and MEMORY.” This means you use them together to save custom settings to each memory bank.
F) Select Which Memory to Write
2) The Expression Pedal Will Override the Settings in the Memory Bank
In other words, in the previous example I provided, I used the expression pedal to control the volume of the drum kits.
When you plug the expression pedal in, it’ll override the volume settings of each memory. When you unplug it, the volume settings will go back to normal.
If you think about it, it makes sense for it to be this way.
3) Make Sure to Use the BOSS Tone Studio
You can get it from this link here.
4) Use Chrome Extension Sample for More Backing Tracks

If you want to get your hands on all kinds of backing tracks, drum loops, and other custom stuff, the “Sample” Chrome Extension is awesome.
You can use it to record almost anything that you would find on the internet. Then you connect your RC-5 to your PC and you can import your custom sounds.
Do you have any thoughts, recommendations, criticisms, or suggestions you’d like to share? I’m all ears.
If you have any questions or you want anything added to the article, let me know.
Other Articles You May Be Interested In
- The RC-5 vs the RC-1 Loop Station – [A REAL Comparison]
- MXR Clone Looper vs The Boss RC-5 [A Real Comparison]
- How To Connect The BOSS RC-5 To Your Computer [SIMPLE]
- How Long Does The Battery Last in the Boss RC-5 [ANSWERED]
- 16 QUICK Tips for Using A Looper Pedal (An Owner’s Guide)


Great article. Would be awesome for you to include a section on setting up the MIDI function as well.
Funny that you mention that because I just bought the proprietary MIDI cables for it the other day. I just haven’t got to it yet. I plan on making a YouTube video where I go through everything as well, like I did with the RC-1 article.
Thanks! I can’t find info about whether it’s possible to use the RC5 as a “freeform” looper. I mean, without “preprogramming” a BPM… Is it possible? Thanks
Hi Martin, what you’re asking isn’t clear to me. The RC-5 records what you’re playing. So if you play free-form tempo, it’ll record your part at a freeform tempo.
Just for clarity on using it in stereo :: do the drums come out both A and B, and if so, can they be directed to ONLY go out one or the other? I ask, because, in stereo mode, I want bass and drums to go to a bass amp, and guitar rhythm and lead to go to a guitar amp. Sending drums to both A & B sort of defeats the purpose of a stereo setup.
That’s a great question that I don’t have the answer to.
What you’re asking for seems like a pretty advanced configuration, so I don’t know if the RC-5 can do that. It’s possible though.
I’m making a full video tutorial on the RC-5 tomorrow (it’ll be published on the 7th of March), and I’ll pose this question to people in the comments. We’ll see what people have to say.
Andrew
Explanation on RC5 very well done!
I have an issue where the loop won’t shut off when I double press pedal? Just keeps playing? I reset to Factory settings but still won’t shut off. Any suggestions?
Thanks
JK
Hello Andrew, Just purchased RC-5 Looper second hand. Yes I had read that there is a steep learning curve (and as a new looper) but I thought well I should be able to manage that. First few days, Oh my gosh, it doesn’t do what its supposed to do, or is it me? or is it the machine? So first thing I did was check the system software. Eventually I downloaded and updated to the latest. But I am still finding (it is simple but) its not simple, as this will not do as I ask. So I’ve been searching the internet for Basic (getting started) guides and there are quite a few. However I came across yours only a few hours ago and your guide as above on first impressions seems to suite me. My reason for contacting you is yes I can read it on the PC and there’s lots of it but, can I ‘download it’ into word and print it off as it will be easier to read on my desk rather than the screen. Can you give me access to a file?