 Written By :

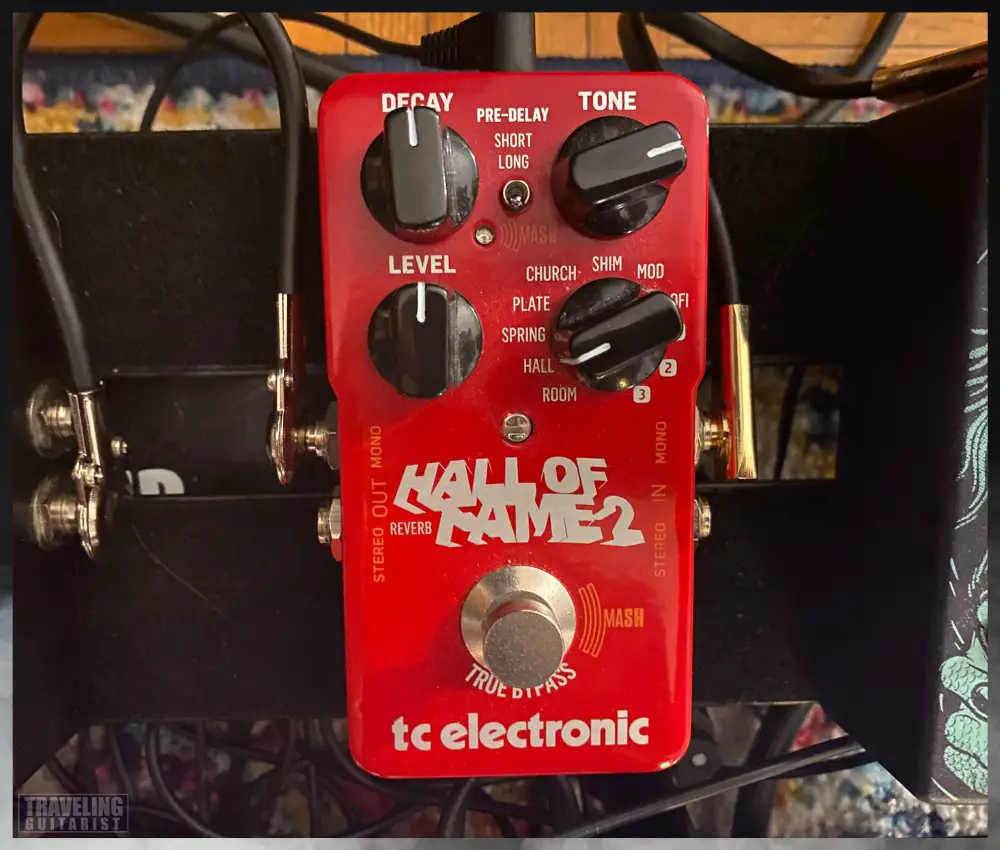
The Hall of Fame 2 is an update of the original Hall of Fame reverb and has some really cool new features, like built-in expression pedal technology, as well as TCE’s trademark TonePrints.
To use the Hall of Fame 2, connect your guitar to the pedal’s mono input with a 1/4″ instrument cable. Run another cable between the pedal’s output & your amp’s input. Power it with a 9VDC adapter on top of the unit, then select the Reverb type. Set your Reverb Decay and Level at 12pm to start.
How To Set Up The TCE Hall of Fame Reverb 2 In Your Signal Chain
1) Near The Very End Of Your Chain
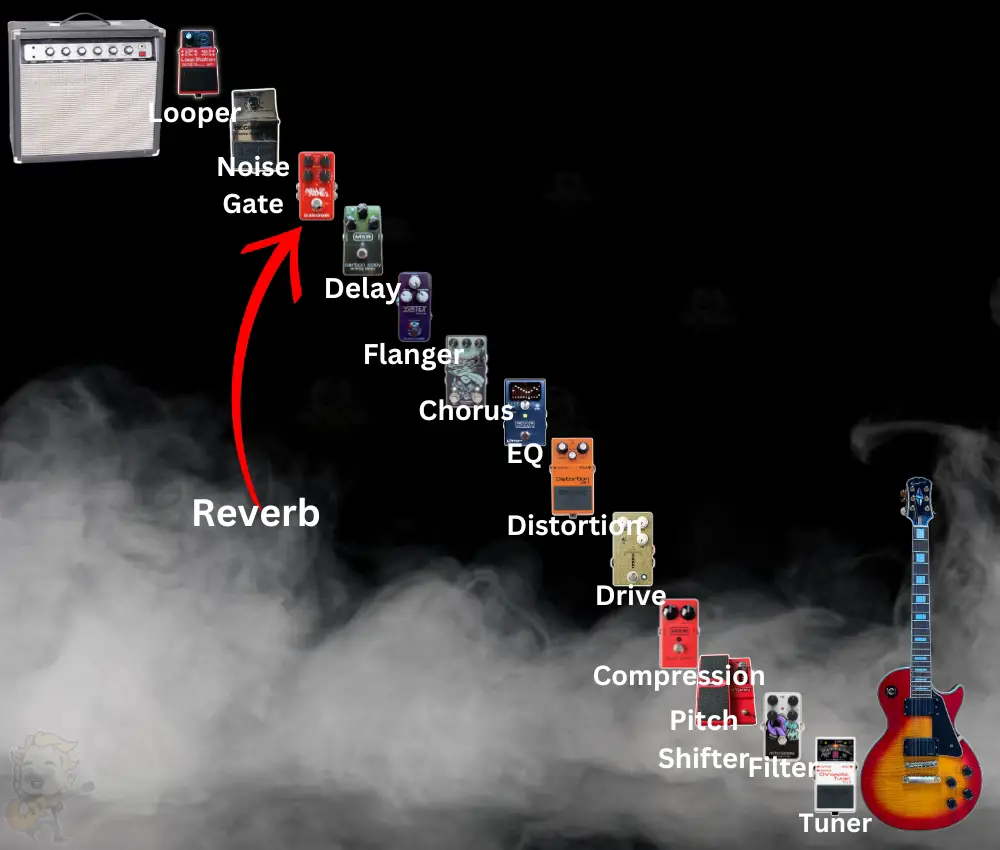
In general, I find it’s best to set up reverb units at the end of the signal chain on my pedalboard, or at least after distortion, drive, time-based, and modulation effects. This is almost always where I put mine.
This way, the signal that has been beefed up by overdrive or modulated by effects has the reverb applied to it afterwards, giving the reverb decay all of the flavour these other units have given your signal.
It keeps things cleaner, in my experience. Having reverb before distortion can cause muddiness and loss of clarity, as the reverb-affected signal will be distorted rather than the other way around.
2) In Your Amp’s FX Loop
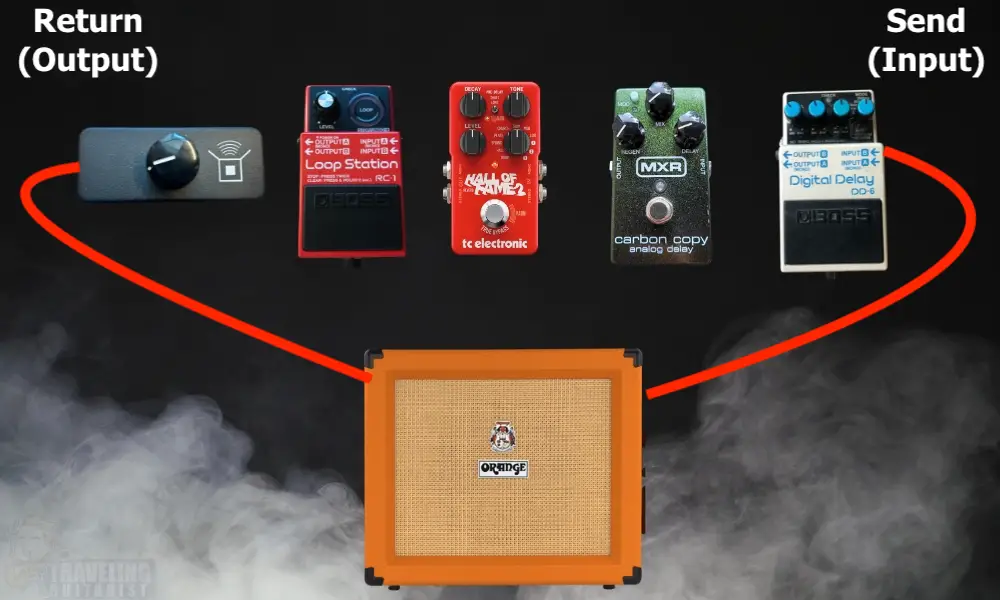
An FX loop lets you apply effects to the signal in between the pre-amp and power amp stages of the amplifier.
Since it’s best to have reverb after distortion, this solves the problem if you’re using only your amp’s gain as your overdrive and compression, which are located in the preamp.
Think of the difference between:
– distorting a clean guitar signal, and then adding reverb
– adding distortion to a signal with reverb on it.

This puts the reverb, or whatever other effects you have in the loop, after this overdrive in the chain, helping to keep things cleaner for the reasons mentioned above.

To set up the Hall of Fame 2 in your amp’s FX loop, take a standard instrument cable and connect it to the ‘send’ output of the loop, then connect the other end to the pedal’s input.
Run another cable from the Hall of Fame 2’s output to the FX loop’s ‘return’ input, and you’ve officially integrated the pedal into the loop.
Refer back to this image for guidance on adding more pedals.
How to Power The TCE Hall of Fame Reverb 2
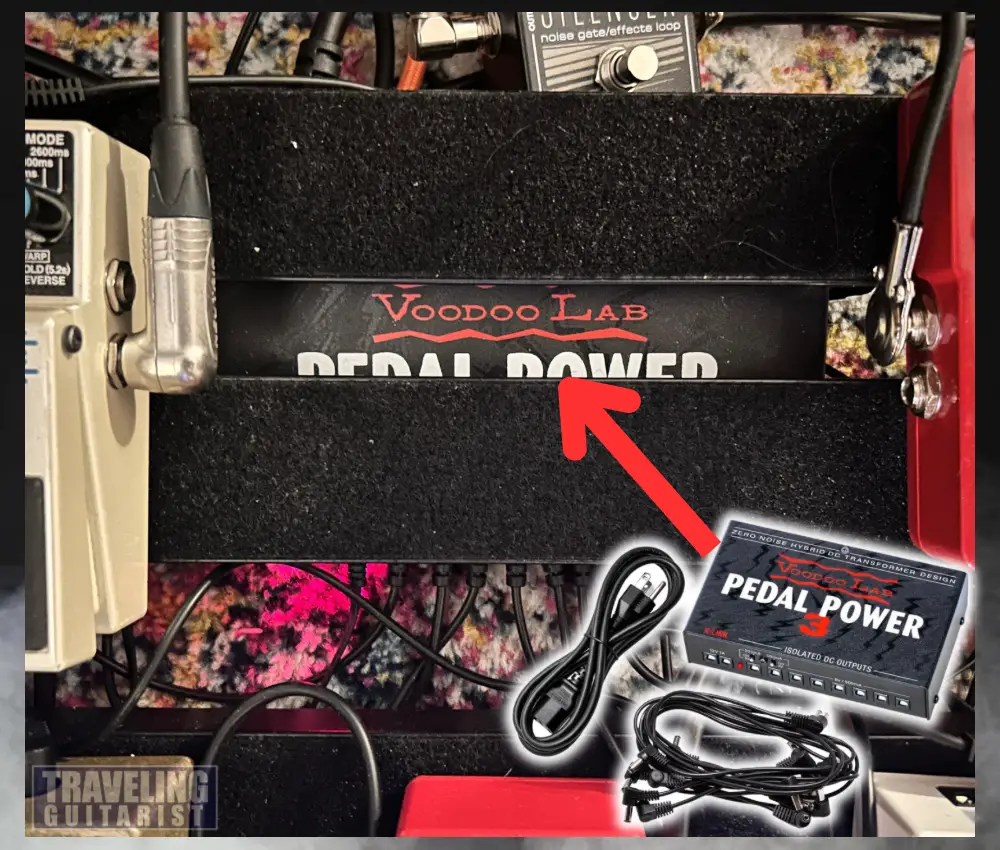
- The HOF2 doesn’t come with a power supply.
- Any 9V AC to DC power adapter will work, as long as its current draw is above 100mA.
TCE HOF Reverb 2 Features & How to Use Them
1) Front Panel Controls
A) Reverb Type – Room, Hall, Spring, Plate, Church, Shim, Mod, & Lofi
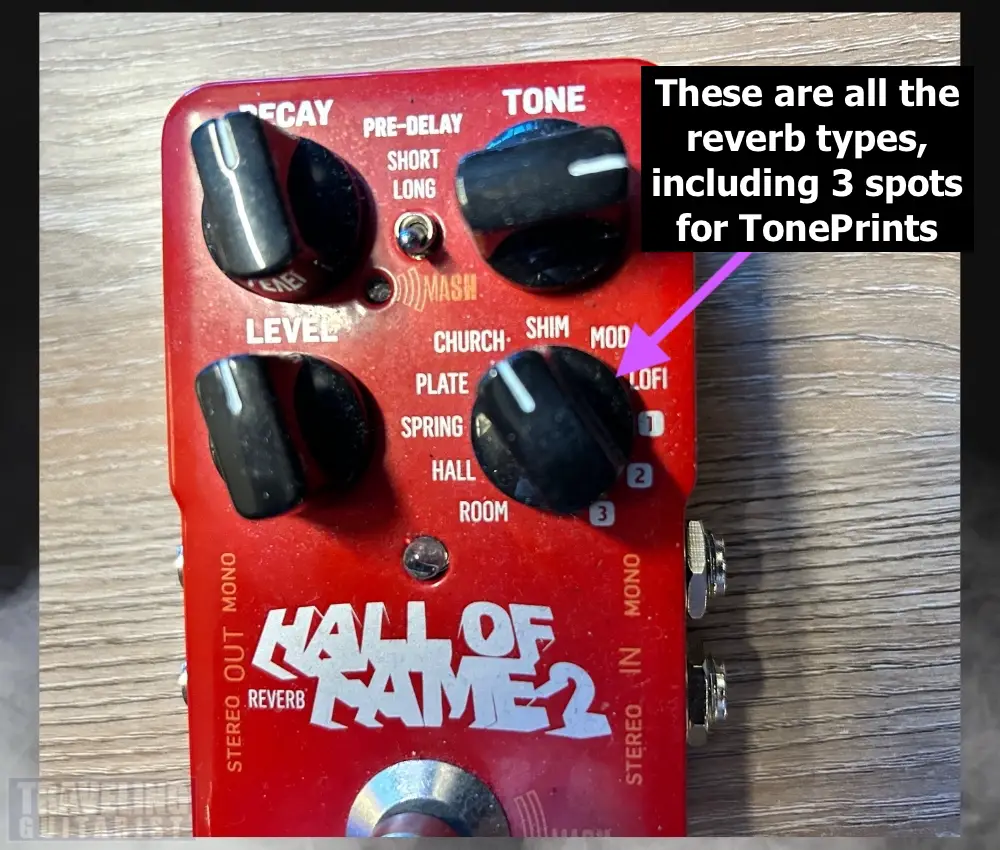
The Hall of Fame 2’s front panel has a knob with eight reverb-type preset options and three banks for saving presets and TonePrints. The presets range from the simple room or spring reverbs to more expansive ambient sounds.
The video below is time-stamped at the section where you can hear each kind of reverb.
i) Room
- Small room emulation like an empty small apartment
- 02:44
The Room reverb preset is the most subtle, emulating a small room in which echoes are absorbed by the walls. This may be the preset I use least, but it’s decent if you want a subtle, small diffusion reverb.
ii) Hall
- A Hall emulation, like a dance hall.
- 02:57
The Hall preset takes things up a notch, emulating a larger space while still keeping things fairly contained. You can still get some good ambience here, especially when using a longer decay setting.
iii) Spring
- An imitation of the classic spring reverbs
- 02:09
The Spring preset gives a really decent emulation of classic spring reverb units. It sounds pretty similar to the spring reverb built into the Fender ’65 Deluxe, and is a solid substitute if you don’t have a spring in your amp, and if you want a vintage, surf tone.
iv) Plate
- An imitation of the classic plate reverb that used a thin sheet of metal inside of a frame.
- 01:50
A bright, guitar-friendly plate reverb emulator. Traditionally, plate reverb is most commonly used for vocals or snares, to give them more punch and sizzle in the mix.
When using a plate reverb with a guitar, it can give your solos a lot of character and prominence, while not being a particularly subtle form of reverb.
v) Church
- A reverb that sounds like you’re playing inside of a church
- 01:37
As the name suggests, this preset emulates a large echoing space with hard surfaces. The diffusion here is big, a step up from the Hall preset.
The Church setting is probably my favourite reverb type. I’m curious to know your favourite type, let me know in the comments.
However, this can sometimes be too much, as things can get too washy, especially with the tone down and the decay up, but it depends on the style you’re going for.
vi) Shim (Shimmer)
- This increases the pitch of the reverb’s “decay” sound by one octave
- 01:26
This is the most experimental of the presets offered by the Hall of Fame 2. It pitches up the reverb decay by an octave, giving you both reverb and an octave effect.
This sounds really cool and reminds me of the Valhalla Shimmer plugin that I use sometimes in productions. The JOYO Atmosphere R-14 has a shimmer reverb as well (I’ll have an article on this one soon).
With the expression pedal function that the Mash technology provides (more on this later), you can intuitively control the intensity of the shimmer effect, giving you some atmospheric results.
vii) Mod (Modulated Reverb)
- A modulation or chorus sound on the tail-end of your reverb
- 03:11
This preset adds a chorus modulation effect onto your reverb tail, adding more warmth and a subtly psychedelic tone.
viii) Lofi
- A very low fidelity and slightly “sea-sick” psychedelic reverb sound. Great for lofi, obviously.
- 02:25
The Lofi setting gives a more dirty-sounding, low-fidelity reverb tail, which sounds rough but can also be ethereal at high-decay settings.
This is a good setting for art rock, post-rock, or lofi hip-hop creators, and I’d like to experiment with running some other instruments through it at some point.
B) Pre-Delay – Short & Long
- How long or short the time is between your playing and the reverb kicking in.
- 04:51
In the top center of the pedal, there’s a small switch you can use to control the pre-delay, A.K.A., how long it takes the reverb to kick in after receiving the signal from your instrument.
Keeping it long can help you keep your original signal nice and clean by giving it more space.
Maybe another knob for pre-delay configuration would give more control options than just a short/long switch, but it still seems to do the job pretty well.
C) Level
- The volume of the reverb.
- 04:13
This knob, unsurprisingly, controls the volume level of the reverb. It functions the same as a dry/wet knob, letting you blend the reverb-affected signal with the dry signal as you please.
D) Decay
- How long the reverb lasts.
- 03:58
The Decay knob controls how long the reverb tail lasts. Crank it up for more atmospheric washes of reverb, or keep it short for a more moderate effect.
The responses of the decay knob obviously vary quite significantly depending on the reverb type or TonePrint you’re using.
E) Tone
- An EQ control for the reverb and reverb only
- 04:32
The Tone knob is effectively an EQ for the reverb signal. Keeping it all the way down lets all the frequencies in your signal have the reverb applied to them, giving a more ‘dark’ echo.
Turning the tone up gradually bypasses the lower frequencies, only applying the reverb to higher sounds, making the reverb more shiny and crisp.
I personally prefer to have the tone knob usually at around 12 o’clock or a bit higher, especially in lead playing, as it keeps things cleaner.
Having it too low I find makes the low frequencies of my pick hitting the strings boom out in the reverb, making things muddier, especially if I’m using a long decay. But play around and see what works for you.
F) Switch
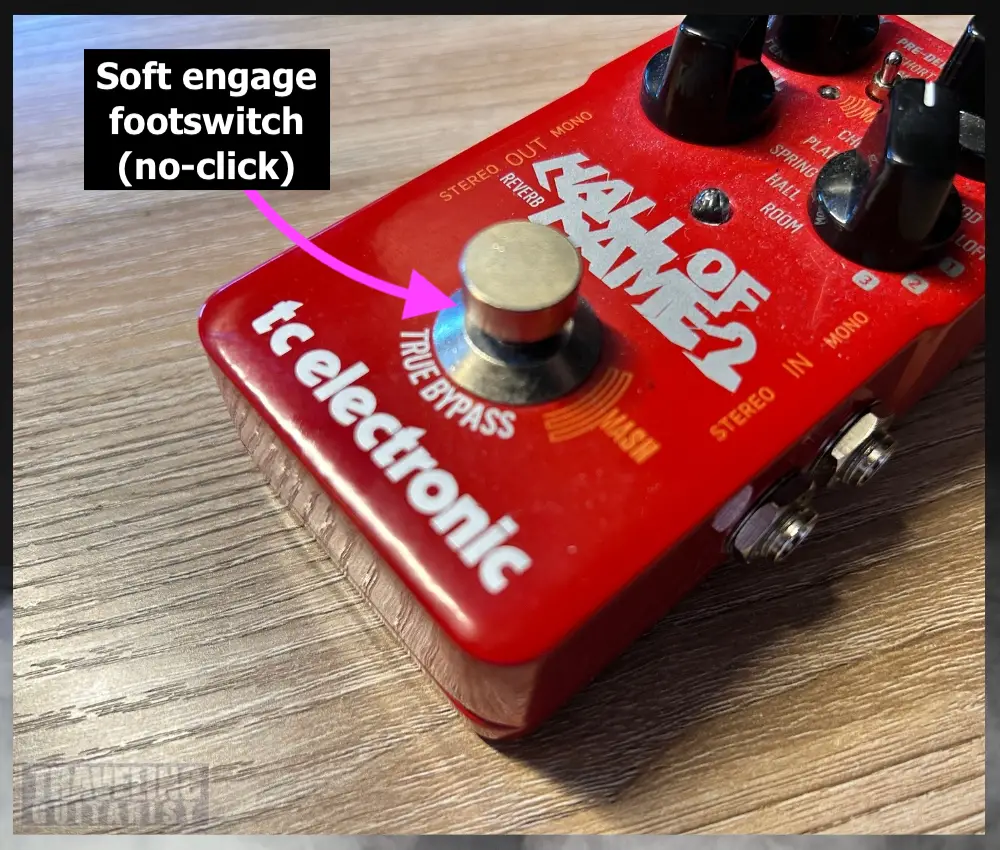
True Bypass
Use the Hall of Fame 2’s only footswitch to activate or bypass the pedal. As standard, the pedal is calibrated to ‘true bypass’ mode, which basically ensures that there is no loss in signal quality when you have the pedal bypassed.
The signal flows through the pedal while you’re not using it without being affected at all, as if the pedal has been removed from the chain entirely.
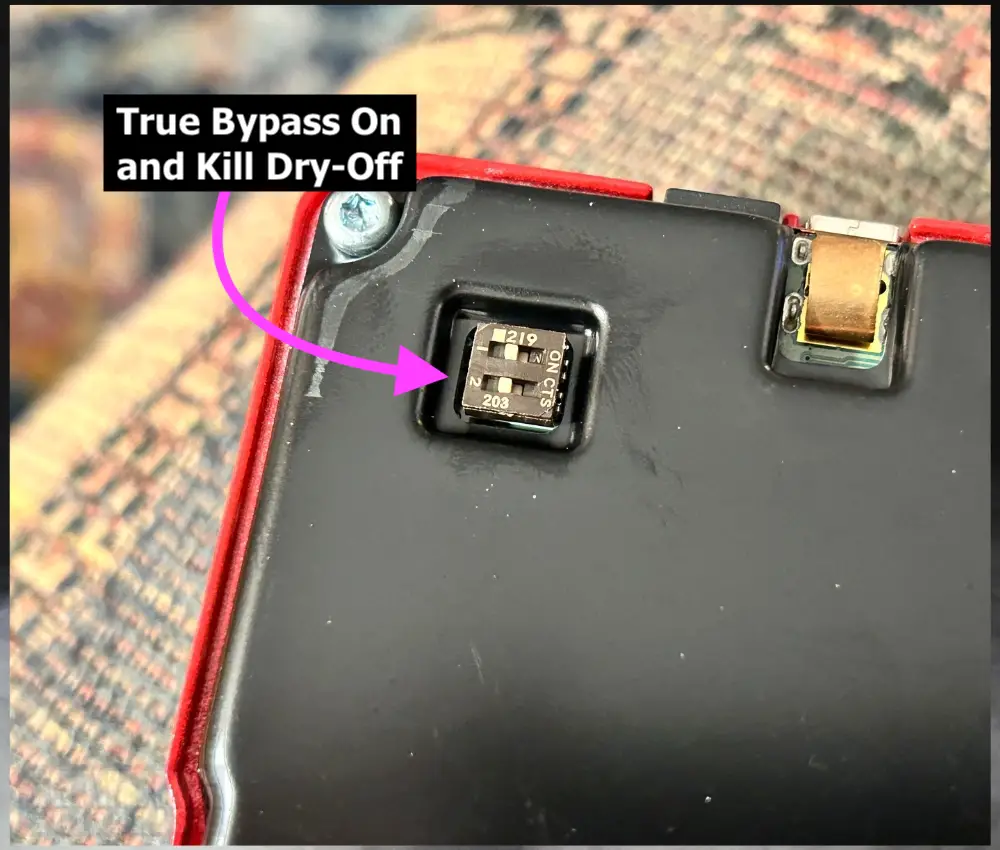
The top switch controls the bypass options and the bottom switch controls the kill dry on/off.
You can open up the back of the Hall of Fame 2 to switch the pedal’s bypass mode to ‘buffered bypass’.

Buffered Bypass
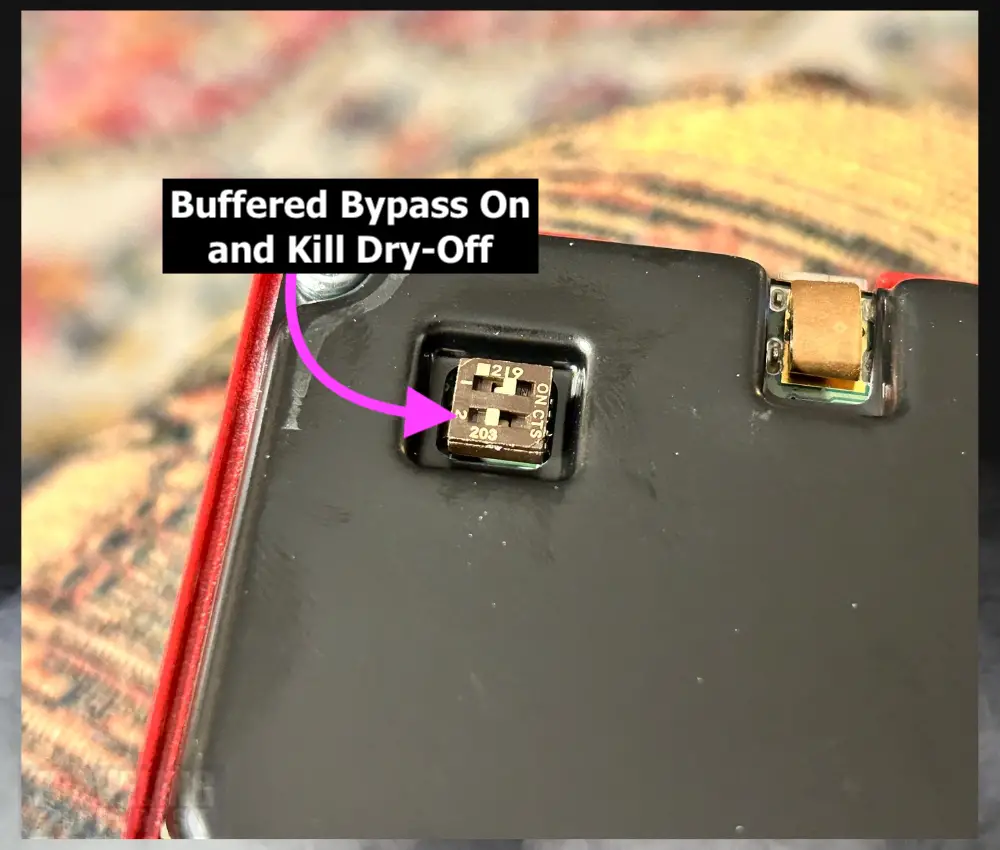
This setting applies a buffer circuit to the signal as it travels through the pedal, designed to help reduce the signal loss that can be caused by long cable runs and large pedalboards.
While I prefer true bypass when I’m using a shorter signal chain with fewer pedals, as it keeps things ‘purer.’
You may want to consider buffered bypass pedals like this if you’re using a lot of pedals and long cables. True bypass can lead to a loss in higher frequencies because of the cable’s capacitance. In other words, a duller tone.
Kill-Dry
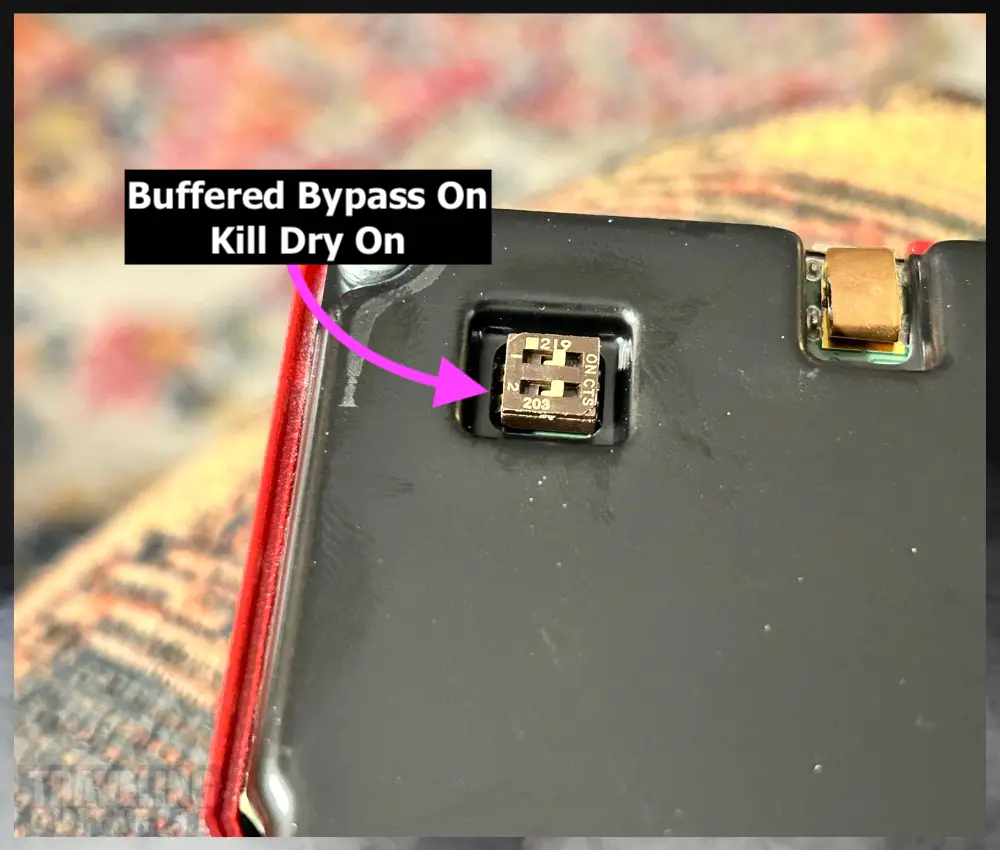
- In simple terms, kill dry kills the dry sound of your guitar and leaves only the wet, processed signal. That’s why it’s called “kill dry.”
Before the TCE HOF2, I had never been exposed to the Kill Dry feature. For most guitarists, we won’t need to use this.
The kill-dry feature is for people with more advanced pedalboards and set-ups. Such a person may need to eliminate the dry signal to avoid issues like phase cancellation or a cluttered sound.
If you’re one of these people, let me know how you use the kill-dry feature in the comments.
G) Stereo IN/OUT
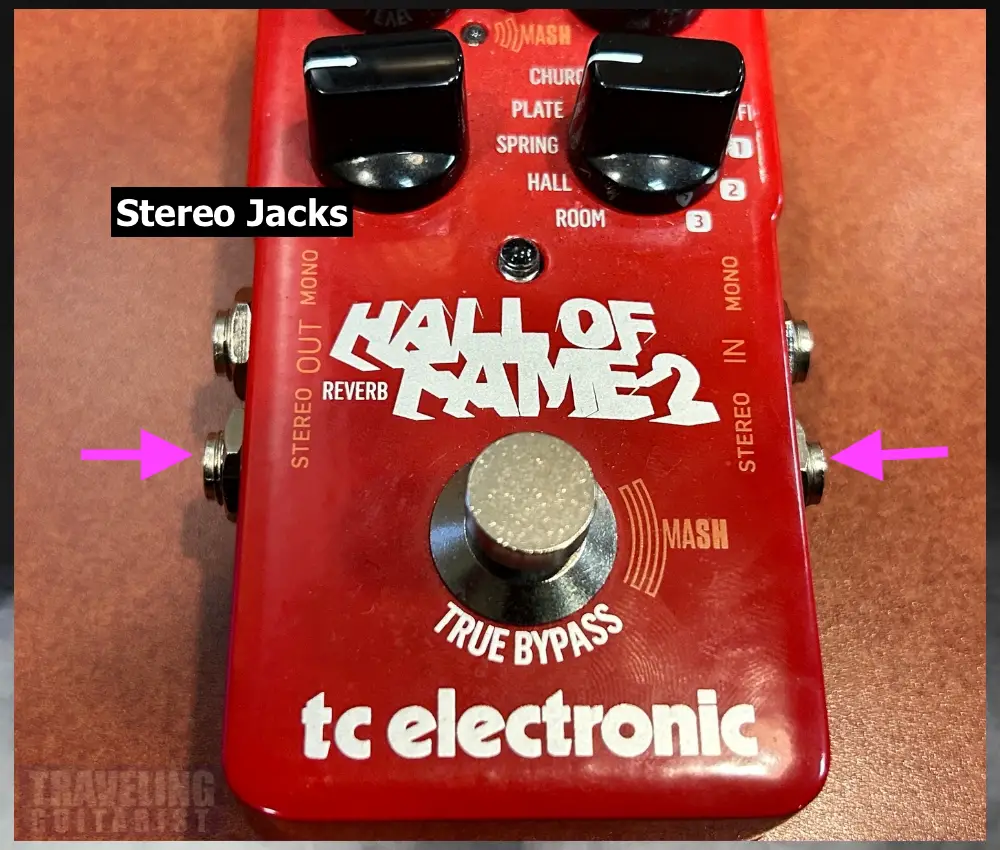
Stereo in/outputs are located on either side of the pedal.
- Stereo inputs and outputs give you the ability to send your signal to more than one amp or sound system. They also give you greater control of how you blend signals together.
H) Mono IN/OUT
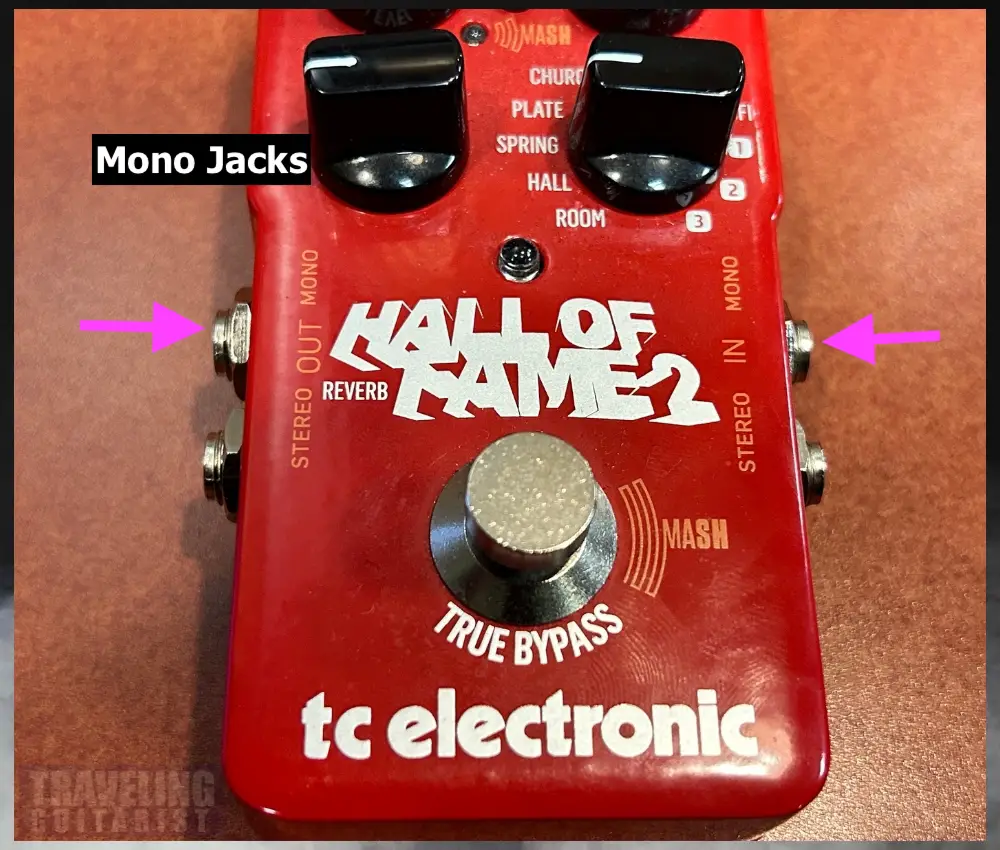
- The standard way to connect your guitar, amps, and pedals. 1 input and 1 output source, ie, your amp.
For standard guitar pedalboard incorporation, use the mono in/outputs. Plug your guitar or previous pedal into the mono input with a 1/4″ cable, and connect another from the Hall of Fame 2’s mono output to your amplifier, or the input of the next pedal in your chain.
2) Other Cool Features
So far, the Hall of Fame 2 may seem like a decent, if somewhat ordinary reverb pedal with some good sounds. However, it’s extremely capable for how small it is. Let’s talk about a couple of features that really make it stand out from the rest.
A) Mash Technology
i) What is Mash Technology?
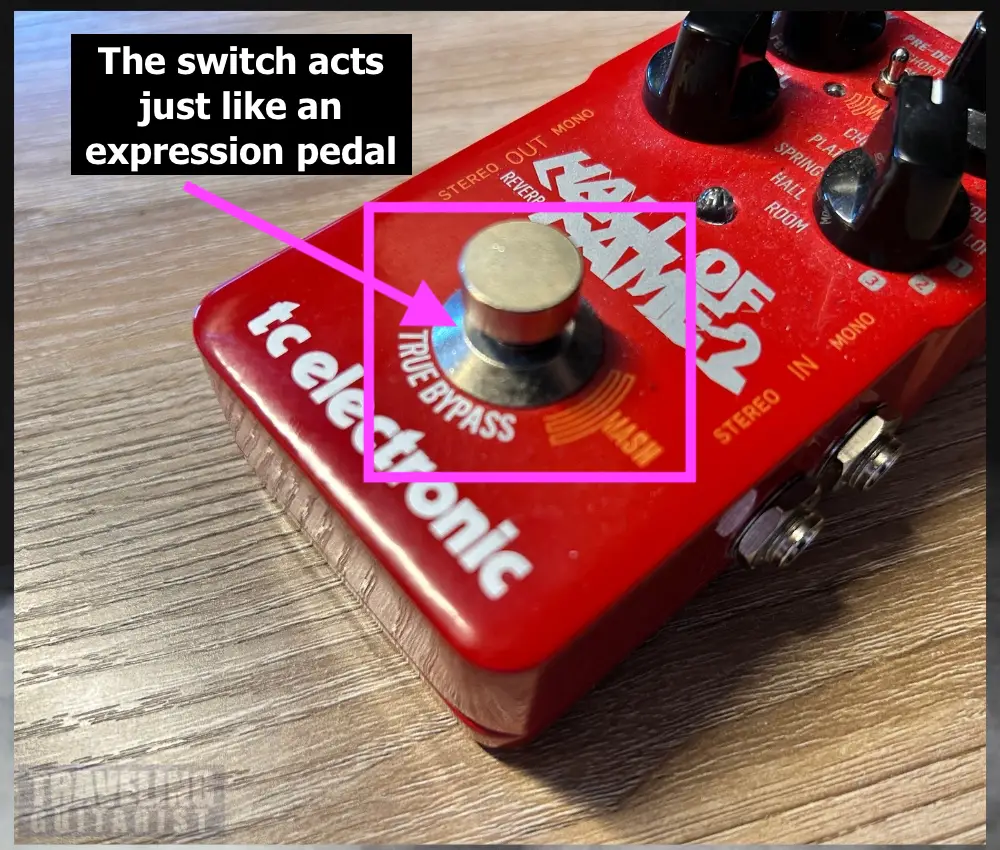
Besides the actual reverb types, the coolest and impressive feature of the Hall of Fame 2 is the built-in ‘Mash’ technology in the footswitch.
- The Mash Technology effectively transforms the pedal’s foot-switch into an integrated expression pedal.
- Expression pedals are passive units that you can control with your foot to intuitively adjust effect parameters in real-time.
A typical expression pedal looks like a wah pedal, but here TCE has compacted this functionality down and integrated it into the Hall of Fame 2’s little footswitch.
ii) How To Use The Mash Technology Function
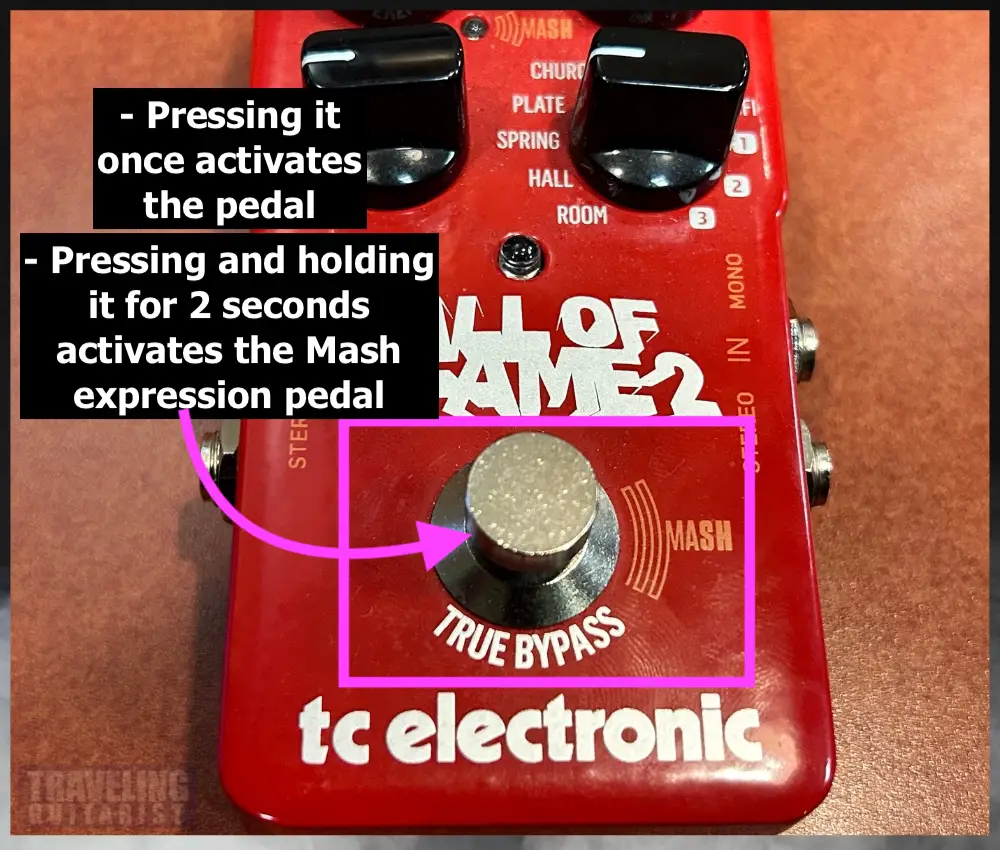
If you hold down the footswitch for a couple of seconds you transform it from a bypass switch to an expression pedal.
There’s another LED display under the pre-delay switch which shows you how much pressure you’re putting on it, and, consequently, how much intensity you’re adding to the effect.
Once Mash is activated, the light will come on, and its brightness will change in response to how much pressure you’re putting on the now-expression pedal.
The video below is time-stamped at the section where I show you how to use it:
This is great as it gives you the creative control you get from an expression pedal but without you having to cash out on one or making space for one on your pedalboard.
It’s fun being able to control the pedal’s parameters in real-time, and according to the own expressions of your body.
When it comes to determining what parameters are mapped to the footswitch, the Hall of Fame 2 comes with predetermined configurations based on which reverb type you’re using.
But you can go further and customize your own configurations, something that leads me to another important and really cool feature of the pedal.
B) TonePrints (USB Connection & Smart Phone App)
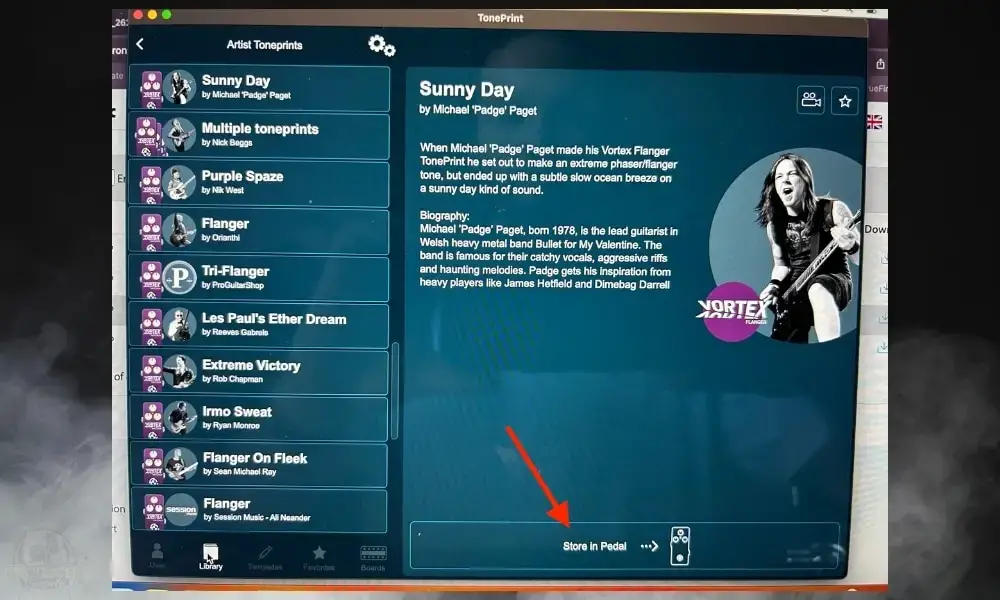
TonePrints are basically effects settings crafted by all kinds of top guitar players and musicians that you can download and use yourself.
Some of them are really cool, and others…not so much. Personally, I prefer to make my own settings rather than focus on what appears to be the marketing material.
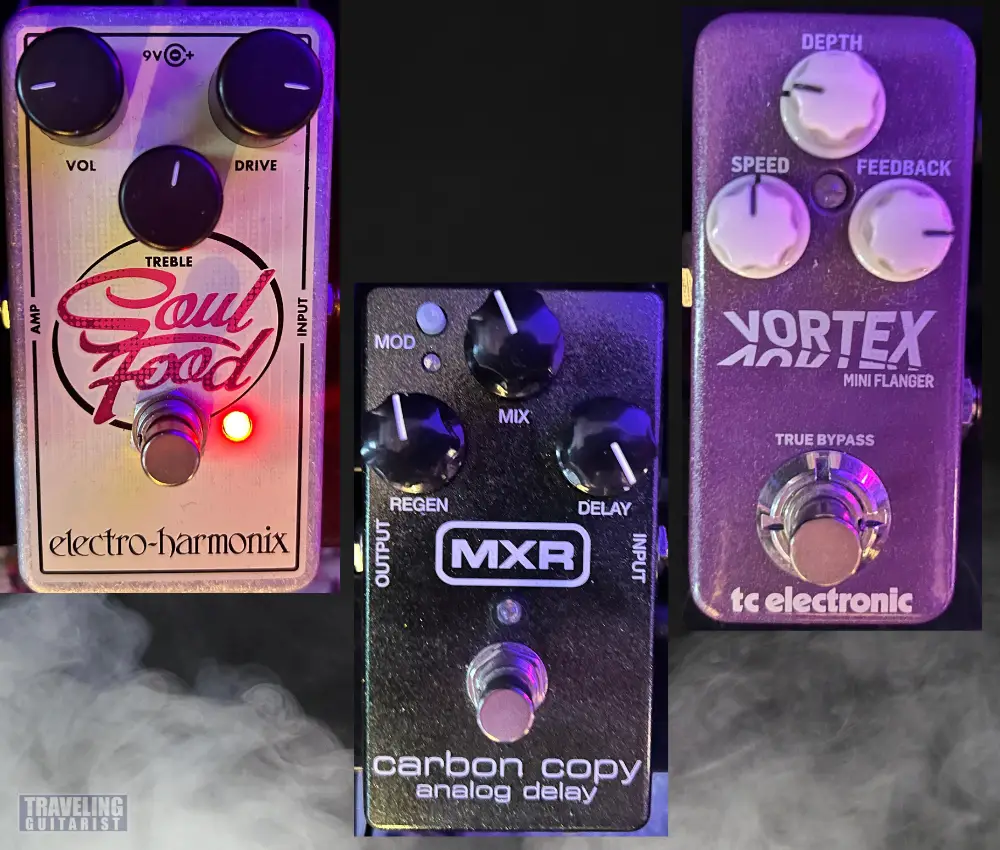
For this section, I recommend you check out my article on the Vortex Mini. I explain how to use this feature in detail in that article. The same principles apply.
i) Using TonePrints with your PC/Mac
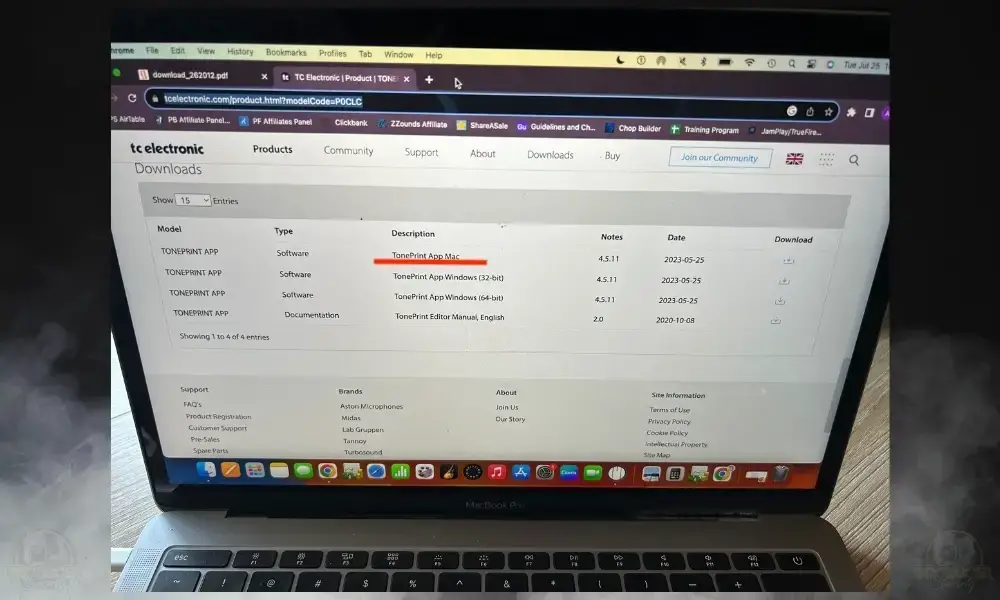
The TC Electronics website gives you access to their extensive TonePrint library and free TonePrint editing software.
Once you’ve downloaded the prints you like, you can then edit them on your computer, adjusting parameters with the software, and sending them to your pedal.
For this, the Hall of Fame 2 comes with a mini-USB input which you can connect to your computer and transfer across your TonePrints.
ii) Using Toneprints with the TonePrint App
In the time-stamped video below, I show you how to use the TonePrint App:

You can also do the same on your smartphone, with the TonePrints app. The app is the same editing software that you can download from the website but adapted for a small-screen device, available for Android and iPhone.
- To get the prints from your phone into your pedal, find the one you want and press ‘beam to pedal’.
- Hold your phone to your guitar’s pickups and the TonePrint will be ‘beamed’ through your guitar and into the pedal’s circuitry.
Make sure you turn up the volume on your guitar before doing this so that your pickups are picking up the strongest signal possible.
C) Analog Dry-Through
- Keeps the dry guitar signal in tact
Like most or all TCE pedals, the Hall of Fame 2 comes with analog dry-through. This basically means that the entire signal isn’t converted into digital, like in some pedals.
Instead, the signal is split: the wet signal is converted to digital as it is affected by the circuitry of the pedal, whereas the dry signal remains analog.
This supposedly preserves the ‘purity’ of the original dry signal, and can also help prevent latency issues sometimes caused by the signal being converted entirely into digital.
D) Easy Battery Access
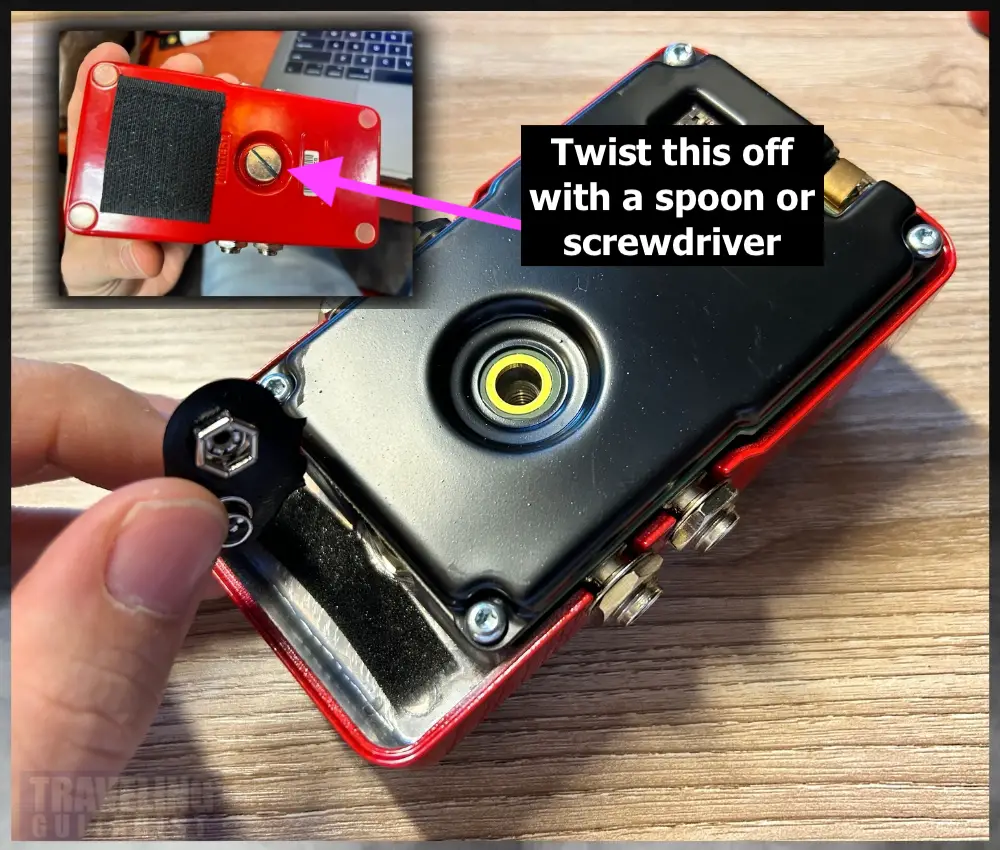
Whereas most standard pedals have at least four little screws you need to loosen to take off the back panel and get to the battery, the Hall of Fame 2 has just one large, flathead screw on the back, making access a bit easier.
E) Very Durable Design
The pedal is reasonably tough, durable and has solid housing. I sometimes wonder if the footswitch will at some stage have problems through so much use as an expression pedal, but I haven’t had any trouble so far.
5 Cool Settings for the TCE Hall of Fame 2
1) My Personalized Setting (Church)
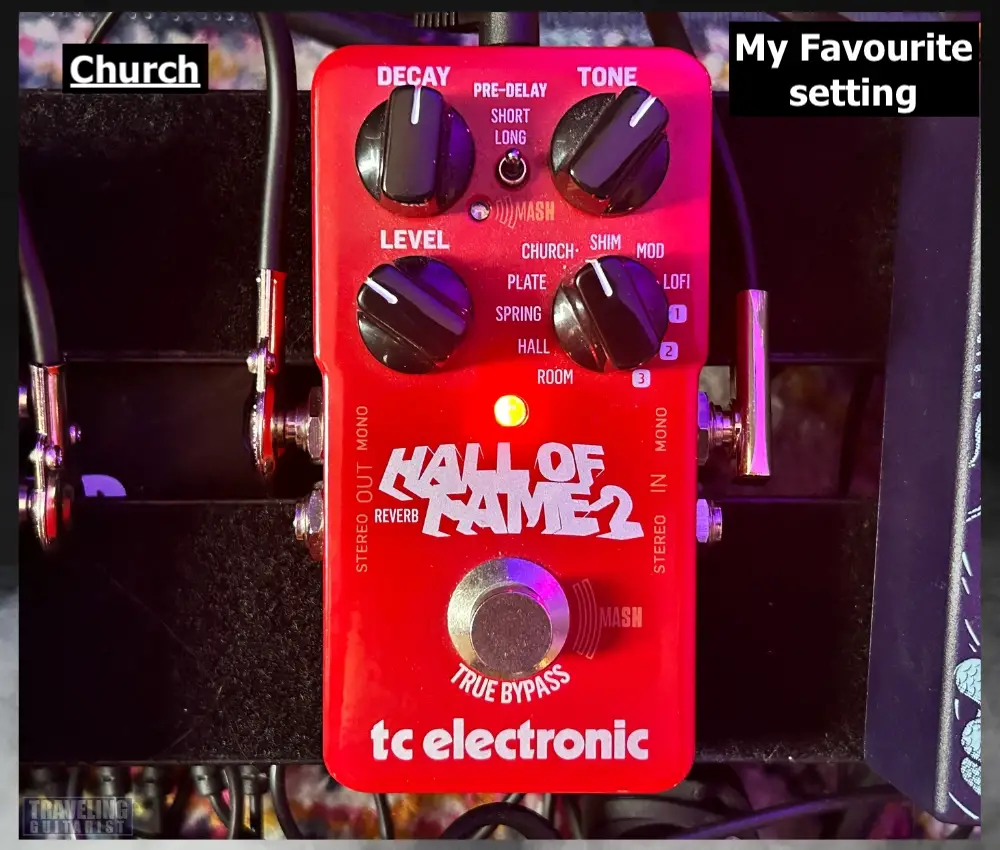
Decay: 12
Level: 10:30
Tone: 1:00
Reverb Type: Church
Pre-delay: Short
Obviously, how I use it depends on the vibe I’m going for, but this is generally what I’ll use when all else holds equal. Sometimes I’ll use a long pre-delay.
2) Dick Dale and the Deltones – Misirlou (Spring)
Decay: 11:30
Level: MAX
Tone: 4:00
Reverb Type: Spring
Pre-delay: Short
As I already mentioned, the Hall of Fame 2’s Spring reverb setting can give you a great surf-rock style tone. Keep the pre-delay short and the decay around 11:30.
You’ll definitely need a Stratocaster as well. This is a hard one to imitate because the original recording is so old and all the gear was 100% analog. Compression will help.
Keep the tone high (definitely not below 12 o’clock), to keep the reverb tail nice and bright.
3) Pink Floyd – Run Like Hell (Mod)
Decay: 2:00
Level: 1:00
Tone: 12:00
Reverb Type: Mod
Pre-delay: Long
This track from The Wall is one of my favourite examples of modulation and reverb working together, and I managed to get a convincing replication out of the Hall of Fame 2’s mod reverb setting.
I kept the decay around 2 o’clock and the tone around 12. In the mod setting the level knob controls the depth or intensity of the modulation effect.
For Run Like Hell you’ll want to keep the level high to get the bright, shimmery effect of the original. I kept mine between 1 and 2 o’clock and kept the pre-delay long.
You’ll need a drive pedal, delay, and definitely a flanger to get a similar sound. The settings I’ve shared in the image above are, in my opinion, very close to the main riff for “Run Like Hell.”
4) Jeff Buckley – Hallelujah (Hall)
Decay: 12:00
Level: 12:00
Tone: 2:00
Reverb Type: Hall
Pre-delay: Long
It wasn’t easy to replicate a reverb as iconic as that used in this song, but I managed to get a decent version.
There’s a fascinating video from Paul Davids where he delves deep into trying to recreate Buckley’s tone here, both with pedals and on a DAW.

One of the things he finds gives good results is blending short, medium and long reverbs together and panning the long and short ones to opposite channels.
In an attempt to recreate this, I decided to keep the decay on the Hall of Fame 2’s Hall fairly long and then blended it with a shorter reverb on my amp using the level knob. This made a rich sound, although, not quite as magical as the original.
I also kept the pre-delay long, and the tone nice and bright (high), to try and emulate the brighter canopy of reverb used on Hallelujah.
5) Pink Floyd/David Gilmour – Comfortably Numb (Hall)
Decay: 12:00
Level: 11:00
Tone: 2:00
Reverb Type: Hall
Pre-delay: Long
Another ambitious reverb tone to try and recreate is that of David Gilmour’s iconic solo on Comfortably Numb.
While there’s more going on here than just reverb, the Hall of Fame 2’s Hall setting with a medium decay and bright tone does a pretty good job and giving you the same epic, spacious echo.
You’ll obviously need to use this alongside some good overdrive and delay. You’ll notice that I added in some flanger as well, but not quite as much. I find the mini flanger makes the sound more “juicy.”
Fender has published an article on their website with recommendations on the kinds of effects you need to get Gilmour’s tone, and in what order to have them in your chain.
If you have any recommendations for settings or interesting tips, please drop some down in the comment section.
Other Articles You May Be Interested In
- Where To Put Reverb In Your Signal Chain? [SIMPLE]
- What’s the Difference Between Reverb and Chorus [ANSWERED]

