I’ve said it before and I’ll say it again. Guitar Pro is probably one of the greatest tools out there for guitarists. And another thing that I’ll say again is that I’m genuinely surprised by how few tutorials there are online on how to use Guitar Pro considering its ubiquitousness and applicability for guitar players of all skill levels.
I often find myself scouring the internet for longer than I should to figure out even the most basic of GP functions, but I digress. One such thing that I was trying to learn how to do the other day was how to delete blank measures in Guitar Pro, which is what this tutorial is about. So what’s the secret then? How do you do it?
To delete a blank measure in Guitar Pro, have your cursor on the measure you want to delete and then press (Control + ‘-‘), or (^-). Another way of performing the same function is to click on “Bar” in the toolbar and select “Delete Bar” which is the second option.
And really, it’s as simple as that. It doesn’t require much more clicking around than this. I have to admit though, it’s not always easy moving around measures and bars in Guitar Pro, at least at first. It takes deliberate practice every single day to really get used to Guitar Pro and all its glory. Let’s walk through how to do this function with illustrations to help. We’ll talk through some other functions as well.
How to Delete A Measure in Guitar Pro With A Keyboard Shortcut
The easiest way to delete measures in Guitar Pro is with the method that I just showed you. But let’s use some pictures to show you just how easy it is like I did with my other Guitar Pro guide on how to add chords.
By the way, to do the same thing in the Windows version of Guitar Pro, here’s the process:
1) To delete an empty measure, use Control + Delete
2) To insert a measure, use Control + Insert [INS]
1) Select the Measure You Want To Delete
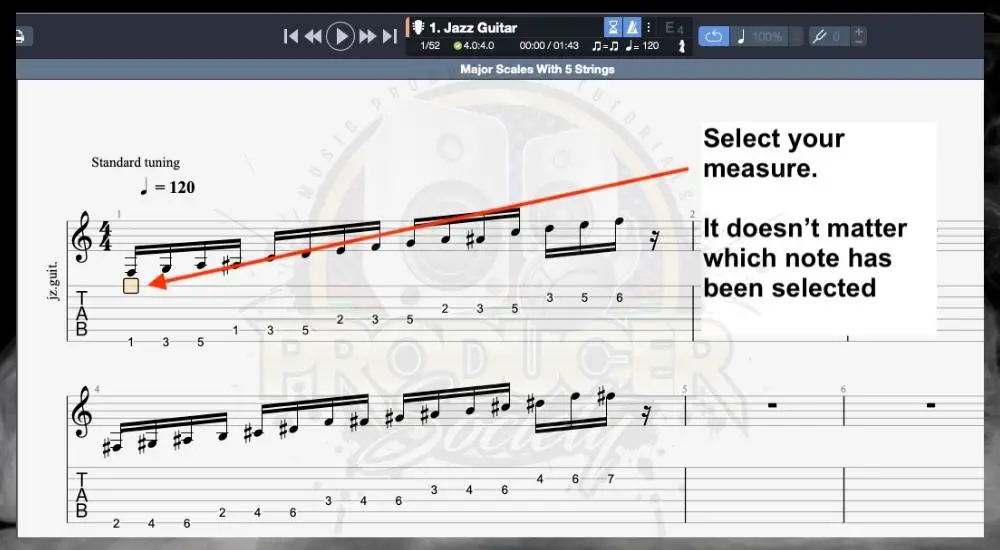
You’ll know that the measure has been selected by the little pale yellow box. It doesn’t matter what part of the measure has been selected. As long as one note has been selected in the measure, the keyboard shortcut that you’ll use to delete the measure will still work in the same way.
2) Press ‘Control’ and Then ‘-‘ to Delete the Measure
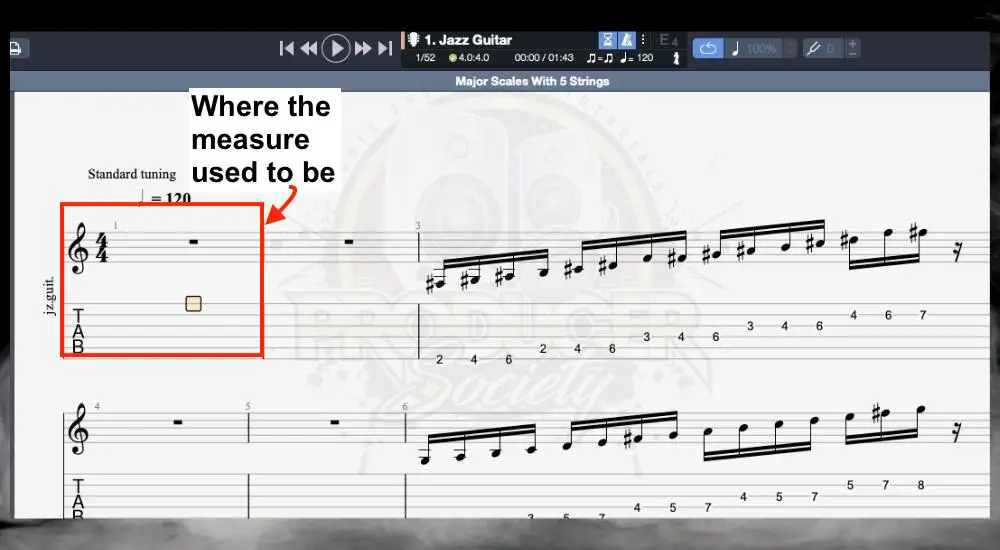
And that’s all she wrote for deleting measures in Guitar Pro. A very straightforward process, that much is for sure. However, there’s another way of going about it too which we’ll explore right now.
This is the toolbar method that nearly every editing software tends to have including Garageband (check out my list of GB keyboard shortcuts).
How To Delete A Measure Using The Toolbar
1) Select the Measure You Want To Delete

So it’s the same process as before. Select the measure with the little pale yellow box.
2) Click on “Bar” in the Toolbar
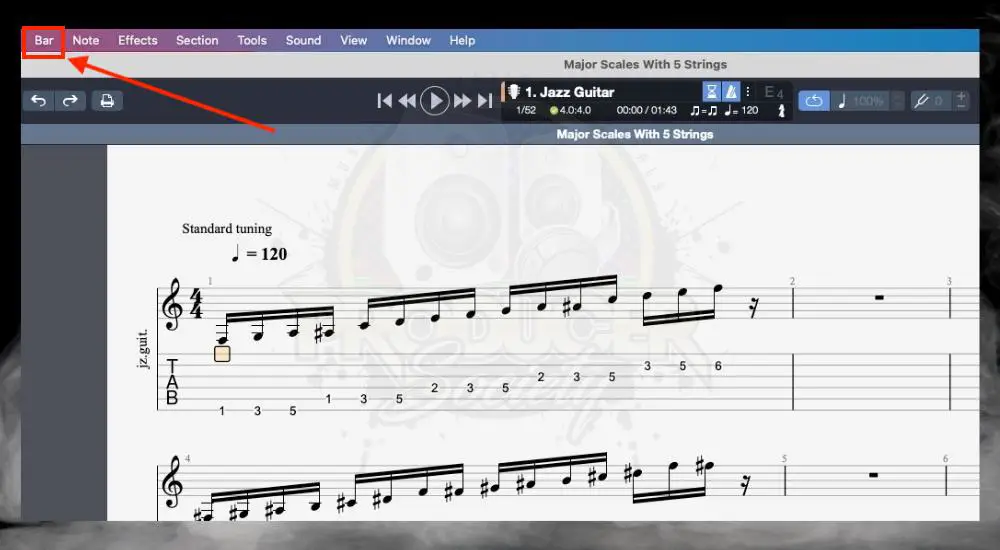
Click on “Bar” like what’s shown here.
3) Select “Delete Bar”
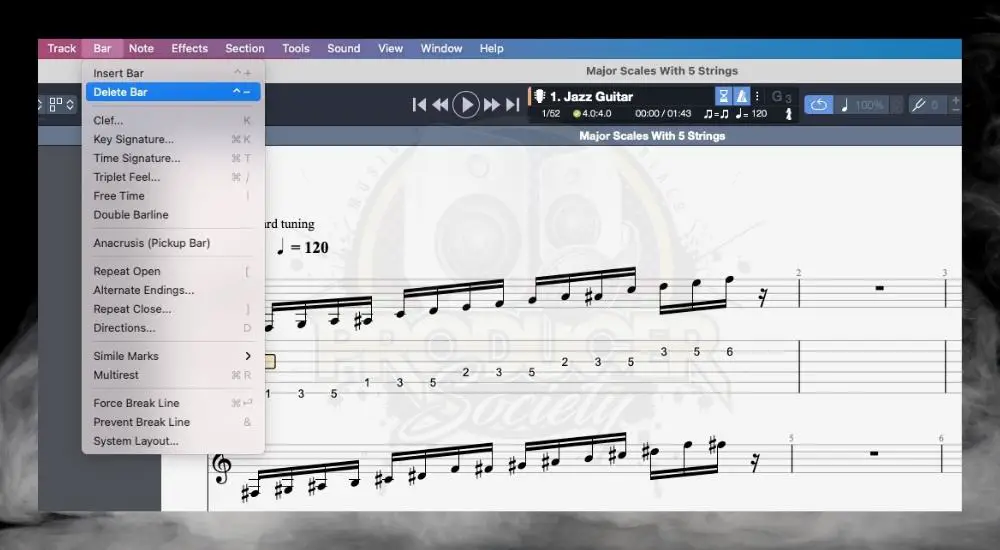
With your cursor on a note within the measure that you want to delete, click on “Bar” in the toolbar and then select “Delete Bar.” This will eliminate the bar as you’re trying to do.
Adding measures and bars in Guitar Pro is equally as easy. So let’s get into that too.
How To Add Measures in Guitar Pro?
To add measures and bars in Guitar Pro, first, have the measure selected from where you want to add a new one, and then use the keyboard shortcut, (Control + Shift + ‘+’). You can also click on “Bar,” and then select the option “Insert Bar,” which will do the exact same thing.
Another way of putting it is this: “^+” However, you’ll need to throw that “Shift” in there in order to make the addition sign.
Just like deleting measures, adding measures and bars is equally as simple, so no worries there. As I said earlier, there are a lot of little functions in Guitar Pro but if you use it every day, you can get a good handle on them.
How to Add Measures in Guitar Pro With A Shortcut?
1) Select the Measure From Where You Want to Add A Bar

2) Use (Control + Shift + ‘+’) To Add A New Bar
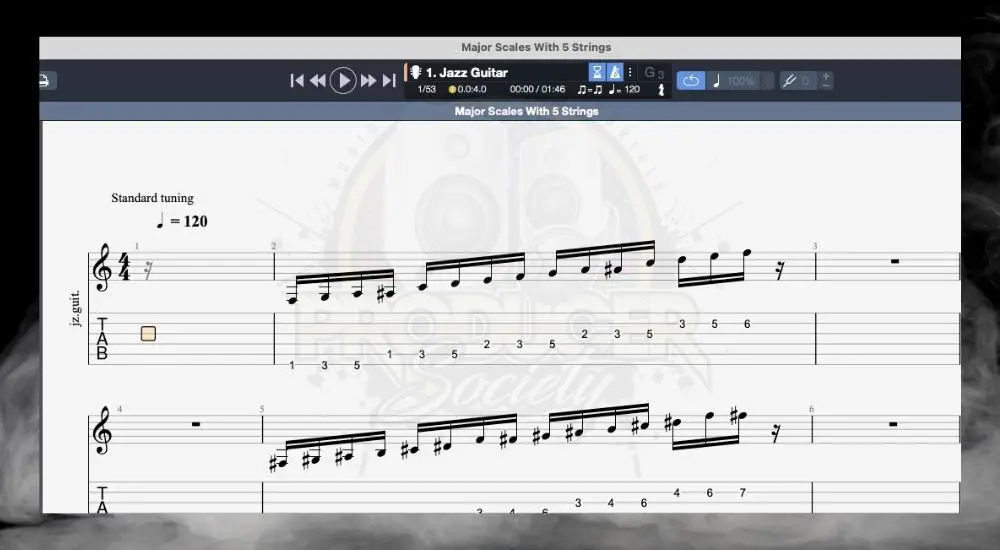
And that’s the easiest way of going about it. You can use this same command over and over again too and it’ll just continue adding measures for as long as you need to.
How to Add Measures in Guitar Pro With The Toolbar?
1) Select the Measure From Where You Want to Add A Bar

2) Select “Bar” and then “Insert Bar”
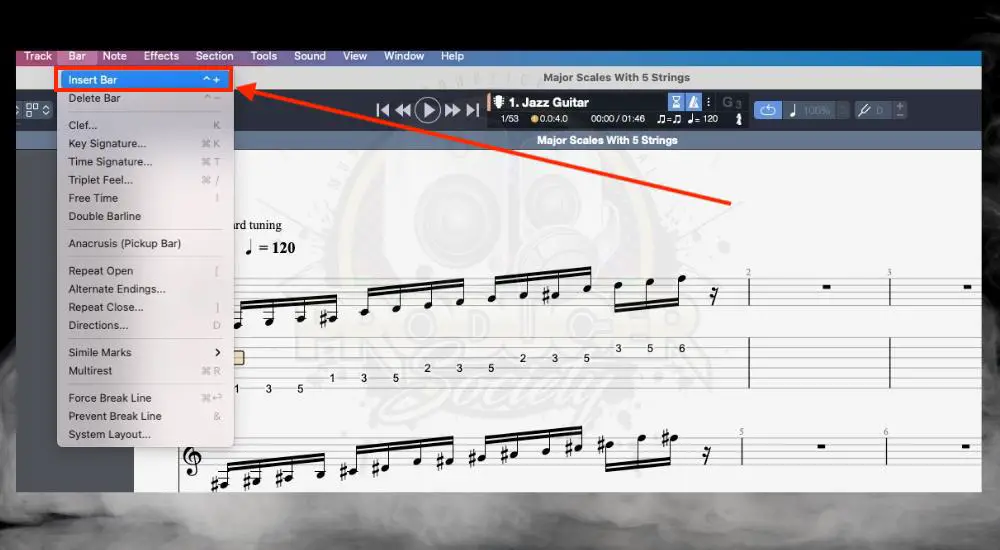
This is one way of going about it, but frankly, I’m not sure why a person would choose the toolbar method when you could just use the shortcut. That said, a lot of the shortcuts are hard to remember, so maybe that’s the reason why some people opt for it this way.
How Do You Do Alternate Endings in Guitar Pro?
To make alternate endings in Guitar Pro, click “Bar” in the top toolbar and then choose, “Alternate Endings.” With the part you want to use as an ending selected, choose which number from 1 to 8. If it’s the first ending, start with #1. If it’s the 2nd, choose #2, and so on.
1) With the Part of the Song Selected, Click “Bar” and then “Alternate Endings”
![Alternate Endings - How to Delete A Blank Measure in Guitar Pro [It's Easy]](https://travelingguitarist.com/wp-content/uploads/2021/12/Alternate-Endings-How-to-Delete-A-Blank-Measure-in-Guitar-Pro-Its-Easy-.jpg)
Click on “Bar” and then choose “Alternate Endings” with the measure selected that you want to use as an ending for your music.
2) Choose The Ending You Want To Use
![Alternate Endings 1) - How to Delete A Blank Measure in Guitar Pro [It's Easy]](https://travelingguitarist.com/wp-content/uploads/2021/12/Alternate-Endings-1-How-to-Delete-A-Blank-Measure-in-Guitar-Pro-Its-Easy-.jpg)
Like I said earlier, start with #1 if it’s the first time that you’re sending a piece of music or phrase of music after a repeat. If you want to repeat after another phrase and then use another bar, use #2 for the next alternate ending, and so on for as long as you need.
One thing I couldn’t find in my searches was a shortcut for alternate endings in Guitar Pro. It seems like one of the only functions where you have to set it up with clicking around in the toolbar, and not with a keyboard shortcut.
Either way, you can use this function to change things around for your practice session like what’s shown in my guide on how to practice on your own.
How Do You Do Grace Notes in Guitar Pro?
Making grace notes in Guitar Pro isn’t terribly difficult either, in fact, it just might be the easiest function that I’ve walked you through thus far. Here’s a brief explanation of how to do it and then an image that shows what this looks like in Guitar Pro.
To make a grace note (also called a ghost note) in Guitar Pro, select the note with the small, pale yellow cursor and then press ‘o’ on your keyboard. This will turn the note into a grace note. Press ‘o’ with the note selected again to turn it back to a normal note.
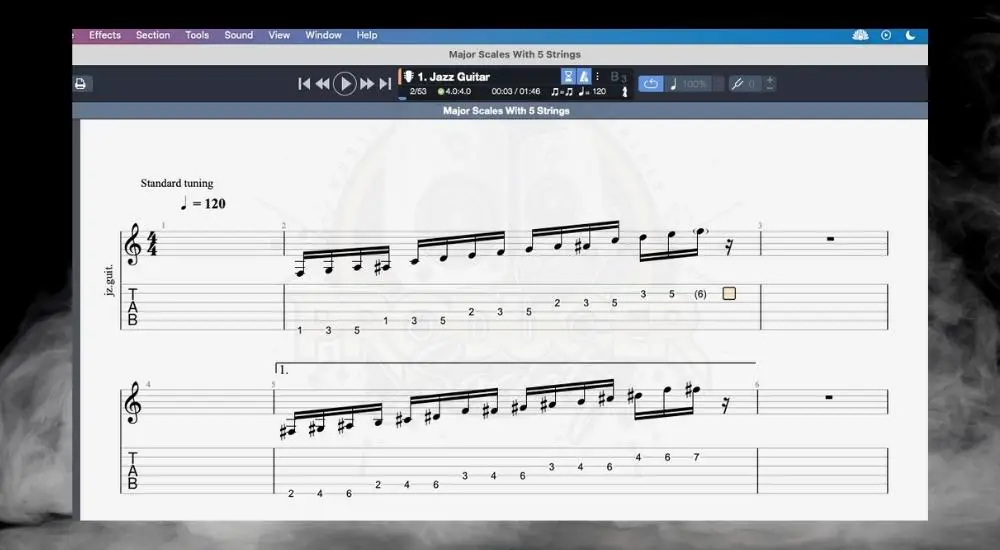
Grace notes and ghost notes are fairly similar to each other but there is a difference, notably, that one has a time value and the other one doesn’t. You can learn more about music theory terminology by signing up for Punkademic’s music theory course with an all-access pass.

 Written By :