 Written By :

I was stunned when I found out just how powerful MIDI technology is today. Virtual instruments can produce entire backing tracks and songs with professional audio quality. I love using my MIDI keyboard, but as it turns out, there are even more options available.
I recently discovered that I could use my guitar as a MIDI controller – and it works. It’s easy, quick, and affordable. And it doesn’t involve buying a JamStik or an external device, although, you can certainly do that as well (which we’ll talk about later).
To use your guitar as a MIDI controller, download Jam Origin’s MIDI Guitar 2. Install it, configure your audio interface, select “Virtual MIDI Output,” then open your DAW. Choose your VST and use your guitar as a controller. Make sure to enable “Bends” so you can use vibrato and bends as well.
No worries if you run into some issues with this because I have a full tutorial below both for GarageBand and a catch-all tutorial for all DAWs. And besides this, I’ve listed six alternative ways to use a guitar as a MIDI controller, so you can create new music in the most fun way possible, and without a MIDI keyboard.
MIDI Guitar 2 for GarageBand (and How to Use It)
MIDI Guitar 2 for GarageBand is how I was first exposed to the MIDI Guitar 2 – which is the version that works in all DAWs (although MIDI Guitar 2 for GarageBand seems to work just fine for FL Studio).
This plugin – which also works as stand-alone software – is really a great tool that works pretty well considering what it’s doing. The easiest way to set it up is the following:
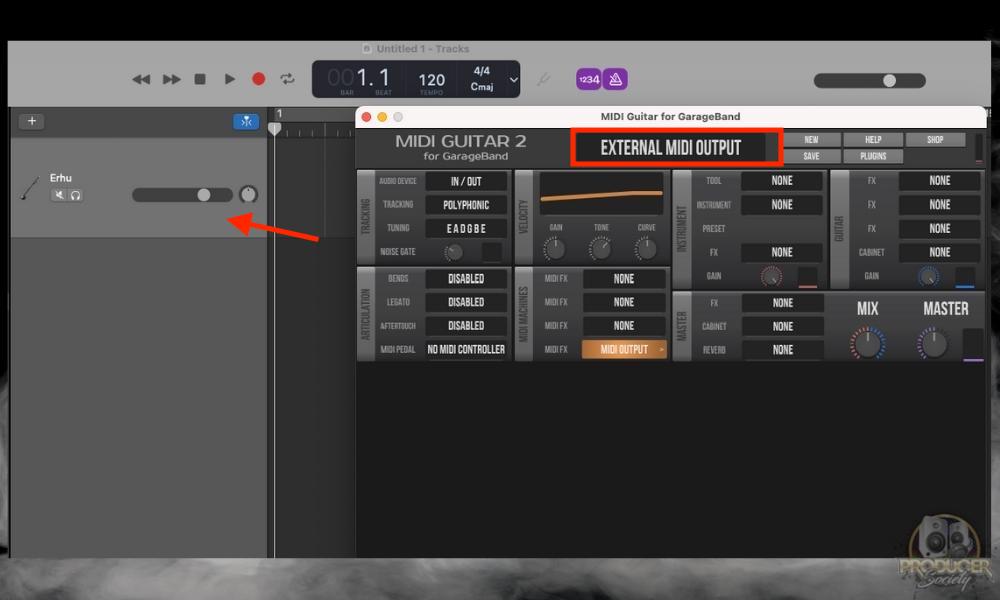
To use the MIDI Guitar 2 for GarageBand, download it from the App Store, open the software, choose “External MIDI Output” in the center console from its list of options, and then choose a software instrument. While simple to use this way, it has its limitations.
The first limitation is that it doesn’t respond perfectly to vibrato, but it is sufficient. Another thing is that the velocity control isn’t 100% either. But ultimately it’s a great tool and I love using it.
The best way of using it is via the plugin option, which I’ll show you how to do right now. The other way is via the “External MIDI Output” method, which is the fastest, but it’s not the best option.
How to Use MIDI Guitar 2 As A Plugin (The Best Way)
1) Download MIDI Guitar From Jam Origins

To get your hands on the MIDI Guitar 2 free trial, just head to their website at this link and then click on the Windows icon if you’re using a PC or macOS if you’re using macOS. They also have them for iOS devices if you need them.
2) Connect Your Guitar to an Audio Interface (Scarlett 2i2)

You don’t have to get the Scarlett 2i2 which I got on Amazon, but it’s practically the industry standard for beginner music producers at this point.
So you won’t go wrong by choosing this one, nor will you go wrong if you get the guitar I have, the PRS SE Custom 24, which is what I’m using for this tutorial.

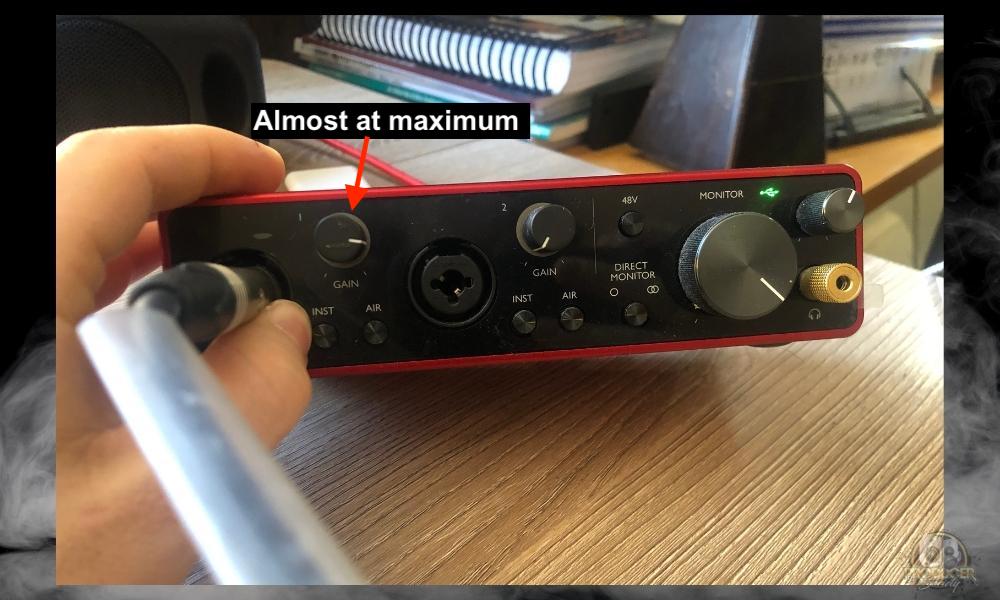
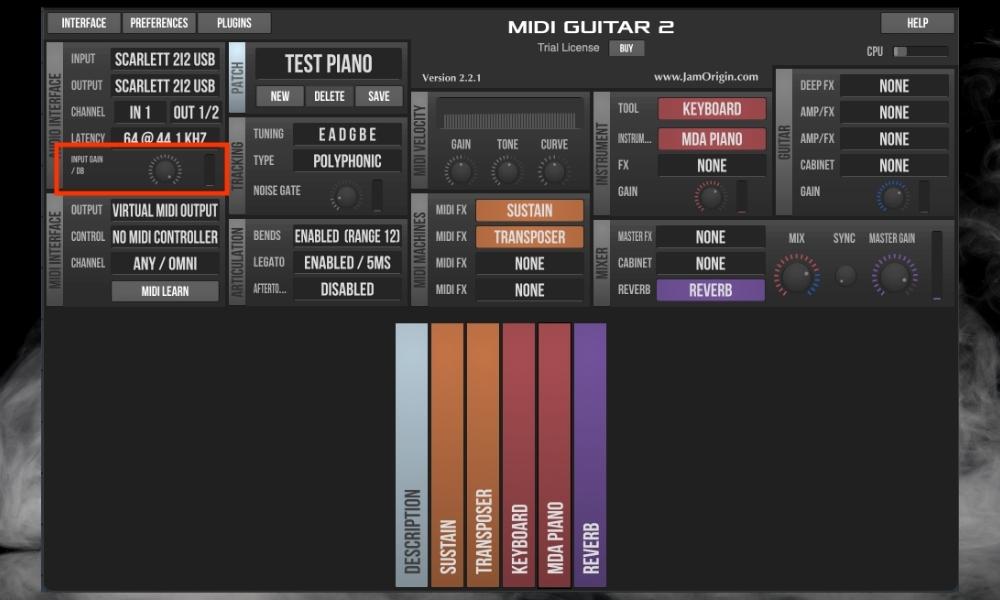
Increase the Gain Almost to the Max
This is an important part of the process. Increase the gain on your audio interface as much as you possibly can without it going into the red. The image below is what I have mine set at.
3) Configure the Settings/Preferences in GarageBand
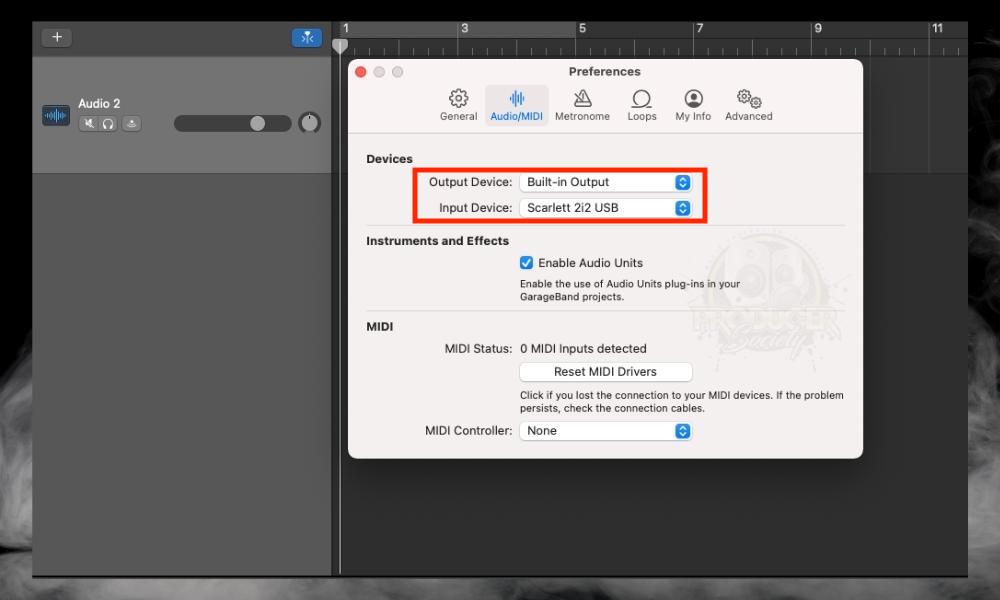
To configure your settings, you just have to do what I already showed you. This is to go into your Preferences on the left-hand side of the GarageBand interface.
Then choose Audio/MIDI, and then select Scarlett 2i2 for your input device, and your Built-in Output for your output device. The next thing you want to do is a bit tricky and it took me a moment to figure it out with the help of their website.
4) Open An Audio Track And Open MIDI Guitar 2 As A Plugin
Delete the old Audio Track that first pops up when you open a new project. Use (Option + Command + A) to bring up a new Audio Track.
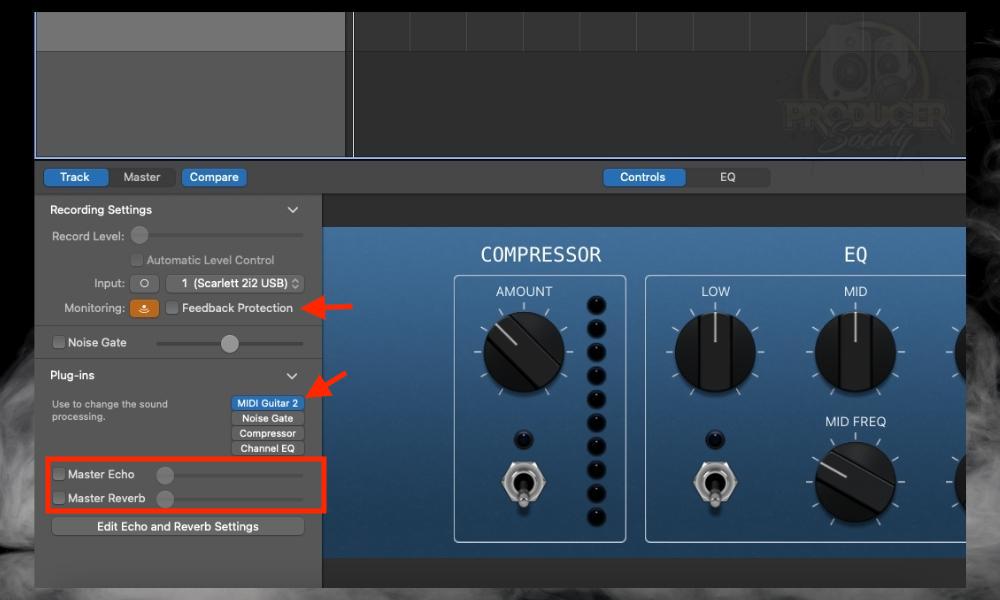
Turn the Feedback Protection off and then disable all of the effects as well, including the stock Channel EQ, the Master Echo, and the Master Reverb. We don’t want any other effects running on it.
When you’re done with that, click on the top plugin slot and then open the MIDI Guitar 2 plugin, ie, Audio Units > Jam Origin > MIDI Guitar 2.
By default, it won’t be ready to go yet but you’ll notice that it has already started to pick up on sounds.
5) Enable the Recording Option
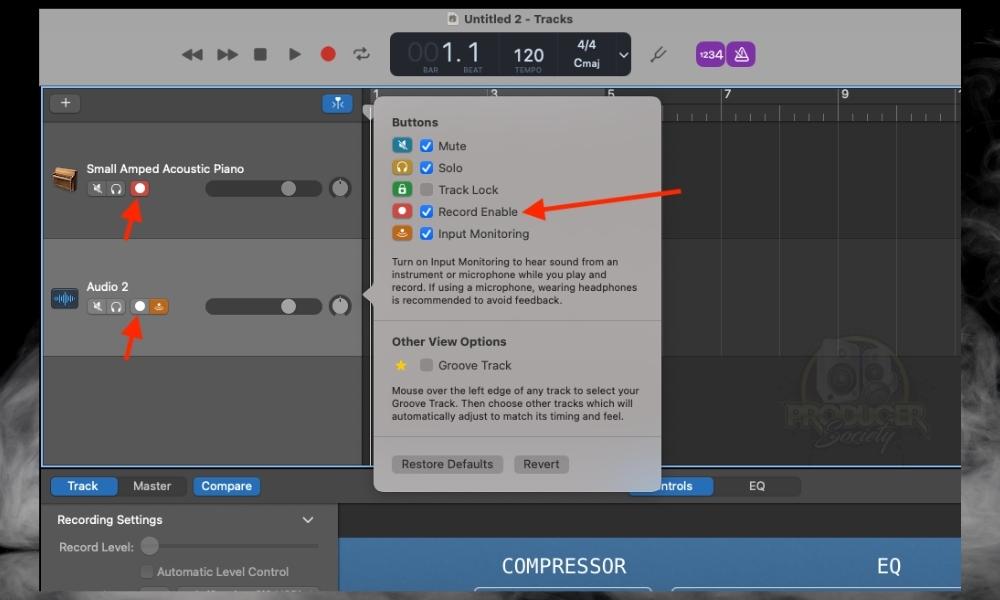
Right-click on the track header (or press Option + T), then check off the box that says “Record Enable.” This will allow you to record two tracks simultaneously. It’s crucial for getting MIDI Guitar 2 to work.
6) Bring Up A Software Instrument Track
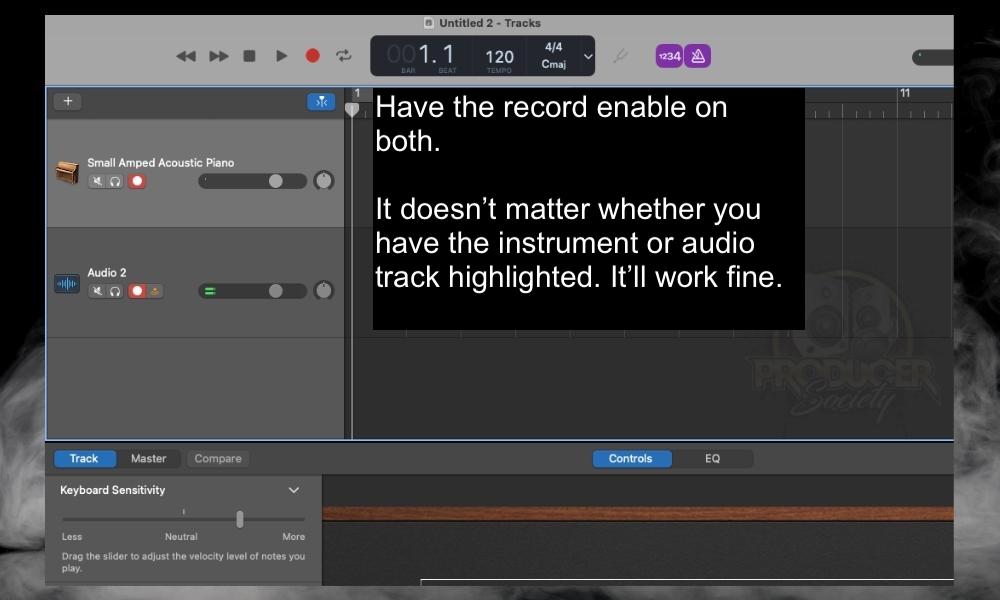
Bring up the software instrument track of choice, and then hit the Record Enable option on both the Software Instrument track as well as the Audio Track. Also, ensure you’ve turned on the Monitoring button as well, otherwise, you won’t hear anything.
7) Enable Bends (Range 2) or (Range 4)
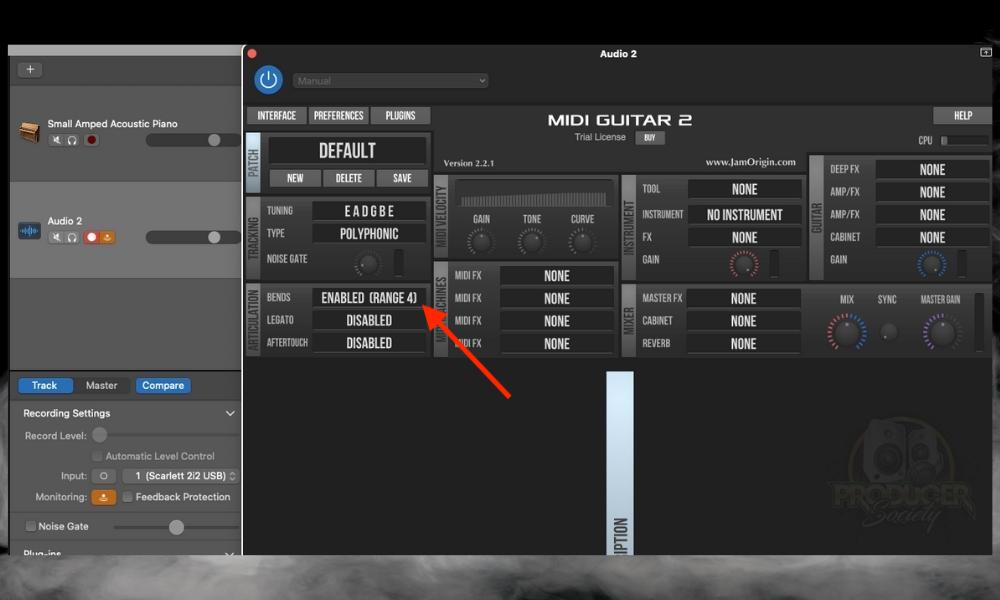
Unless you want to run into the annoying problem of not being able to bend the notes, enable the Bend (Range 2) option. This is a lifesaver if you’re the type of player who can’t help but bend and do a lot of vibratos.
Go up to Range 4 if you want to do bends. I didn’t even realize it was capable of this until I looked around more online. This is a game-changing feature, in my opinion, and it makes buying it totally worth it, in my opinion.
How to Use MIDI Guitar 2 In GarageBand Without the Plugin
Follow Steps 1, 2, 3 from Above
As I said earlier, using it as a stand-alone device isn’t as good. But the option is there if you need it, particularly if you’re having trouble getting it to work in other DAWs.
4) Open MIDI Guitar 2 for GarageBand
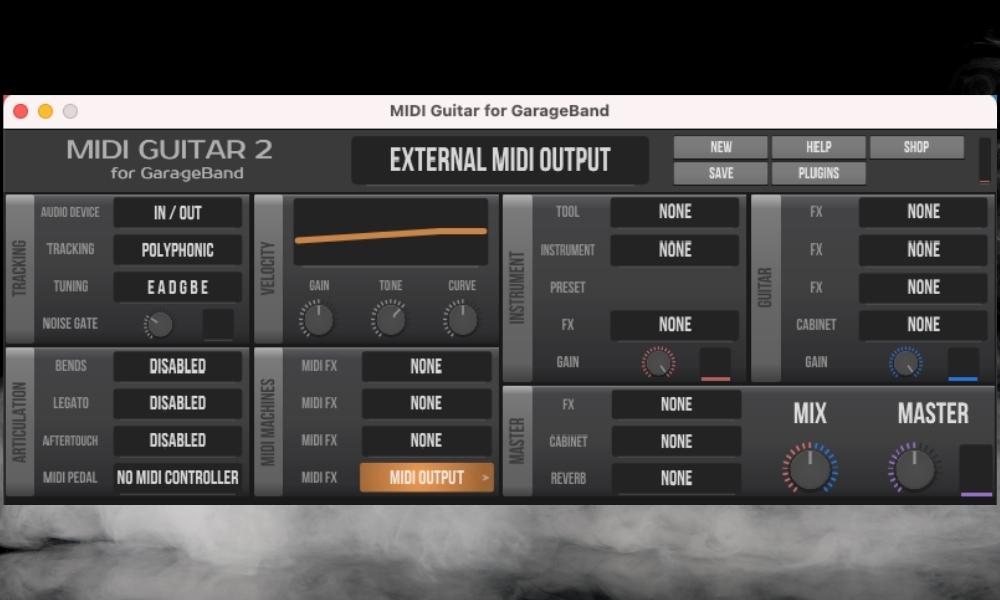
5) Select “External MIDI Output”
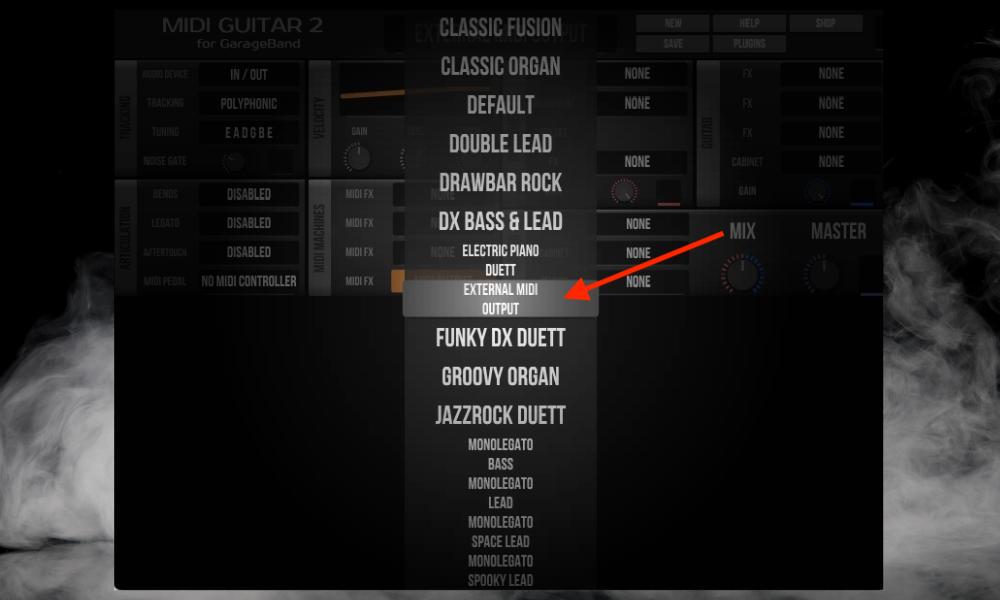
To find the “External MIDI Output” option, you have to click on the list of options at the top-center of the MIDI Guitar 2 interface.
It’ll bring up the menu that you see above, and then you can select it from the list. It actually took me a moment to figure out.

I forget where I finally found out how to do it, although, I know that the guy from GarageBand and Beyond has a video on it here. There are a few other users on YouTube who have tutorials on how to use it.
6) Select the VST You Want to Control
This part is also important because you want to make sure you’ve chosen a VST instrument and not an Audio Track. If you choose an audio track, you’ll only have the ability to use the MIDI Guitar 2 as a stand-alone device.
If you’ve chosen to use it without GarageBand or a DAW, you’ll have a limited amount of options to use. You can see just a few of the options available as a stand-alone VST in the image shown in the previous section (#5 in this tutorial).
How to Use MIDI Guitar 2 (for All DAWs)
MIDI Guitar 2 is compatible with most DAWs on Windows and macOS. I’ve written this as a general guide that should help you set it up properly on any DAW.
I can’t say that I’ve used it in Cubase, Pro Tools, or any of those DAWs, but I can confirm that it does work in GarageBand, Logic Pro X, and FL Studio.
I also know they have support for all of the aforementioned software. Although, as a plugin, it doesn’t work the best in FL Studio, unfortunately.
1) Download the MIDI Guitar 2 Free Trial from their Site
Head to Jam Origin’s download page and download the MIDI Guitar 2 free trial for your macOS version (it’s available for iOS too). Once downloaded, run the setup file to install the software on your computer.
I recommend following through with the default installation settings, but in case you store your plugins in a different folder, you can change the installation location. That said, I just move it over to my external Samsung T5 SDD.
2) Connect Your Guitar to Your Audio Interface

Now that MIDI Guitar 2 is installed, set up your signal chain properly by connecting your guitar to your audio interface and setting the appropriate input levels.
Your guitar shouldn’t clip, but it should be as loud as possible, which goes against the advice that you would normally hear if you just wanted to connect your guitar like normal.
In my experience thus far with MIDI Guitar 2, it isn’t advanced enough to pick up on complicated strumming patterns.
But it is surprisingly good at fast legato and alternate-picking runs. Another limitation is that it doesn’t do the best with palm muting, but I digress.
Because you probably won’t be strumming hard, you can turn up the gain on your audio interface as much as possible without going into yellow or red. Here’s what my setting looks like and it works great for controlling synths.
If you’re not sure about setting the input gain right, try this: Palm mute the lowest string and chug some notes.
Now slowly increase the gain until your interface has a red light to indicate clipping. Then just decrease it a little bit. If you’re a really aggressive picker, you’ll have to turn it down more to accommodate for that.
3) Open Your DAW – Do A Plugins Scan If You Can’t Find It
In some cases, you’ll have to do a plugin scan in your DAW to find it. FL Studio has the ability to do this, as I’m sure other DAWs do, and that’s how I was able to finally find the plugin.
To do a plugin scan in FL Studio, open your DAW and then click Options > Manage Plugins > Find Plugins. One thing I have noticed though is that MIDI Guitar 2 has some problems running in FL Studio as a plugin.
4) Start A New Project & Open MIDI Guitar 2 As A Plugin
![FL Studio Interface with MIDI Guitar 2 Open - How to Use Your Guitar As A MIDI Controller [Full Guide]](https://travelingguitarist.com/wp-content/uploads/2022/04/FL-Studio-Interface-with-MIDI-Guitar-2-Open-How-to-Use-Your-Guitar-As-A-MIDI-Controller-Full-Guide.jpg)
To test MIDI Guitar 2, open up your DAW of choice with a fresh project. Load up a new track, and then open the MIDI Guitar 2 interface which looks like what you can see in the image above.

Open up your channel rack with fn + F6 or just F6 if you’re using Windows, and then open the plugin that way, or you can use the mixer like what they show right on the Jam Origin website in the video.
![MIDI Guitar 2 - How to Use Your Guitar As A MIDI Controller [Full Guide]](https://travelingguitarist.com/wp-content/uploads/2022/04/MIDI-Guitar-2-How-to-Use-Your-Guitar-As-A-MIDI-Controller-Full-Guide.jpg)
Go through the Help section if you want a detailed walkthrough of everything the plugin can do, but I’ve cut it down to the basics below.
5) Test To Ensure Your Guitar Is Working With MIDI Guitar 2
![MIDI Guitar 2 - How to Use Your Guitar As A MIDI Controller [Full Guide]](https://travelingguitarist.com/wp-content/uploads/2022/04/MIDI-Guitar-2-How-to-Use-Your-Guitar-As-A-MIDI-Controller-Full-Guide-1.jpg)
The ‘Default’ preset won’t produce any sound, but it’s a good way to send MIDI to another virtual instrument (more on that later).
First, click on the preset menu and select the ‘Test Piano’ preset. This is the most basic preset, but it’ll help you get a feel for the MIDI instrument.
It’s a simple piano sound, but it works smoothly. After you’re done testing that, try out some of the other presets to see which one inspires you most. I liked ‘Drawbar Organ’ and ‘Strum, I’ll Sing For You’.
6) Optimize Your Settings For Max Performance
Once you’ve confirmed that everything is working well with your plugin, you should optimize the settings for the best low-latency performance and better tracking.
A) Optimize Your Audio Interface

First, set your audio interface settings to an appropriate level. For reference, I use a 44.1kHz bitrate with a 64 sample buffer for the lowest latency of ~5ms.
I have an Intel i7 on Windows, so depending on your computer specs you may need to increase the buffer size to 128/256.
Just make sure that there are no audio pops or glitches while playing. If there are, it means your CPU is likely unable to handle the load, so you will need to increase the buffer size again.
Also, make sure to close any running apps besides your DAW to improve performance. Now, click on INTERFACE inside the MIDI Guitar 2 plugin. You should see some information about the latency.
If it’s lower than 3ms, that’s great but lower than 5ms is good too. But more than 5ms means you’re going to hear a noticeable delay while playing.
B) Check The Tuning And Tracking Mode
![Set Your Tuning - How to Use Your Guitar As A MIDI Controller [Full Guide]](https://travelingguitarist.com/wp-content/uploads/2022/04/Set-Your-Tuning-How-to-Use-Your-Guitar-As-A-MIDI-Controller-Full-Guide.jpg)
Next, you have to check the tuning and the tracking mode in the interface. Next to ‘Tuning’, select your guitar’s current tuning. It’s set to Standard (E A D G B E) by default, but you can select from various tuning presets or enter a custom tuning.
In other words, if you have your guitar tuned to Eb standard, as I do with my PRS SE Custom 24, MIDI Guitar 2 will account for that.
It’s worth stating again that you need to set the tuning in the MIDI Guitar 2 interface if you are tuned differently than the E standard.
Now click on ‘Type’ and select either Polyphonic or Monophonic. I recommend Polyphonic most of the time, as it allows you to play chords and fast scale runs and use most guitar techniques with ease. The tracking is relatively stable as well.
But if you face any issues, then try Monophonic. You won’t be able to play chords (my guide on the best ones to learn, by the way), but you can still play single-note lead lines.
This is more like a monophonic synthesizer if you’ve ever played one. The tracking is a bit more stable than Polyphonic in this mode.
C) Set The Noise Gate Properly
The final step is to set the noise gate properly. This varies entirely from guitar to guitar, and also depends on your audio interface. Personally, I just set the noise gate right in the MIDI Guitar 2 interface.
But a thumb rule is: even if you pick very lightly or play some legato/tapping on your guitar, those notes should still ring through the plugin.
If you find that these faint notes aren’t being picked up, lower the noise gate. But if you find erroneous notes being played again due to noise, then increase the gate just a little bit.
This will make your guitar DI more consistent, and help track better performances with more accurate audio-to-MIDI conversion. You can use any free comp, including a DAW factory plugin.
Use MIDI Guitar 2 With Other Virtual Instruments
Now that you’ve got MIDI Guitar 2 working perfectly with low-latency tracking, it’s time to combine this with other virtual instruments you own to make full use of its power. My usual FX signal chain inside my DAW looks like this:
Noise Gate > MIDI Guitar 2 > Virtual Instrument 1/2/3/4
That’s a bit complex, as I split the output from MIDI Guitar 2 onto various different plugins to combine all of their sounds and features. But for simplicity, you can just use a single virtual instrument.

If you have Logic Pro X, you already have some great virtual instruments built-in that you can use. Since the output from MIDI Guitar 2 is a simple MIDI signal, you can send it to anything that receives MIDI, including a hardware synthesizer or even a drum kit.
Try it with some orchestral instruments like a violin, cello, saxophone, flute, etc., and inspire yourself to play some innovative musical ideas. Use some of the chords I used in my article on the most beautiful chords and then you’re set.
Using A JamStik Guitar MIDI Controller Instead

If you don’t want to use your own guitar as a MIDI controller, you can get a specialized one from JamStik. They have two products – the JamStik Studio MIDI Guitar, which is a full-fledged, 24-fret headless guitar with MIDI pickups.
Their other product is the JamStik Guitar Trainer, which is a much smaller, portable guitar with only 7 frets. It’s a great learning tool, but also great for translating simple chords and melodic ideas into MIDI. Here’s a quick tutorial on using it.
1) Connect Your JamStik To Your PC, Mac, or iOS Device
The JamStik can be connected to any Windows, Mac, or iOS device. It works via both Bluetooth and USB. For detailed guides on connecting it to your system, check this support article.
2) Visit the JamStik Portal or Use The App
After connecting your JamStik, visit their online portal to download any firmware updates and get started with using it. You can also use the iOS app.
3) Use It In A DAW Or A Third-Party App
Once you’ve set up and connected the JamStik, you can use it with several DAWs, including Logic, Cubase, REAPER, FL Studio, Pro Tools, and more. You can check the full DAW compatibility list.
Since it’s a MIDI controller, you can use the basic MIDI functions inside most apps and even with external hardware like synthesizers. Some of them will also support MPE (MIDI Polyphonic Expression), allowing for better, more spontaneous performances.
Alternatives To The JamStik
There are a lot of options for guitar MIDI controllers, so here are some of the best alternatives to JamStik:
A) Jammy Guitar
The Jammy E and G are two MIDI guitar controllers worth looking at, similar to JamStik. They’re very portable, feature 15 frets, and they track well with low latency. The fretboard sensors and onboard volume control help make it good for live usage too.
B) Artiphon Instrument One
The Artiphon One is an innovative instrument, as it’s shaped like a guitar but it doesn’t have real strings. It works wirelessly and is a great way to make MIDI music for non-guitarists. The learning curve is quite easy for beginners.
C) Fishman TriplePlay Pickup
The TriplePlay pickup by Fishman is one of the best ways to turn your existing guitar into a MIDI controller, as it can be retrofitted on just about any guitar body, and it picks up your playing with very good accuracy and low latency.
D) Roland GK-3 Pickup
The Roland GK-3 is one of the oldest MIDI pickups, and can also attach to most guitars. But it requires a compatible Roland pedal, such as the GR-55 or new SY-1000. If you’re looking for synth-focused tones, this is a great option.
E) MiGiC
MiGiC is an audio-to-MIDI conversion software similar to Jam Origin’s MIDI Guitar 2. Its interface is sleek and easy to use, and the tracking works well. It’s a somewhat cheaper option that still works decently well.
Things to Note While Using Your Guitar As A MIDI Controller
1) MIDI Guitar 2 Isn’t That Stable With FL Studio
This is something even the people at Jam Origin say on their site. It should work just fine for any other DAW though. I know that it works great for GarageBand, Logic Pro X, and there is support for many other DAWs too.
That said, you can also use MIDI Guitar 2 as a stand-alone device and then set the External MIDI Output as I showed you earlier. It won’t work as well, however.
2) Latency Depends On Your Computer and Audio Interface
If you’re facing too much latency while playing and you don’t know how to fix it, remember that it depends on both your computer and the audio interface you’re using. Upgrading to a better audio interface, and upgrading your CPU/RAM on a desktop (or a new laptop) can do wonders.
Ideally, I recommend a round-trip latency of <5ms, as the MIDI software conversion will also add some latency. Anything beyond 10ms, and you’re likely to notice the lag while playing.

