The MXR 10-band EQ is a popular choice among guitarists because it can take your guitar tone to the next level. It’s really crazy what you can accomplish with a basic EQ pedal. That said, guitarists are often unable to see the opportunities it presents and therefore struggle to use it at its potential.
Some just forget about it (like me). After coming to my senses though, I made this tutorial which shows you everything you can do with an EQ pedal. But first, let me give you a quick run-down of how I like to use the MXR 10-Band EQ.
To use the MXR 10-band EQ pedal, connect an 18V power adapter and then connect your guitar to its input and your amplifier to the output. Push the sliders to 0. To start, press the footswitch to turn it on, then increase the high-end and the low-end gently while keeping the mids the same.
This isn’t the only thing you can do. An EQ pedal can completely transform your guitar and amplifier if you use it right. You could take a Les Paul and make it sound like a Strat with the right settings. Or take a Marshall and turn it into a Mesa Boogie. Let’s get to it then.
Complete Guide To Using The MXR 10-Band EQ
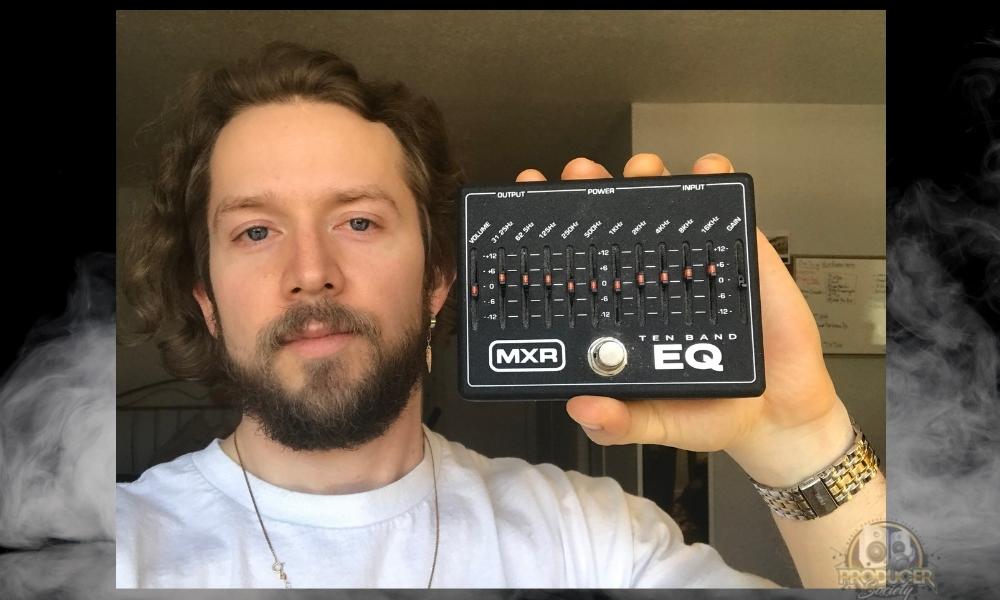
How to Power the MXR 10-Band EQ
A) Connect a Compatible Power Adapter to the Power Jack At the Front of the Pedal
To power the MXR 10-band EQ pedal, you’ll need an 18-volt DC power supply. MXR includes the Dunlop ECB004 18-volt adapter with the pedal, so you probably have that already.
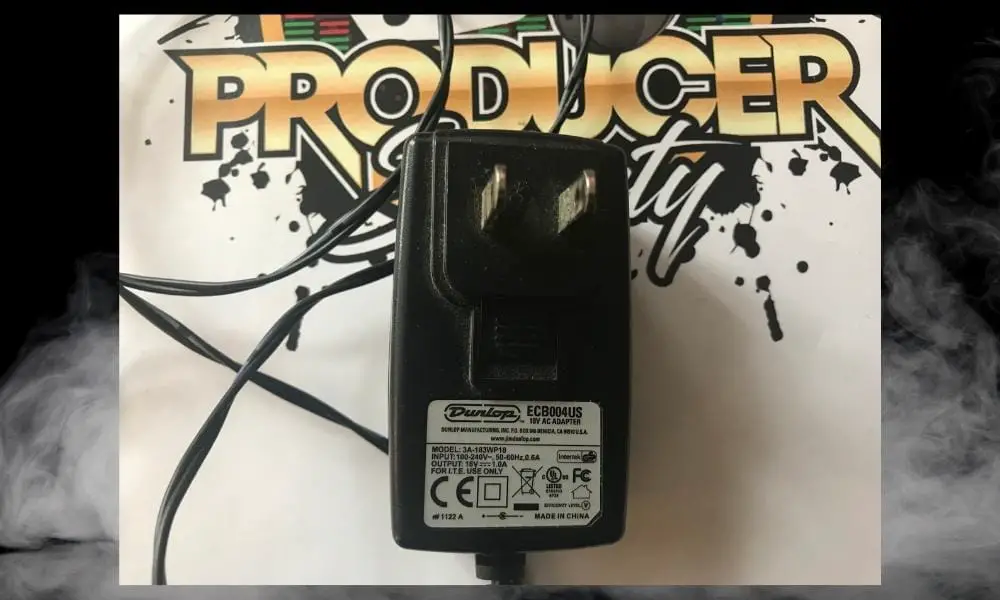
You can also use a DC Brick, Iso-Brick, or Mini Iso-Brick power supply, according to the manual which you can find here. I currently use the 18V port on the MXR Isobrick M238 which I got on Amazon.
I wouldn’t recommend running it on a 9V power supply or anything less than 18V, as it’ll cause the output to be lower and noisier, there’ll be less headroom, and it can potentially damage the pedal.
Also, if you’re running it as part of a pedalboard, you should use an isolated power supply for the MXR EQ, or else you’re likely to get a lot of noise. I do not recommend using a daisy chain with this pedal and it doesn’t use batteries either.
![MXR Connected to the Isobrick - How to Use the MXR 10-Band EQ [Dedicated Tutorial]](https://travelingguitarist.com/wp-content/uploads/2022/04/MXR-Connected-to-the-Isobrick-How-to-Use-the-MXR-10-Band-EQ-Dedicated-Tutorial.jpg)
B) Connect Your Guitar to the Input and an Amplifier to the Output
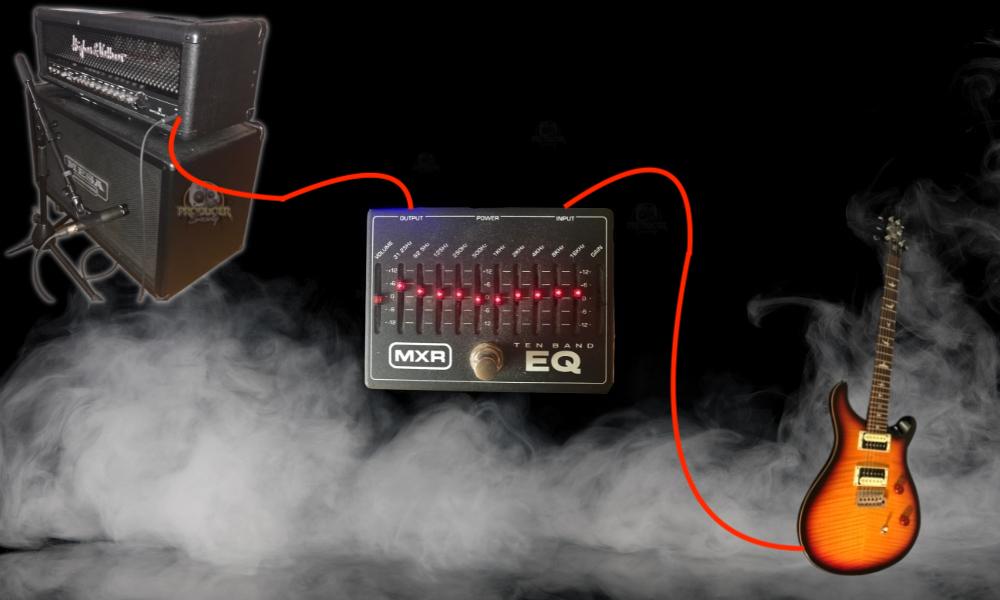
Both the input and output jacks are on the top of the pedal. If you’re using the EQ in a pedalboard with several other pedals instead, connect the previous pedal’s output to the input of the EQ, and the output of the EQ to the next pedal. I usually put the noise gate first, before the EQ pedal.
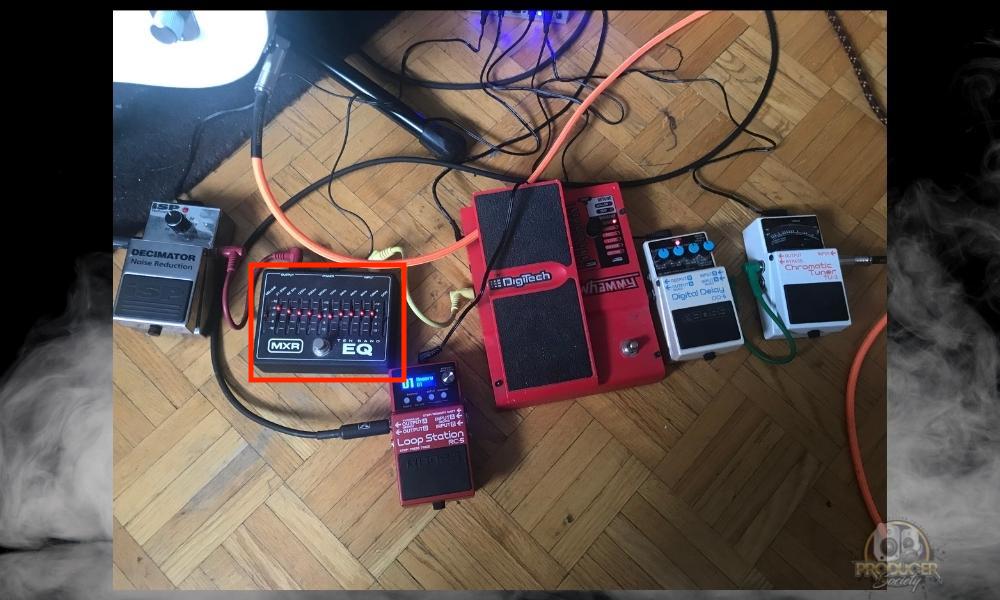
EDIT: my current signal chain is: Amp > Reverb > EQ > Drive > Compression [Looper > Flanger in FX Loop]. Because EQ is a dynamics processor, you’ll want it close to the beginning, but not totally. Just don’t put it at the end like reverb/chorus.
C) Press the Footswitch to Turn the Pedal On and Adjust EQ
When you press the footswitch, the pedal will turn on, and the LEDs on the faders will light up blue (or red if you have the old one) to indicate this. You can now adjust your EQ as I discuss below.
How To Use the MXR 10-Band EQ’s Basic Controls
The MXR 10-band EQ works just like most other graphic equalizers, and it’s very easy to use. Once you’ve connected everything and turned the pedal on, the LEDs on the faders will light up blue/red.
This helps you visualize their position as an EQ curve, especially on dark stages where there is no light. Each fader can add 12dB of boost or cut it. The available frequency ranges are (all in Hz):
31.25, 62.5, 125, 250, 500, 1K, 2K, 4K, 8K, 16K
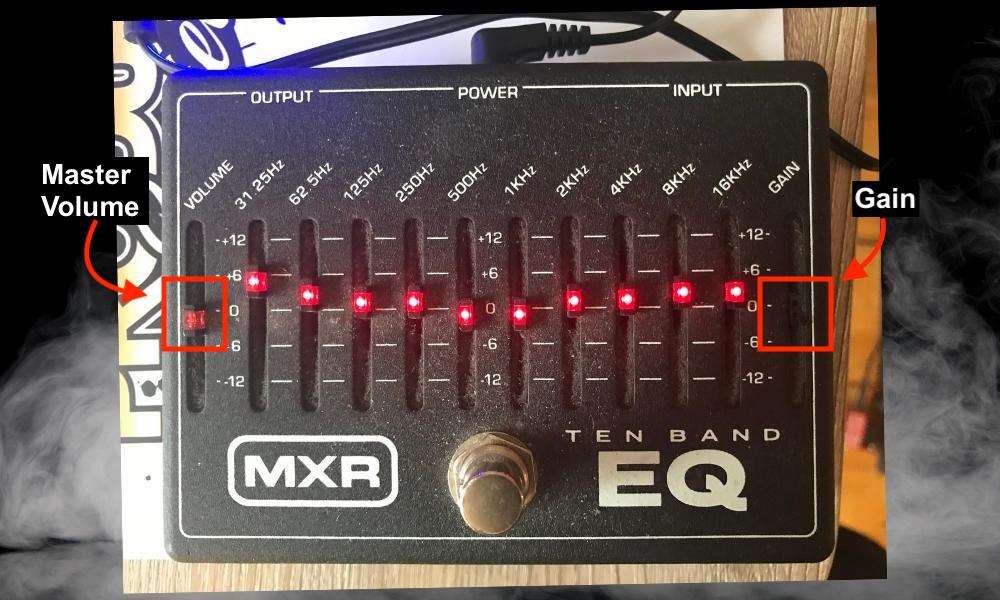
On the left, you’ll find the master volume fader. This will control the overall volume output without adding any gain/distortion and can add/cut 12dB of volume. On the right, you have the gain fader.
This can add or cut 12dB of gain and will help shape the overall gain structure of your tone (as I discuss below). To use the EQ pedal, just play a chord on your guitar and adjust the faders one by one until you get the tone you’re looking for.
The thing about this pedal is that it sounds better pretty much the moment you turn it on, however, the newer M108s is a quieter unit.
If you’ve ever used an EQ plugin like the Fab Filter Pro Q-EQ, this will be similar. And even if you’ve only used an amplifier EQ before, this pedal works quite similar but it’s a bit more surgical.
To better understand the 10 EQ faders on the pedal, I’ve broken it down into four broad sections:
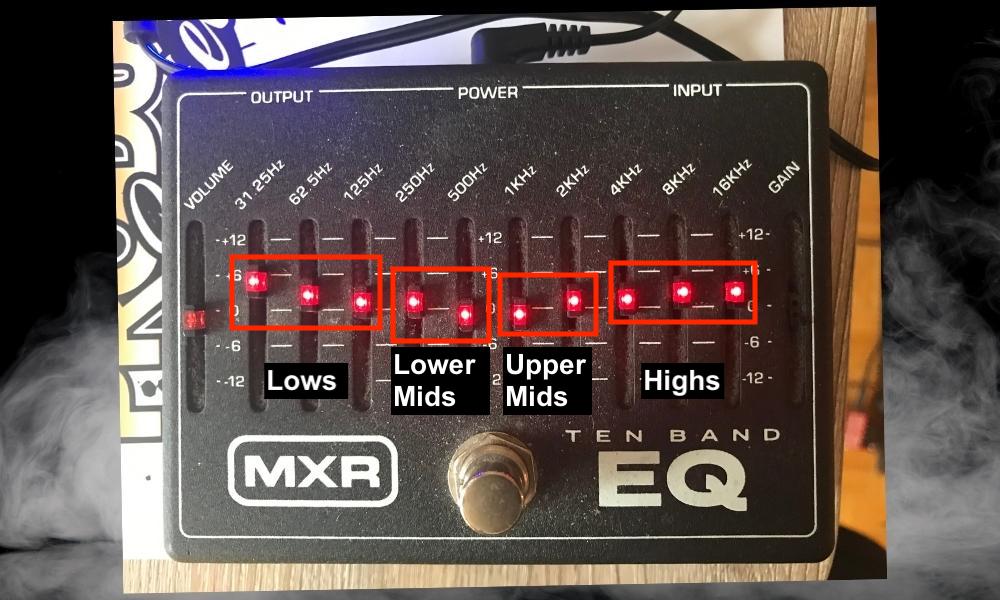
Lows: 31.25, 62.5, 125 (Bass frequencies)
Lower-mids: 250, 500 (the muddiness region)
Upper-mids: 1K, 2K (for more attack)
Highs: 4K, 8K, 16K (sparkliness)
By visualizing these four sections, you can shape your tone accordingly. If you’re going for a classic scooped tone, try lowering both the mids and boosting the highs and lows a bit – Guitar World has an article on this as well.
Some consider 16K as ‘air’, as it’s too high to be heard in most cases and won’t necessarily have a major impact on most tones. And the region below 60Hz is generally referred to as ‘sub-bass’ and guitars generally don’t go that low either.
That said, adjusting these frequencies will make a difference, in my opinion. You can definitely get some more bass and sparkle into your tone by adjusting the lowest and highest parameters on the MXR 10-Band EQ.
It’s worth stating that an EQ pedal like this one is very powerful based on how you use it and where you place it in the signal chain. And if you have a parametric EQ pedal, you could potentially combine the two for even better, more accurate tone shaping.
How to Use the MXR 10-Band EQ As An Overdrive Pedal
1) Set the Faders To Zero First To Get A Clean Start
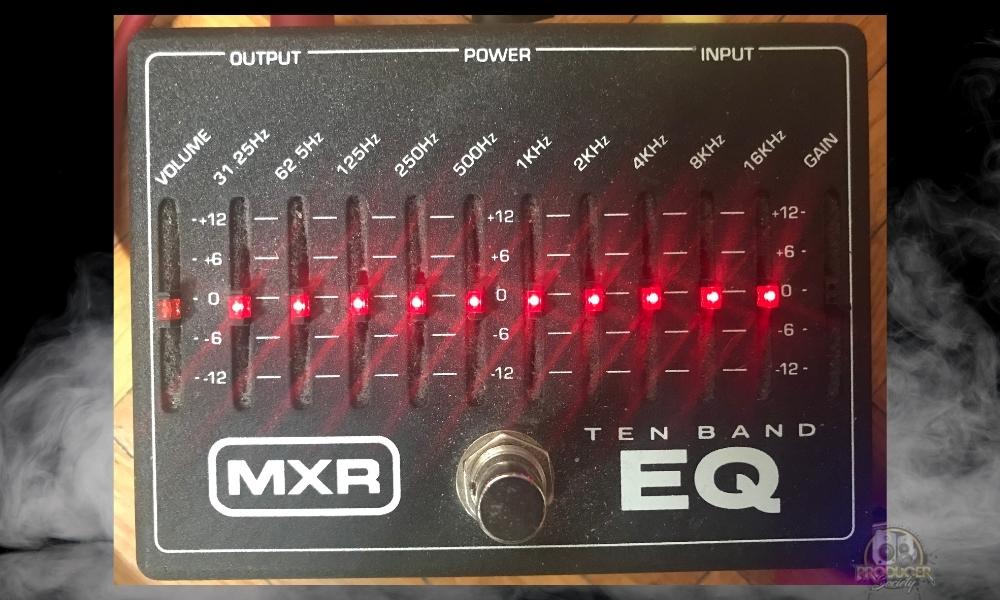
To use the MXR 10-band EQ as an overdrive pedal, first, you should make sure all the sliders are set at 0 dB so you get a fresh start.
Now, place the MXR pedal at the beginning of your signal chain. You could connect it directly to your guitar. This will help shape the original tone of your guitar.
For starters, use a clean tone on your amplifier so you can hear what the MXR pedal is really doing.
2) Increase the Gain Fader Slowly Until It Starts Breaking Up
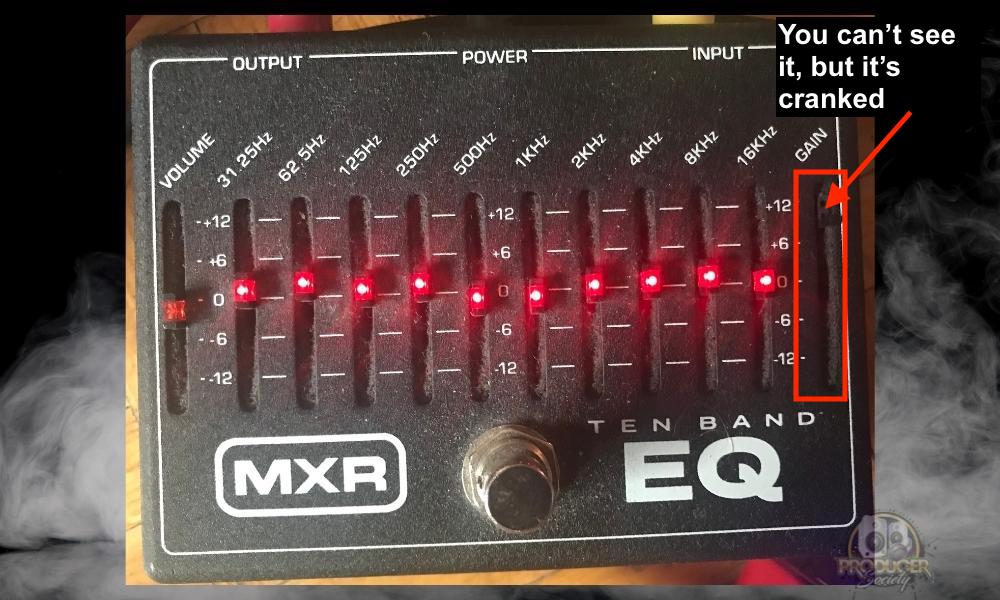
Then, start by slowly increasing the gain slider on the right of the MXR EQ. As you increase it, keep playing some power chords and listen to the tone. You should get a crunch tone at first, and as you increase it further it will feel like a proper overdriven tone.
I recommend not increasing the gain all the way on the MXR pedal, but rather using it somewhere around the +6 and +8 dB mark. Then, set the rest of the gain through your amplifier.
This will help you get a sweet saturated tone without oversaturation or too much noise. Another great thing is that you can mimic different types of overdrives by adjusting the EQ.
One thing that’s important though is that your amp has to be already at the point of almost distorting. The EQ pedal, on its own, won’t be able to crack up the gain so much that it distorts the amp. That’s coming from the preamplifier of the amp.
Regarding the point made above, if your amp is running pretty quiet, and it’s not even close to breaking up, the MXR 10-Band EQ probably won’t have the juice to drive it to overdrive. Unless you crank the volume and the gain on it.
3) Decrease the Volume On the Amp or Pedal To Compensate
![Volume - How to Use the MXR 10-Band EQ [Dedicated Tutorial]](https://travelingguitarist.com/wp-content/uploads/2022/04/Volume-How-to-Use-the-MXR-10-Band-EQ-Dedicated-Tutorial-.jpg)
Because you’ve jacked up the gain big-time on the pedal, you may find yourself having to drop either the volume on your amplifier or right on the pedal itself. It probably makes more sense to drop the volume on the pedal instead, so give that a shot.
Important Tip
Try moving the EQ pedal around in your signal chain if you’re getting too much noise or hiss from it.
Additionally, I’ve found that the newer MXR 10-Band EQ (the silver one) has better noise reduction circuitry.
Like I was saying earlier, you can get some interesting overdrive sounds out of the EQ pedal. Some overdrives tend to add a mid-boost, so you can boost the 1-2K range as well.
Or you can boost the high-end, which is really useful for hitting pinch harmonics. This could get noisy though. In fact, this was one of the primary purposes for which I used the pedal back when I first got mine in 2009 or 2010.
How to Use the MXR 10-Band EQ As A Solo Boost
Like these Gear Page users pointed out if you’re playing a guitar solo in the middle of a song, the MXR EQ is a great way to not only boost volume and gain but to shape the tone to cut through the mix.
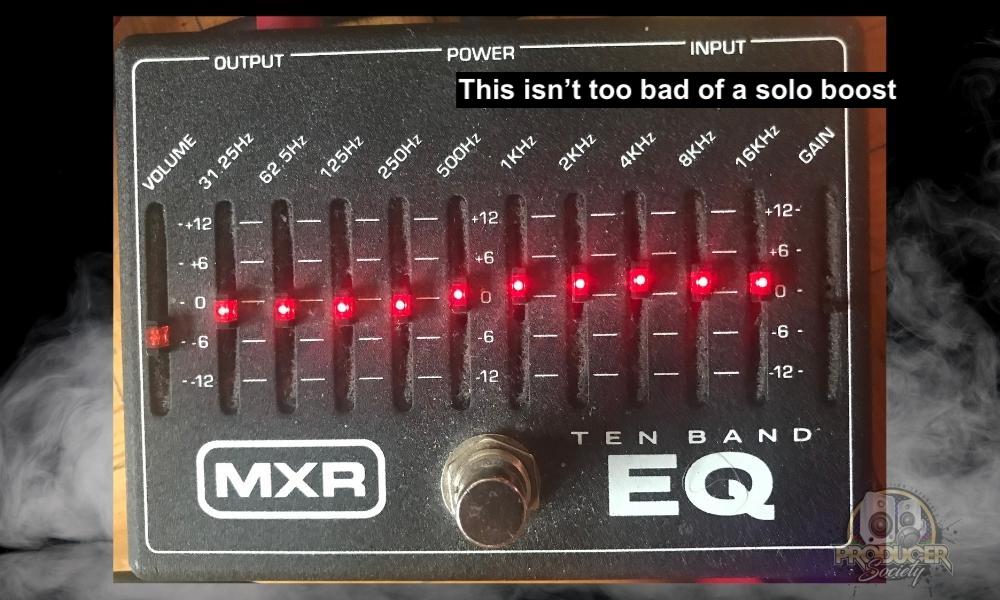
To use the MXR 10-band EQ as a solo boost, first reset the settings to 0 dB. Now, increase the mid and high-frequency faders by +2-3dB. Also, increase the gain by +0.5dB or +1.0dB for an added boost.
Personally, I find that a touch of boosted mids and some high frequencies in the 4K range is good enough to make the tone stand out.
On the other hand, even just a simple boost of the highs, as well as the lows with the slightest increase in gain, is enough to improve your tone. In other words, You don’t necessarily have to have a “solo EQ” to make it sound good for a solo. But I digress.

Now, increase the output volume slider on the left. Note that for a solo boost, the output volume is more important than the gain, because you don’t want to mess up your amp’s tone.
The EQ pedal should just add about 2-3 dB of volume, and add some mids and presence so that it cuts through the mix, making your solo shine through and sound well-articulated.
How to Use the MXR 10-Band EQ to Modify the Amplifier’s EQ
EQ pedals are powerful enough to go so far as to modify your amplifier’s sound. You can go to the extent that it’ll sound completely different, so much so that it’s not even the same amplifier anymore.
Euge Valovirta did a great video where he compared three EQ pedals and argued the same point. If I recall correctly, he said if he were going to the studio to record, he would probably bring an EQ pedal in case the in-house amplifier wasn’t his style.
1) Connect The MXR 10-Band EQ to Your Regular Signal Chain (In Front)
If you want to modify your amp’s sound then place the EQ pedal after your amplifier. Connect the output of your amp into the MXR EQ pedal, and connect the pedal’s input to your guitar as you normally would (or in the FX Loop).
This will allow you to modify the amp’s final output exactly as you want it, with any custom EQ curve you can think of. For example, if your amp sounds too bassy, just cut the bass frequencies a bit.
You can follow several popular EQ shapes, such as ‘V’ or ‘U’, which cut the mids and boost the lows and highs. You can also go for a staggered setup, where you cut some of the lows, keep the mids constant, and boost some of the highs.
2) Find Out How Other Amplifiers Sound
If you want to replicate another amplifier’s sound, then it’s a bit complex but still doable. Simply put, you have to be very well-versed in the sounds of other amplifiers to mimic their style.
You’ll have to rely on your ears to do this accurately, but you can often find information online that helps. For example, if you want to convert a Marshall JCM amplifier to get a Mesa Boogie’s tone, find out the frequency curve of the Marshall and the Mesa.
Using this curve, you can estimate which frequencies you will need to cut/boost accordingly. Another thing you can do is head to this article here which discusses some of the more common amps for different genres.
3) Mimic The Frequency Ranges
For example, if you’ve heard that a Fender Deluxe Reverb has a great mid-range tone, pull down your highs and lows a little bit on the EQ pedal to accentuate the mids. Or, you could try increasing the mid-range if you prefer to boost.
If you want a Mesa Boogie Rectifier sound, you’ll probably want to increase the low-end frequencies instead to get that dark, boomy, and thick Mesa sound.
How to Use the MXR 10-Band EQ to Modify The Guitar’s Sound Before Amplification
To use the MXR 10-band EQ pedal to modify the guitar’s sound before amplification, connect it to the FX Loop of your amplifier. This will EQ the guitar signal after the pre-amplifier stage, just before it goes to the power amplifier stage for the final stage.
Then, you can modify the faders on the pedal according to your needs, and get a completely different guitar tone going into the amp.
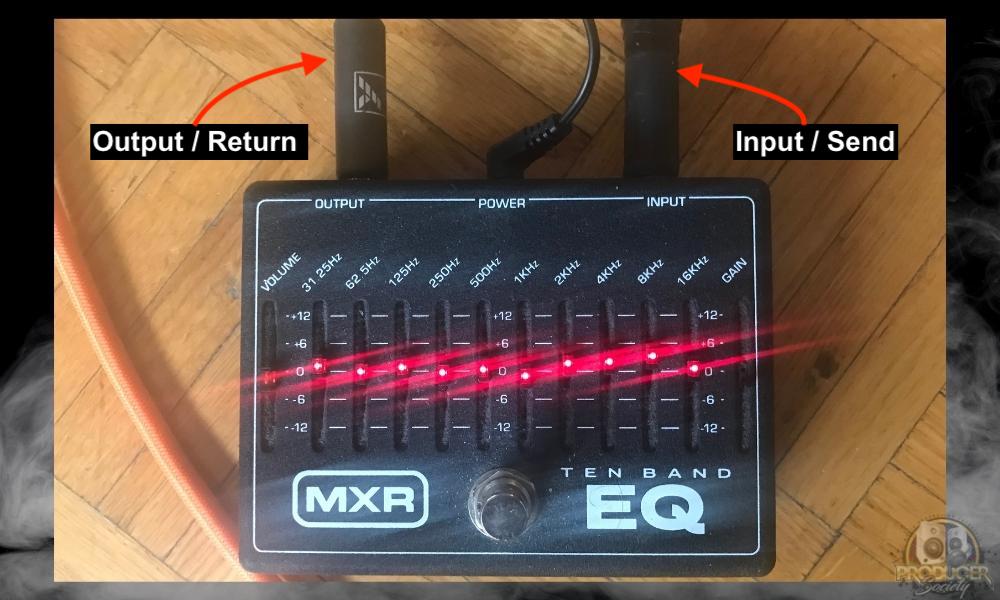
I found this great method by Andertons to convert a Les Paul into a Stratocaster-style tone. Raise the upper-mid frequencies (1K and 2K), and reduce the lows (125 and 62.5).
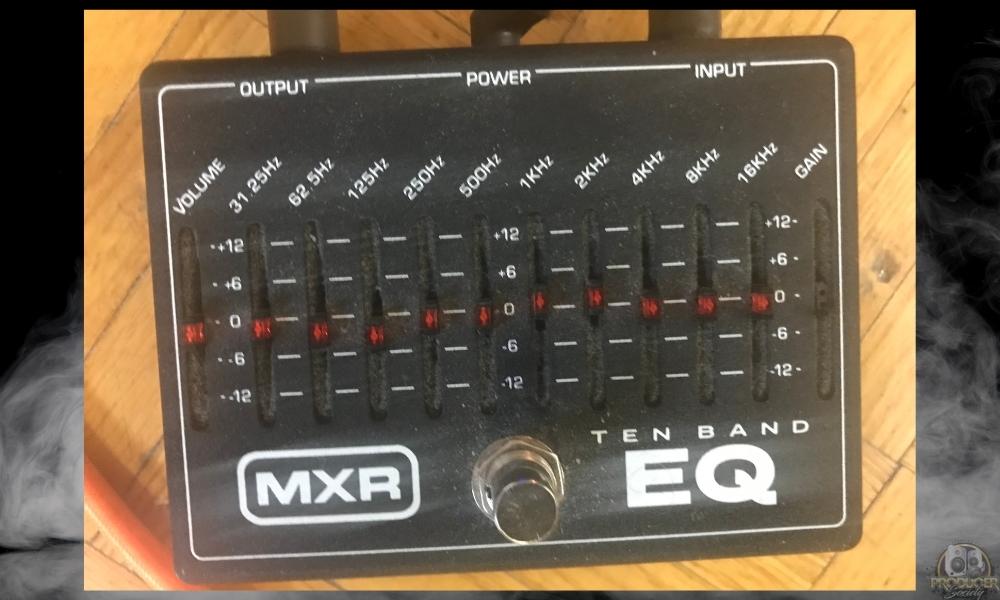
This will get you that snappy, single-coil tone that the Strat is so famous for. Experiment with the settings a little bit to get into the perfect zone.
If you regularly use the split-coil on your humbucker, you may have noticed the drop in volume when switching. You can use the EQ to counter this, by increasing the gain and also increasing the mids to make the sound ‘pop’ better.
There are no limitations to what’s possible with this, and you can get very good guitar tones from just about any guitar with the right settings.
But try not to add too much gain from the EQ pedal if you don’t have a proper noise gate in place. I recommend the ISP Decimator Noise Reduction Pedal II which is the one that I have, although, I have the first edition.
How to Set Up the MXR 10-Band EQ In Your Amplifier’s Effects Loop
As Waymore Sound puts it, the position of your EQ in the signal chain will have a drastic effect on how it modifies your tone. Each possible position has unique effects on your tone, including adding in the amplifier’s effects loop.
To set up the MXR 10-band EQ in your amplifier’s effects loop, you have to have an amp with an FX loop (more on FX Loops in my other article). Here’s what mine looks like on my Hughes and Kettner Switchblade 100w amplifier:
![FX Loop - Where To Put The Looper Pedal In Your Signal Chain [SIMPLE]](https://travelingguitarist.com/wp-content/uploads/2022/04/FX-Loop-Arrows-Where-To-Put-The-Looper-Pedal-In-Your-Signal-Chain-SIMPLE.jpg)
Connect your guitar to your amplifier’s input (or if you have pre-FX pedals, connect it to them). Connect the amp’s ‘Effects Send’ to your EQ pedal’s input, and the output of the pedal to the amp’s ‘Effects Return’.
This will set up the EQ pedal inside your amp’s FX loop, which is designed to be after the preamp (which adds gain) but before the power amp (which adds volume).
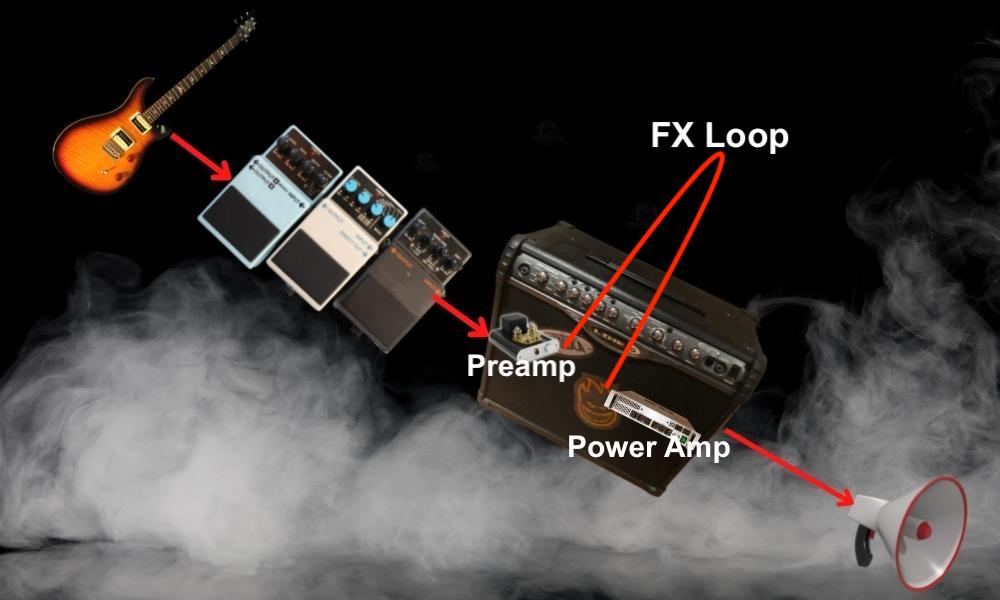
You can use the MXR pedal to shape the gain structure and add volume to the overall signal. But you won’t be able to add more distortion or use it as an overdrive pedal in this position (you must place it before the amp for that).
How to Set Up A Low Pass Filter with the MXR 10-Band EQ
A low pass filter will allow everything below a certain frequency to be heard. This cuts off the high-end, or treble, of your guitar tone, helps resolve resonant frequencies and reduces any shrillness.
To create a low pass filter (LPF) on your MXR 10-band EQ, start by moving the 16K and 8K sliders all way to -12 dB. This will remove these frequencies almost entirely, but you may lose some presence and brilliance as a result.
To fix that, slowly move up the 8K slider while playing your guitar, and find a suitable spot that sounds good to your ears. You can also move up the 16K slider just a bit.
If you still have some shrillness or your tone sounds too trebly, consider rolling back the 4K slider a bit as well. I find that these LPF settings work well for me:
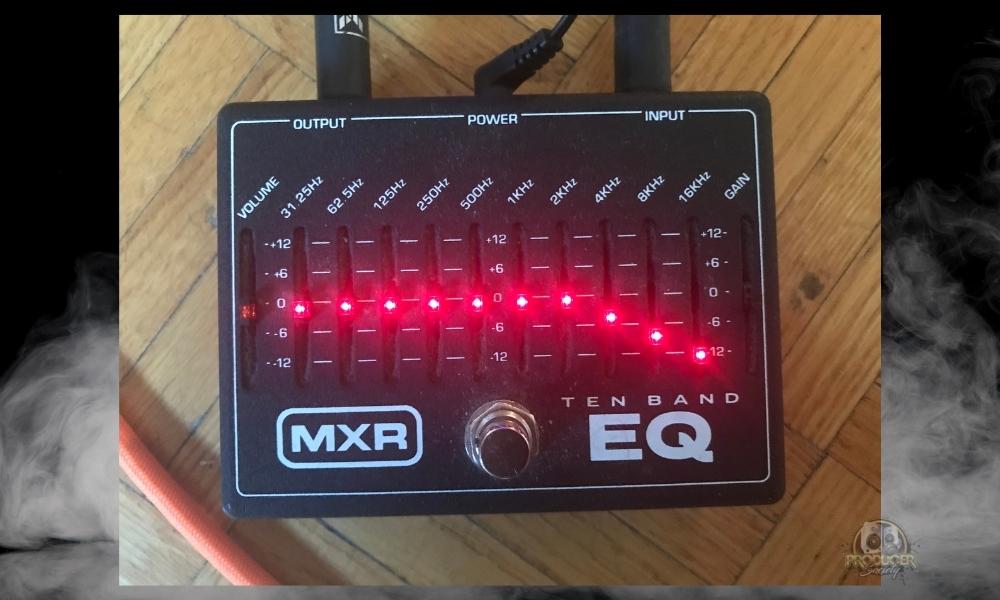
4K: -3 dB
8K: -8 dB
16K: -12 dB
Always experiment to find what works with your specific tone and amplifier. And if you find that you’re not cutting through the mix, try boosting some highs again and see if that helps.
How to Set Up A High Pass Filter with the MXR 10-Band EQ
A high pass filter is designed to allow everything above a chosen frequency, and it will remove excess bass from your sound. While HPF pedals are also common among guitarists, you can replicate the same on an MXR 10-band EQ with more precision.
To set up a high pass filter (HPF) on an MXR 10-band EQ, start by moving the 31.25, 62.5, and 125 faders all the way to -12dB. This will cut these frequencies almost completely, and create a basic high pass filter.
But these can also make your sound thin, as there won’t be enough bass. So to fix this, experiment with the sliders a bit by bringing back up the 125 and 62.5 sliders slowly. I find that these settings work well for me:
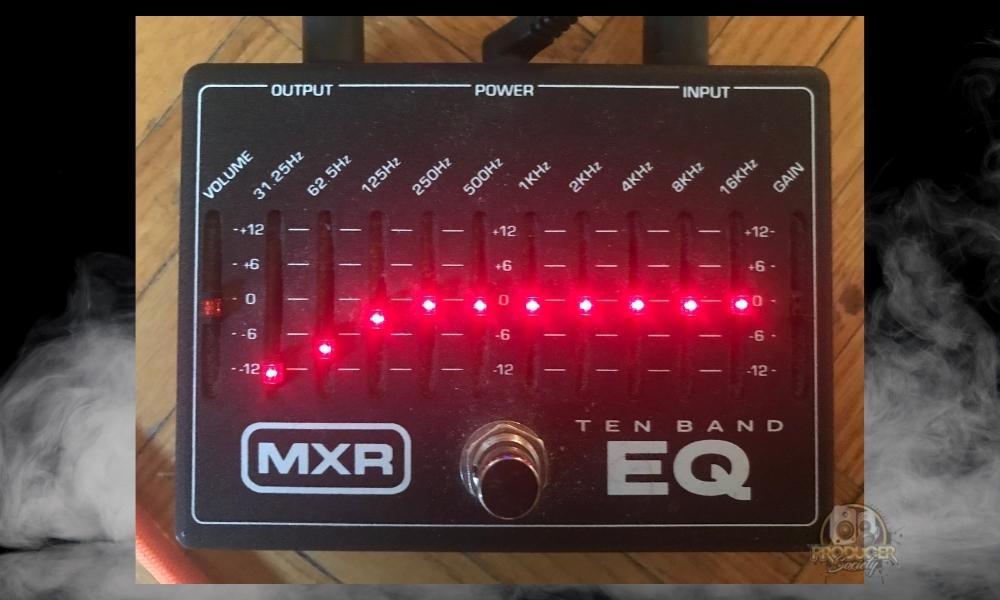
31.25Hz: -11 dB
62.5Hz: -9 dB
125Hz: -5dB
This won’t cut the bass entirely, but it’ll still clear up any muddiness or resonance so that you get a tighter sound. This HPF setup is particularly great for rhythm tones.
How to Cut the Mids with the MXR 10-Band EQ
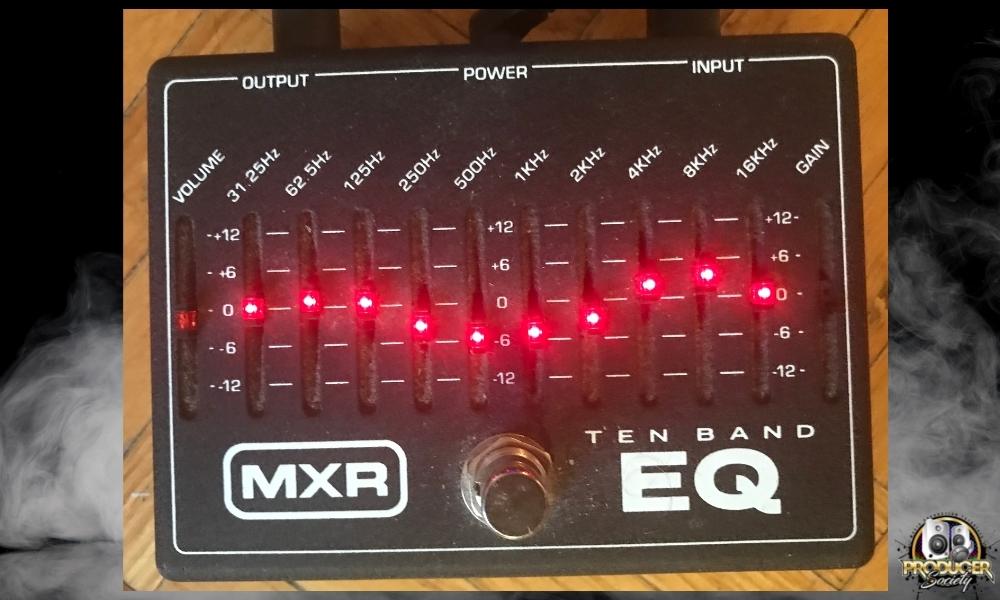
To cut the mids with your MXR 10-band EQ, bring down the 500, 1K, and 2K sliders down by 3-6 dB. This will cut the mids and give you a ‘scooped tone’.
But after this, you need to make a few more adjustments to get a good tone. Sometimes cutting the mids too much makes the guitar sound thin, so in this case, increase them in very small steps until you get a good, thicker sound.
You can also slightly increase the 250 and 125 sliders for added bass, and the 4k, 8K, and 16k sliders for some more treble. This will lead to a true ‘V-shaped’ tone and is perfect for classic rock. Although, I like it with a clean tone as well for just an all-around better sound.
Remember, your amp settings also matter, so if the EQ pedal isn’t enough, try altering the settings on your amplifier for a more pronounced effect.
Here’s a tip: If your guitar isn’t standing out in a mix with drums and bass, consider turning up the 1K dial a little bit to get more presence.
How to Use The MXR 10-Band EQ For Special Sounds
You can get a lot of great, weird, nasty, and uniquely experimental tones by using an EQ pedal. Here are some fun examples to try out.
A) Fixed Wah Sound
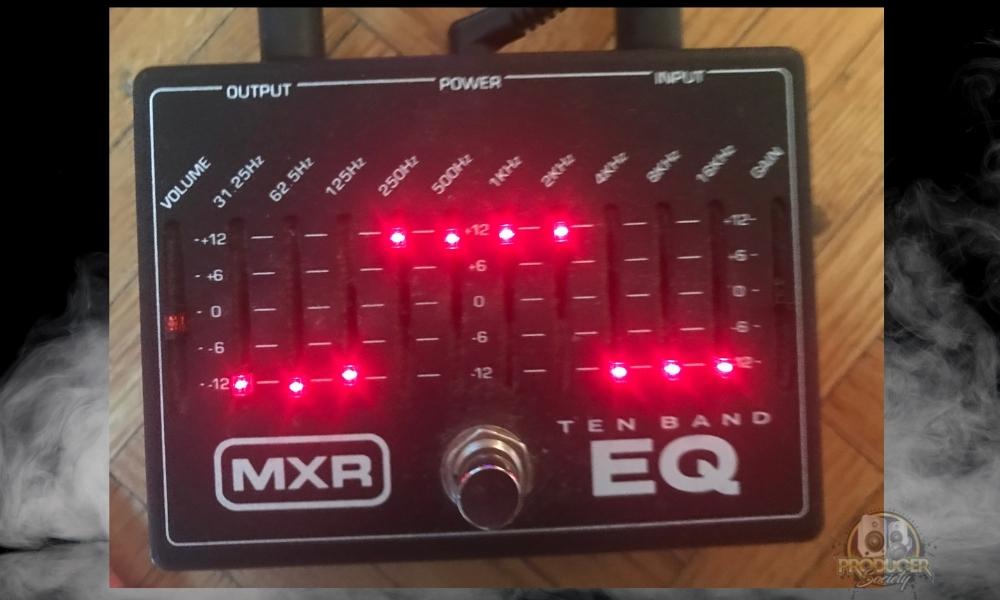
To get this tone, boost the mids (500, 1K, and 2K) all the way to +12 dB (max), and cut the rest of the frequencies to -12 dB (both highs and lows). This will give you a highly mid-focused sound that’s somewhat like a Wah-Wah filter but stays fixed.
B) Lo-Fi Sound
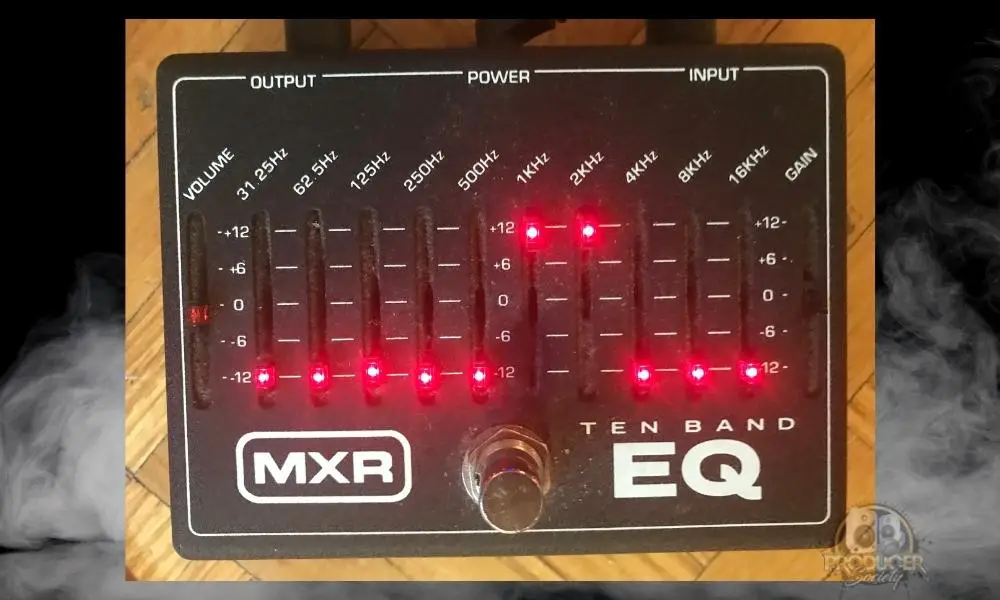
Similar to above, simply boost the 1K and 2K sliders all the way up. And cut all the other frequencies. This creates a very Lo-Fi tone – (which I showed you how to do in my LoFi article on Producer Society) – that you’ve probably heard used for iconic intros.
It sounds like it’s coming through a broken telephone, which is a very cool effect.
C) ‘Scooped’ Tone
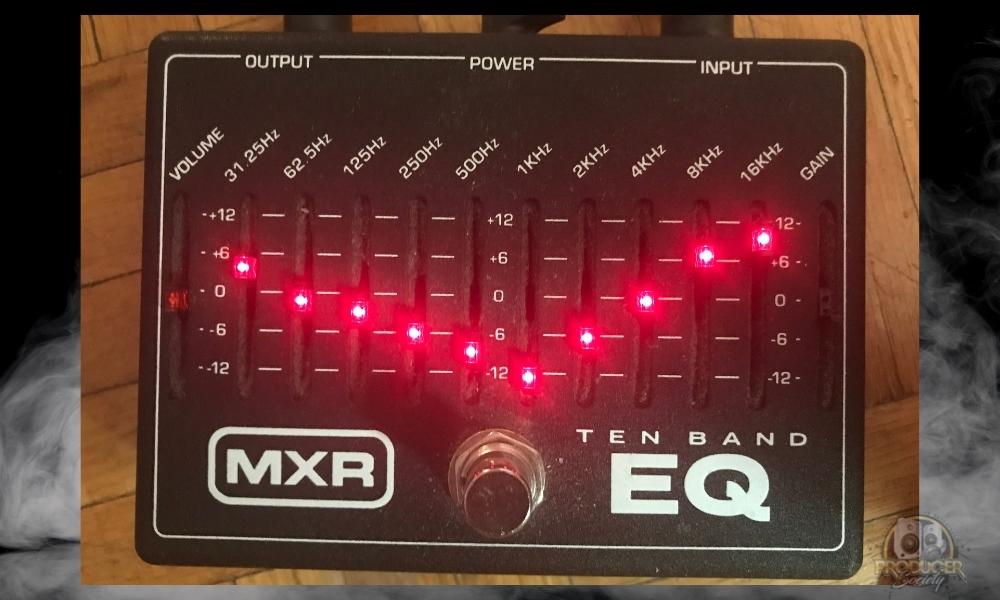
Dimebag Darrell of Pantera is probably most famous for having popularized the ‘scooped’ guitar tone, where he would almost completely cut the mids. To achieve this, the overall graphic EQ will have a ‘V’ shape, with settings that look like this:
31.25: +3
62.5: 0
125: -3
250: -6
500: -9
1K: -12
2K: -6
4K: 0
8K: +6
16K: +9
This, combined with a beefy, distorted amp tone, should get you a fuzzy tone that sounds heavy and has a lot of presence even in a full band mix (Pro Audio Land has some more settings too).
Dimebag was probably the only one to ever have that tone and successfully make it sound good though. A lot of people try the same thing and do poorly.
How to Use The MXR 10-Band EQ With An Acoustic or Bass Guitar
The MXR 10-band EQ isn’t just a great EQ pedal for electric guitars; it works equally well for acoustic guitars and basses (more on the importance of bass in my guide).
If you have an electro-acoustic guitar or a bass with pickups, then you can use this EQ pedal to shape a better tone. While the basic principles remain the same, you’ll want to make sure that you adjust the EQ according to your guitar.
For example, if your acoustic sounds a bit trebly, consider increasing the bass and low-mids to add body and resonance to the sound.
For bass guitars, don’t increase the bass too much, or you might get a ‘boomy’ sound. Instead, consider adding some upper-mids and highs to give the bass guitar a good presence when playing with a band.
Quick Tip – Look For Other EQ Settings Elsewhere (And From Other Manufacturers)
The thing about an EQ pedal is that you can find tons of presets from other places. For instance, you can take a look at the stock EQ presets that are found in both GarageBand and Logic Pro X libraries.
And this isn’t the only place you can find EQ presets either. Most third-party VSTs like Fab Filter have EQ presets, as do many other EQ plugins, or even pedals. For example, the video shown down here has over 15 EQ presets that you can check out.
They’re all for the BOSS GE-7, but you can use them for the MXR 10-Band EQ as well. You can also check out this video too which has a ton of useful information too.
Important Things to Note About the MXR 10-Band EQ
1) These EQ Techniques Apply Everywhere
Once you get used to using an EQ pedal, you can use the same basic principles on any EQ pedal and any other EQ as well – even a plugin in a DAW. So if you decide to get another pedal later on, such as the Boss GE-7, the same techniques can be applied.
And if you plan on recording your guitars, these EQ tricks can make a big difference in making your mix sound better.
2) Add a Noise Gate If You’re Using Several Pedals
If you’re using a full pedalboard complete with distortion, EQ, reverb, delay, and a distorted amplifier, things can get noisy quite fast. To cut down on that, consider adding a noise gate at the beginning of your chain.
If you have an older MXR EQ pedal as I do, then consider the new M108s model, which comes with built-in noise gate circuitry and offers improved headroom as well. It’s an improved version, for sure.


 Written By :
