Written By :

I’m all about ‘transparent’ overdrive units these days. They add grit to your signal while preserving the tone & sound of your guitar/amp. The JHS Morning Glory V4 is an update of JHS’ original and it includes a Gain switch that can be remotely operated and a Bright Cut for attenuating higher frequencies for a more rounded tone. Despite the added controls, the pedal is really easy to use.
To use the JHS Morning Glory, connect an instrument cable from your guitar’s output to the pedal’s input and then another cable from the pedal’s output to the amplifier’s input. Power the pedal with a 9VDC power supply. Start with the Drive, Tone, and Volume at 12:00 & slowly adjust from there.
Everything The JHS Morning Glory V4 Can Do & How to Use It

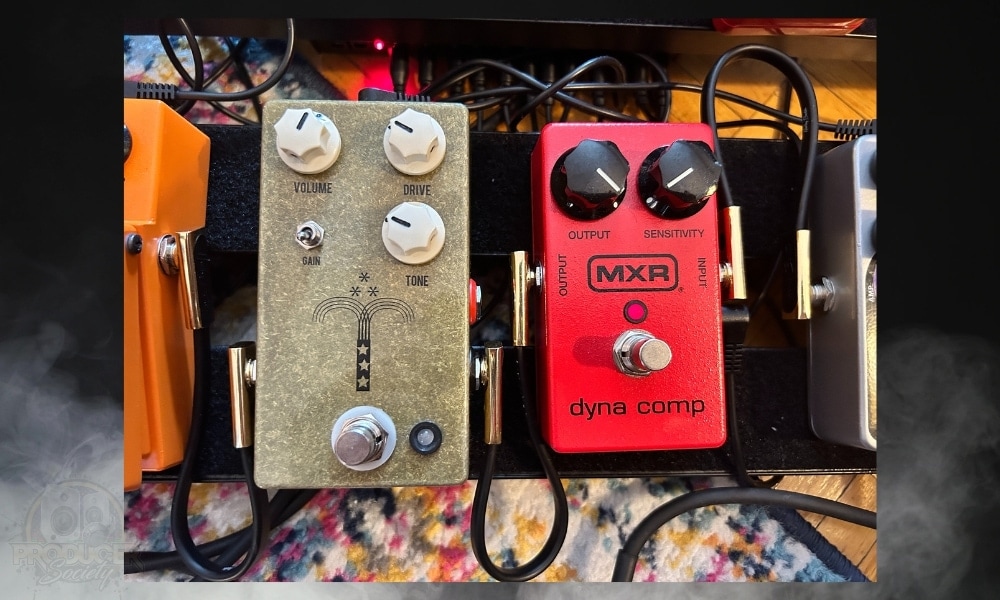
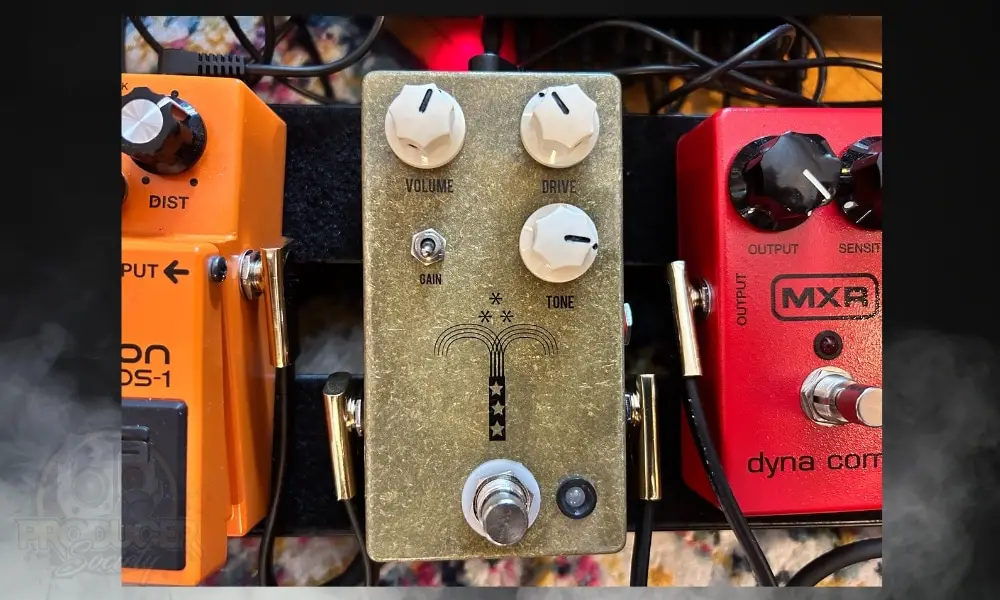
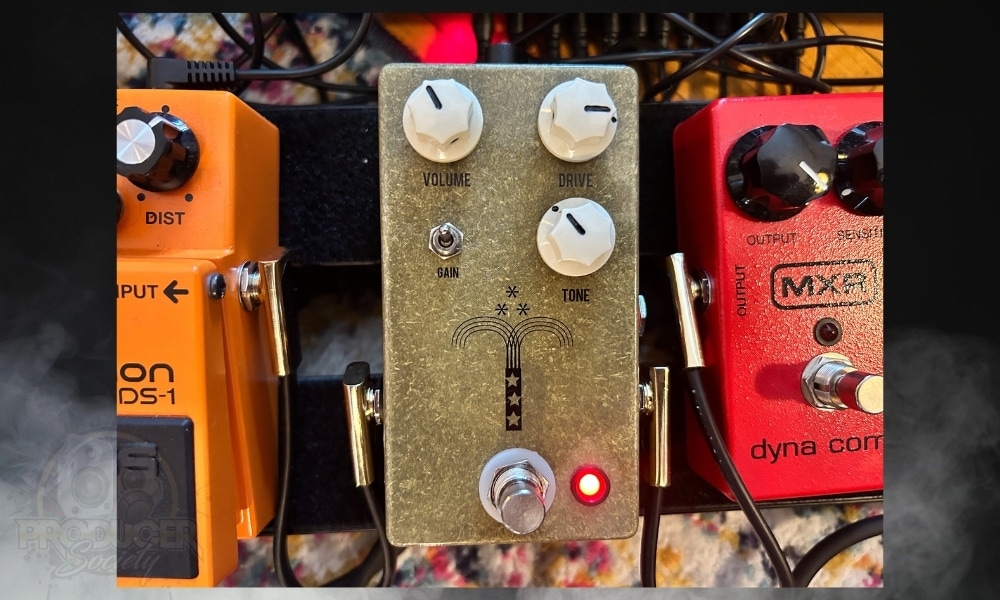
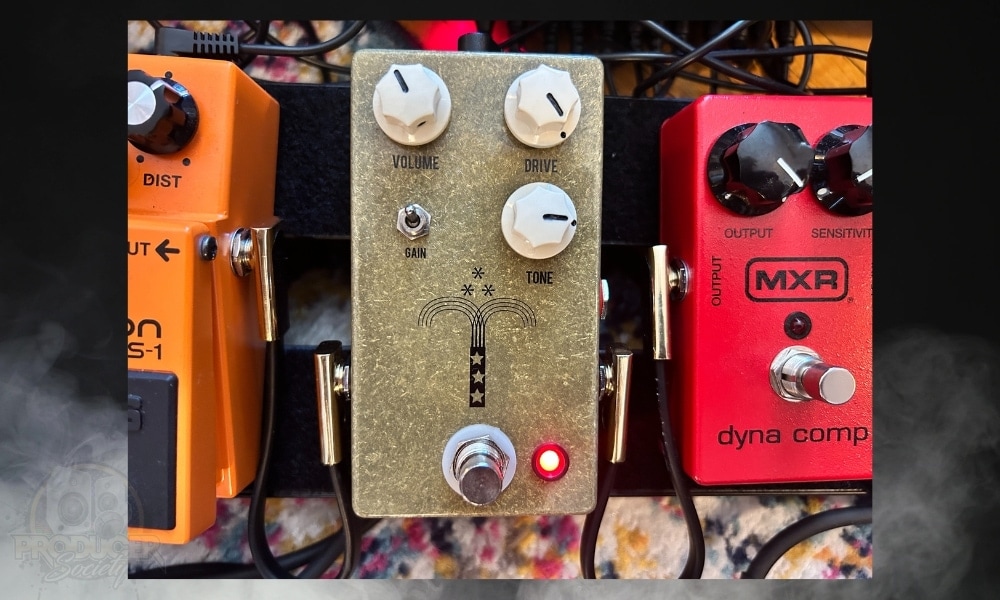
The Morning Glory has a really simple interface, with just three knobs on the front panel, and a couple of switches. But don’t be fooled by the simplicity: there is a lot of scope for nuance and creative control here. And it sounds great to boot.
1) Volume
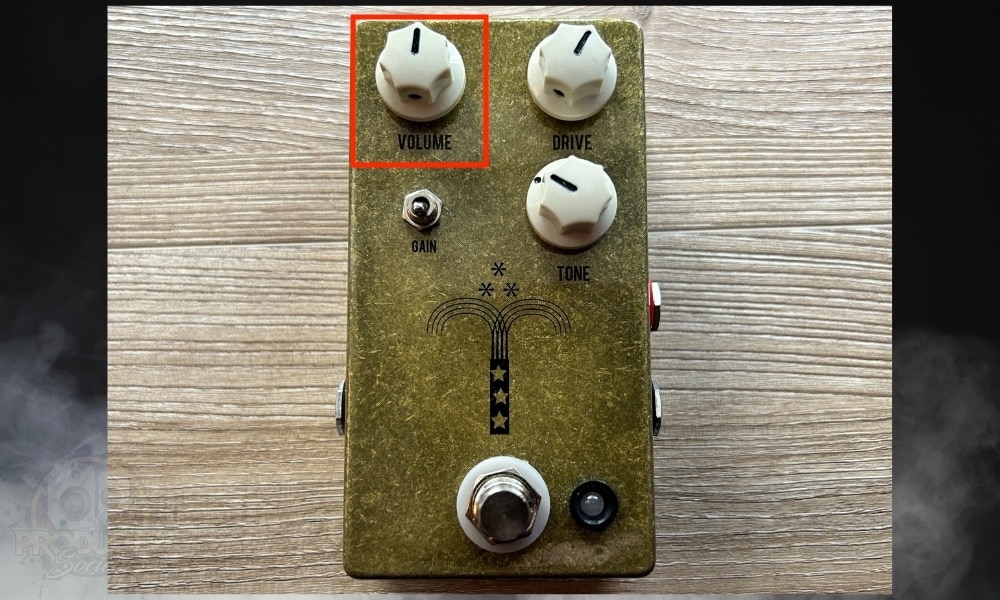
As you can probably guess, the volume knob controls the overall output volume. Clockwise cranks the volume up, and counter-clockwise reduces it. I usually find that setting it halfway is perfect to match with the pedal when disengaged.
However, if you use the High-Gain Mode Toggle switch, you’ll find that you may have to bring the volume down a bit to compensate.
2) Drive
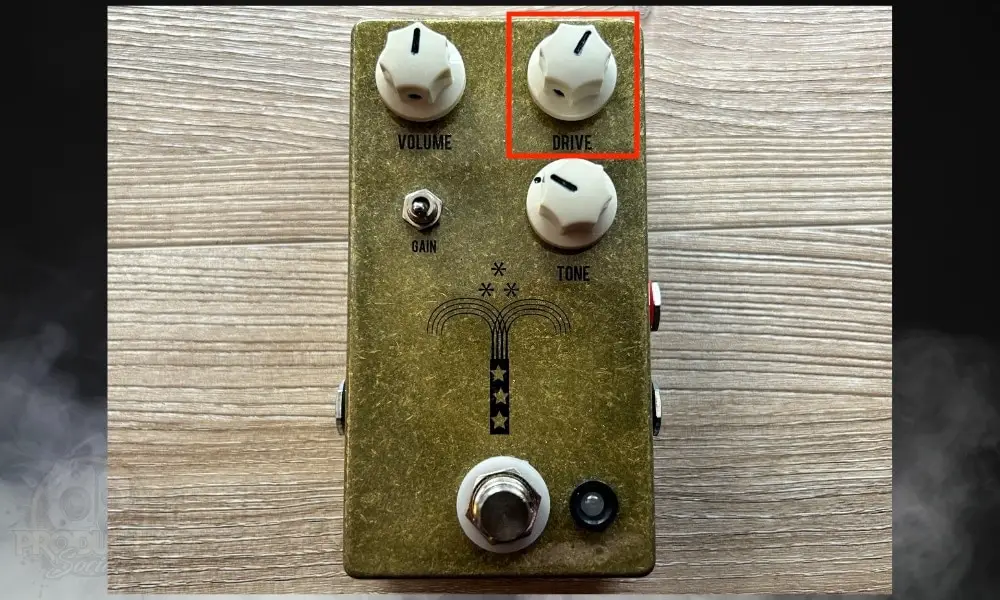
The Drive control determines the amount of gain being added to your signal, like cranking up the gain knob on a tube amp. Think of it as a dry/wet knob for dialling in the amount of the overdrive effect you want.
Anything below 30% is basically just a clean signal boost, with anything higher gradually causing breakup and also adding brightness to the signal. It sounds great.
3) Tone
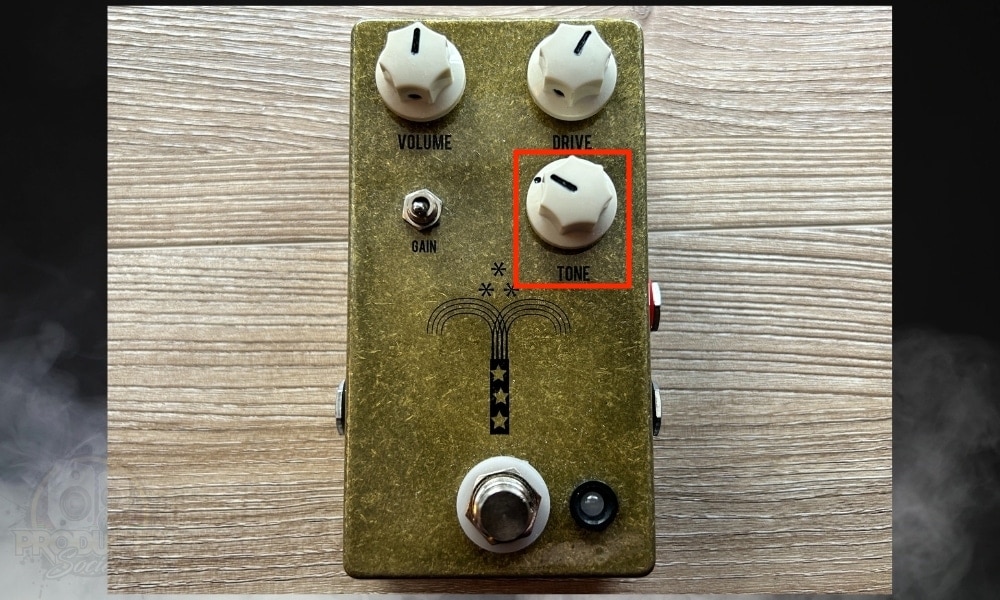
The Tone knob controls how bright the affected signal sounds. As I said, cranking up the Drive adds brightness to the overdriven signal too, but it may be the case that you like the crunch you get from a Drive setting, but it sounds a bit too bright.
The Tone control comes in useful here, letting you darken the signal by turning counter-clockwise. Likewise, if you want a brighter tone, turn the Tone knob clockwise. You can use the Bright-Cut switch for this as well.
4) Gain Switch
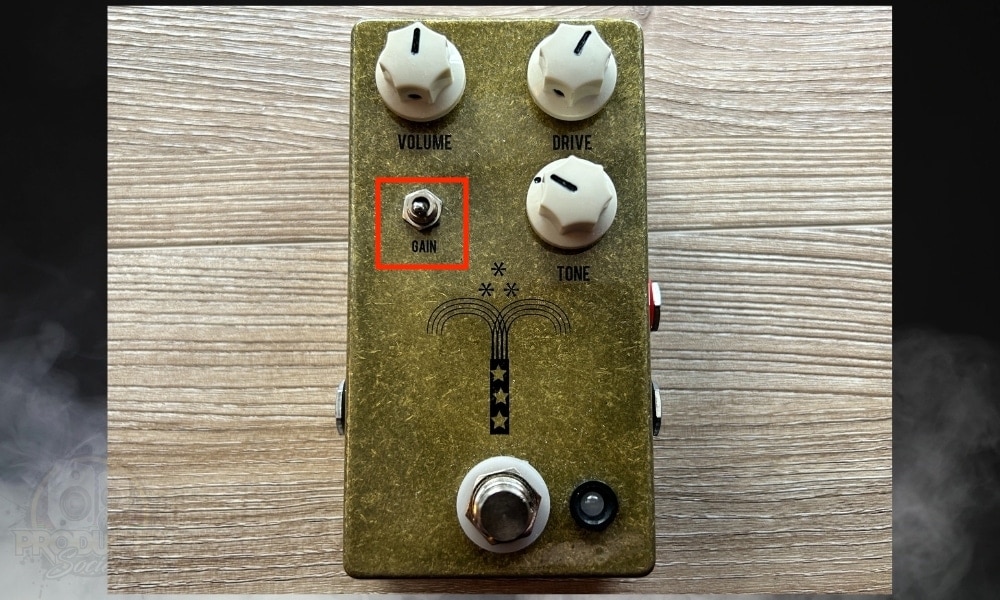
The Morning Glory V4 comes with a switch for an extra gain boost. Flipping it up turns on High Gain mode.
This is a really nice feature and gives you a whole new set of tone options. The two modes, High & Low gain, are represented by the LED which turns red for high, and blue for low gain settings.
For some players, such as metal or doom guitarists, the ‘High’ gain here may sound more like a ‘Mid’ gain setting than a truly high one. But you can still get some really satisfying crunch with it.
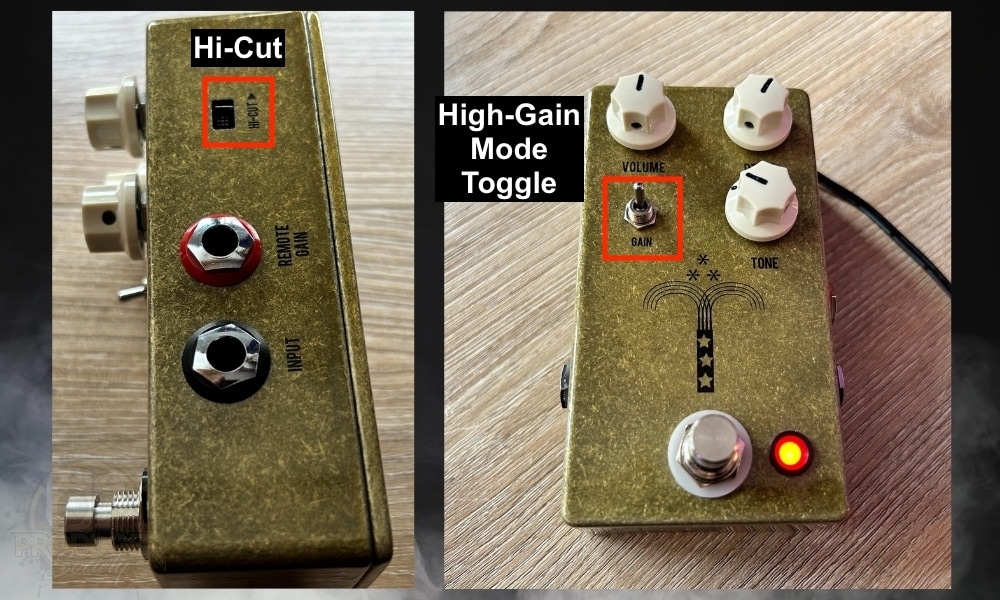
5) Bright Cut
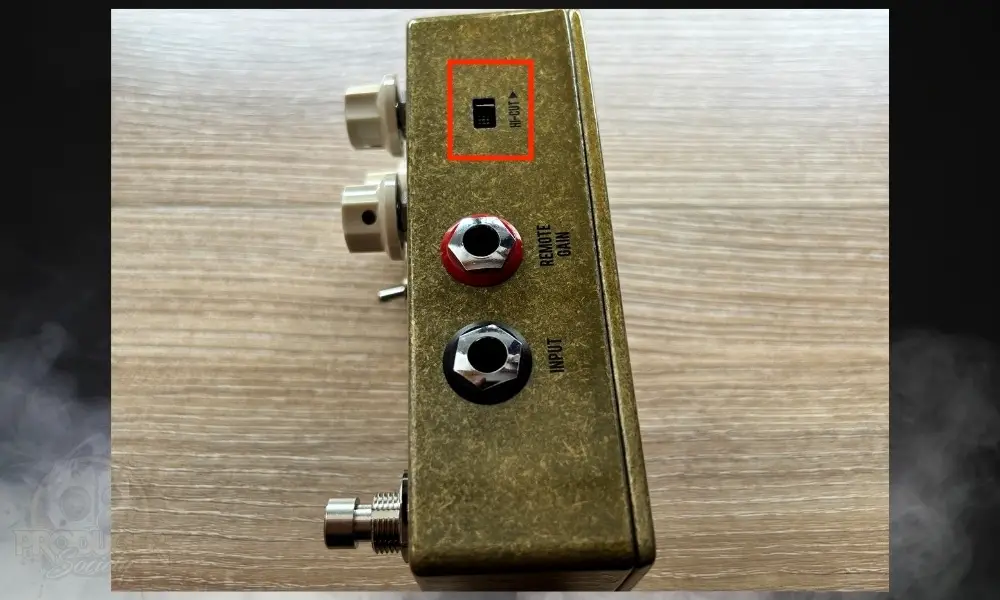
On the right-hand side of the Morning Glory, you’ll find a little switch labelled HI-CUT ON/OFF.
This acts as a mini-EQ which automatically catches and reduces the highest frequencies, giving you even more control over the brightness of your output signal, especially when used in tandem with the Tone knob.
Like the Gain switch, this feature offers up another range of tonal options: keeping all the knobs on the same settings but flipping the Bright Cut switch can give you a completely different sound, giving you even more choice of tone.
It works well for reducing those harsh brittle sounds that you can run into if you’ve got the tone and drive knob turned up a lot.
6) Remote Gain Jack
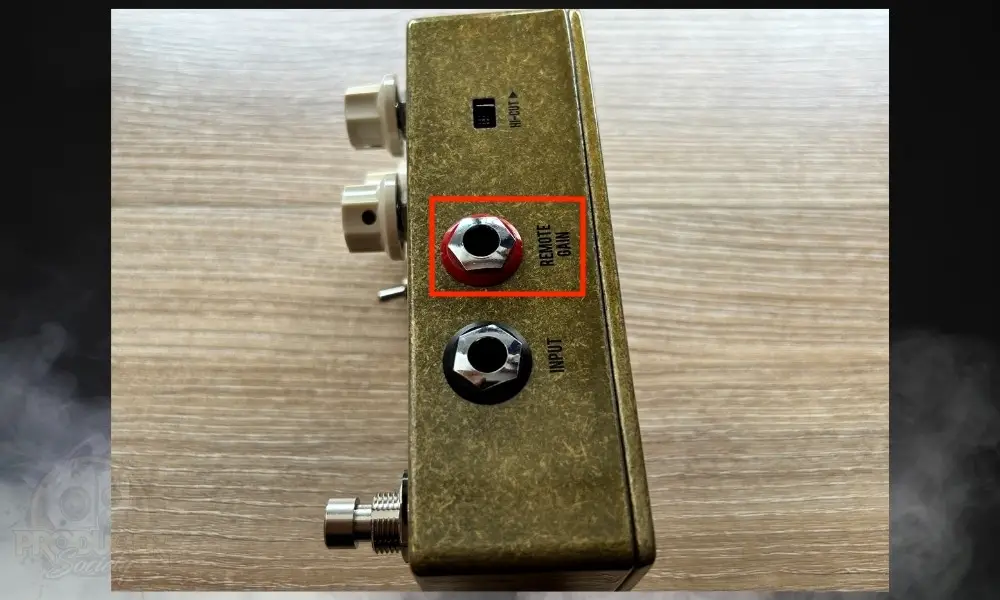
The Morning Glory has an extra 1/4″ input on the side, where you can hook up the JHS Red Remote and control the Gain switch on the fly.
I’m not completely sure why they didn’t make the switch foot controllable, which would eliminate the need for the Red Remote (which takes up more space on the pedalboard).
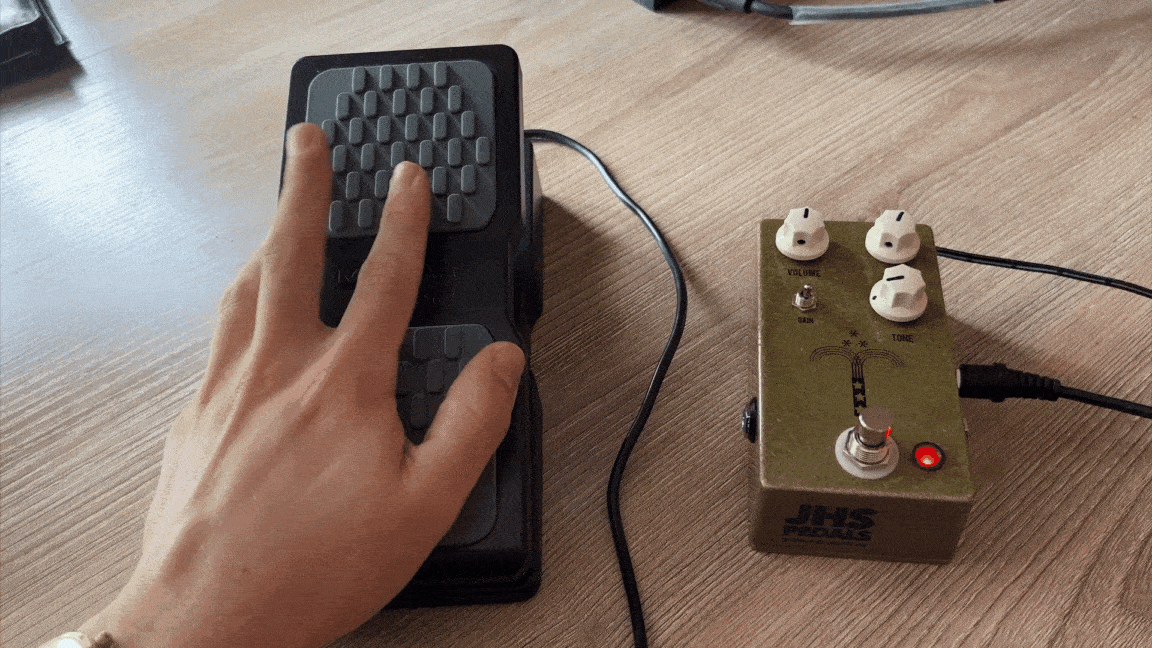
But this function at least means that you don’t have to bend down and flip the switch in the middle of a song. The M-Audio pedal, as I said, works for this. You just have to switch the toggle on the back of the expression pedal to “Other.”
7) Footswitch (True Bypass)
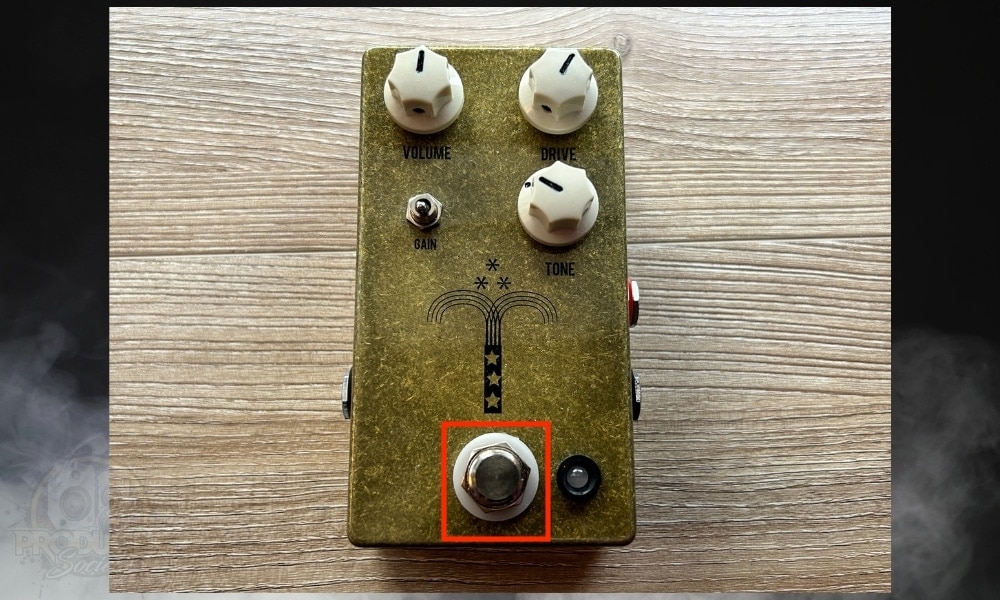
The Morning Glory JHS V4 has a footswitch on it that’s a lot easier to step on and activate than some of the other pedals out there from BOSS and Electro Harmonix, just to name a few. It’s important to note that it’s a true bypass switch as well.
8) LED (Blue for Regular & Red for Extra Gain)
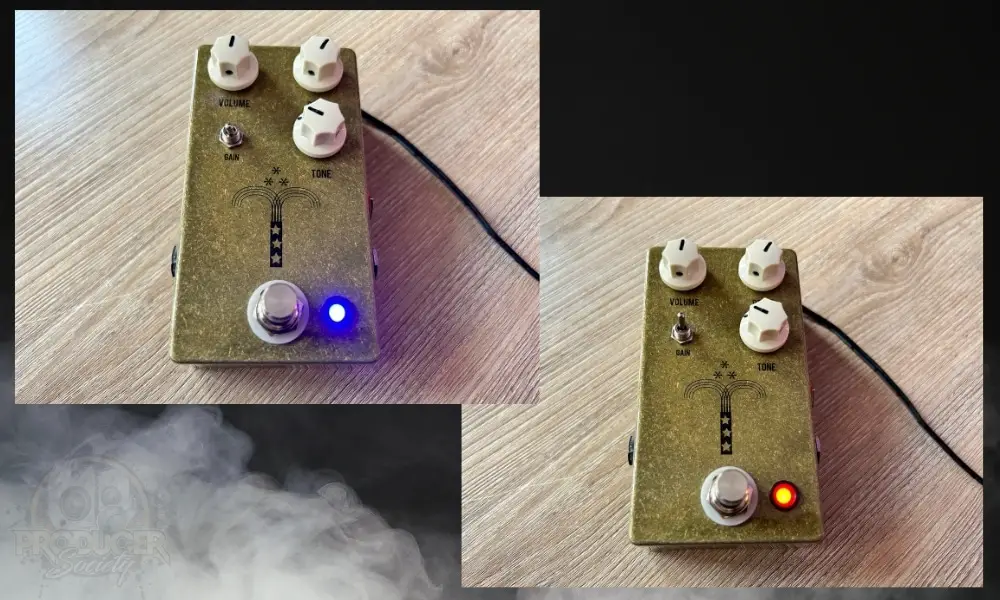
I usually prefer to have it in the regular mode, because that’s all the gain I need. However, if you really want to get some awesome lead tones for a solo, the extra gain is really great for it.
How to Power The JHS Morning Glory V4
9VDC Power Supply Only (43mA)
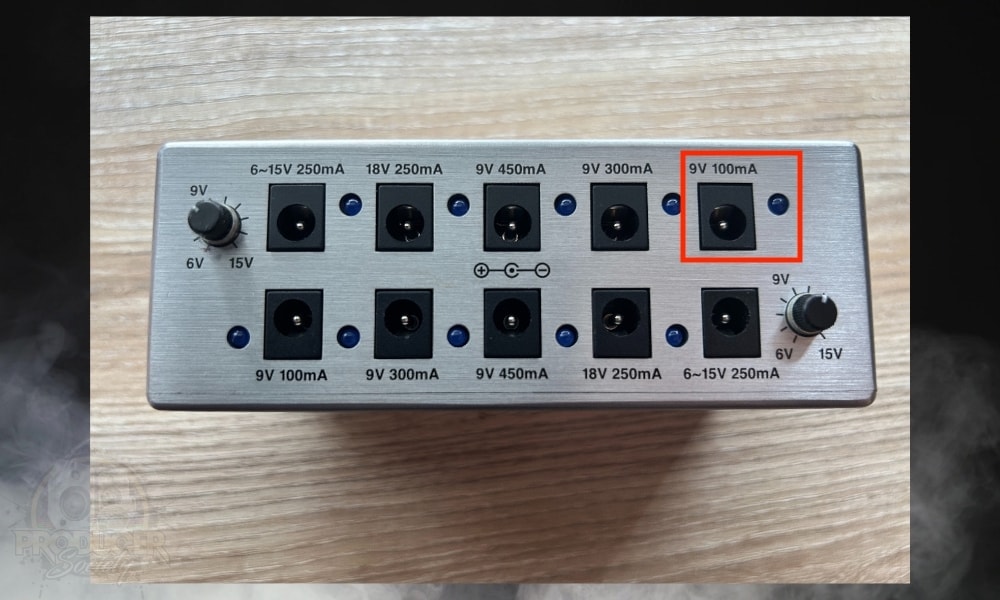
The Morning Glory only takes a 9V DC Negative Center power supply, which is the standard for the majority of drive pedals, although, some take considerably less like the TS9. Make sure that the power consumption on your supply is 43Ma.
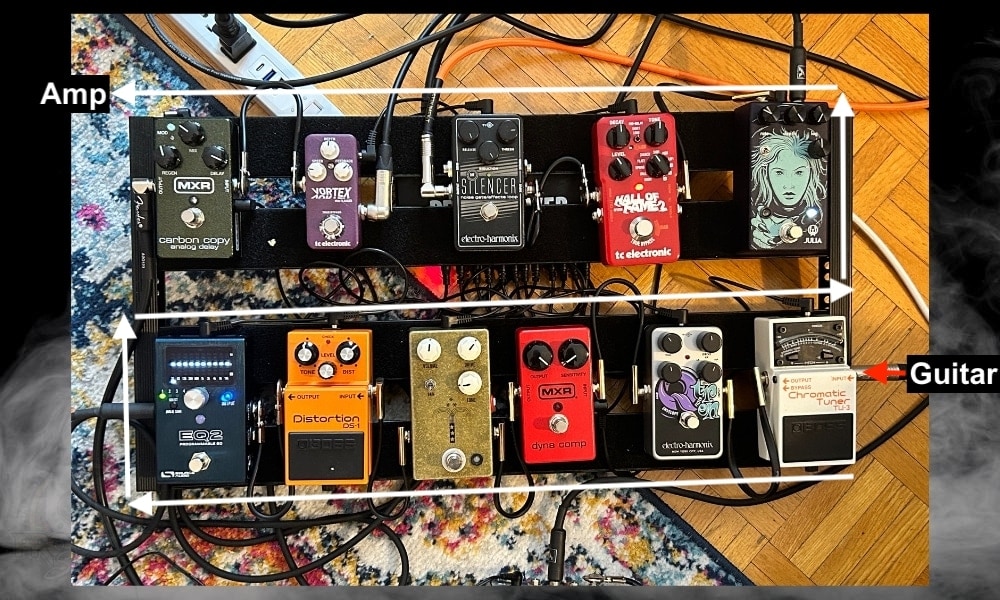
Where To Put The JHS Morning Glory In Your Signal Chain (And Why)
I’ve discussed signal chains a lot including in my looper pedal guide. Here I’ll give some general rules I like to consider when deciding where to place overdrive units in my signal chain, and some options for setting up the Morning Glory.
1) Earliest In The Chain But After Dynamics, Pitch, & Filters
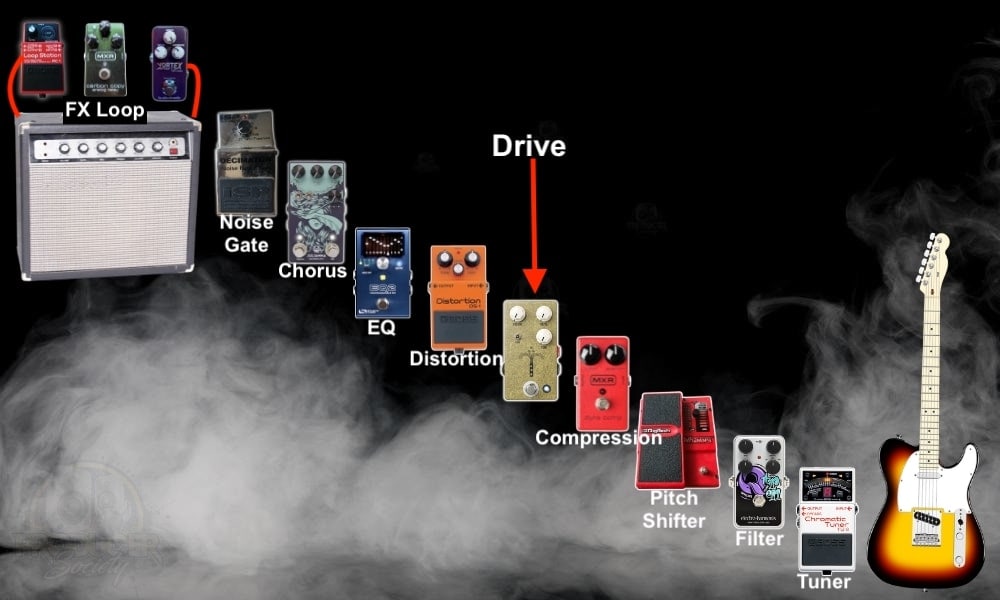
The standard place to place an overdrive unit in your signal chain is early: well before modulation or time-based effects like flangers or reverb.
When it comes to effects such as filters, pitch shifters or compression pedals, it’s best to have these before the overdrive.
This way, the signal is shaped by these units in terms of dynamics, pitch and EQ and then beefed up by the overdrive before reaching other effects.
This means that your modulation and time-based effects are receiving a richer and fuller signal and tone for them to decorate. All this stuff is up for debate, as you know.
2) Paired With Distortion Pedals
You can get some really good results by pairing an overdrive pedal like the Morning Glory with a distortion pedal.
While a lot of people (myself included for many years) see overdrive and distortion as the same thing, there are some differences which are useful to have in mind when considering where to put each pedal in the chain.
Distortion alters your signal directly with saturation and clipping, usually resulting in a more aggressive and notable distorted effect.
Overdrive, on the other hand, tends to preserve the original clean signal, instead of gradually adding signal breakup, resulting in a more natural-sounding, ‘transparent’ distortion.
A) Overdrive Before Distortion
I personally like to have overdrive before distortion in the chain, using it to boost the signal and beef it up with mild breakup before sending it into a distortion pedal for an extra layer of saturation.
It lets you create a fuller input for the distortion pedal to receive, as the tone has been shaped by the overdrive, which for me gives a richer and textured sound and a smoother transition into distortion.
I find that adding the distortion on top can really make it go wild. It reminds me of Dimebag Darrell or Zakk Wylde’s pinch harmonics. It’s great for that.
B) Distortion Before Overdrive
Doing things the other way around will give you different results. Having the distortion first can give you a more consistent, compressed-sounding crunch, with a less dynamic variation.
This may be preferable for metal shredders but less ideal if you prefer a bit more dynamic expressive control in your playing.
One benefit of having an overdrive after the distortion though can be to bring it in occasionally to add more sustain, texture and midrange on top of the distorted signal, to give things like solos more prominence.
As usual, it’s up to the preference and style of each guitar player, so try things out to see what suits your sound best.
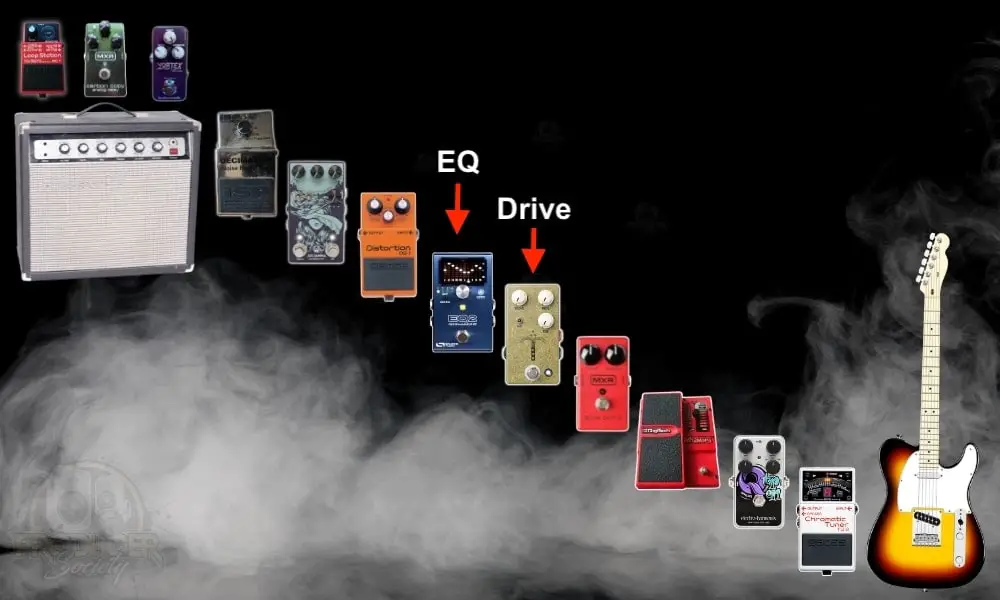
3) Before and After An EQ Pedal
A) Placing Overdrive After EQ
An overdrive like the Morning Glory can work well being next to or close to an EQ pedal in the chain. Sometimes I like to have the EQ first and overdrive directly after.
This way you can sculpt the signal that’s reaching the overdrive, boosting or cutting certain frequencies so that only the ones you want get the effect applied to them.

This method, if done properly, can result in a much cleaner, distinctive tone, which you’ve shaped yourself. Just be sure not to boost low mids too much before sending them to an overdrive unit, as this can result in muddiness.
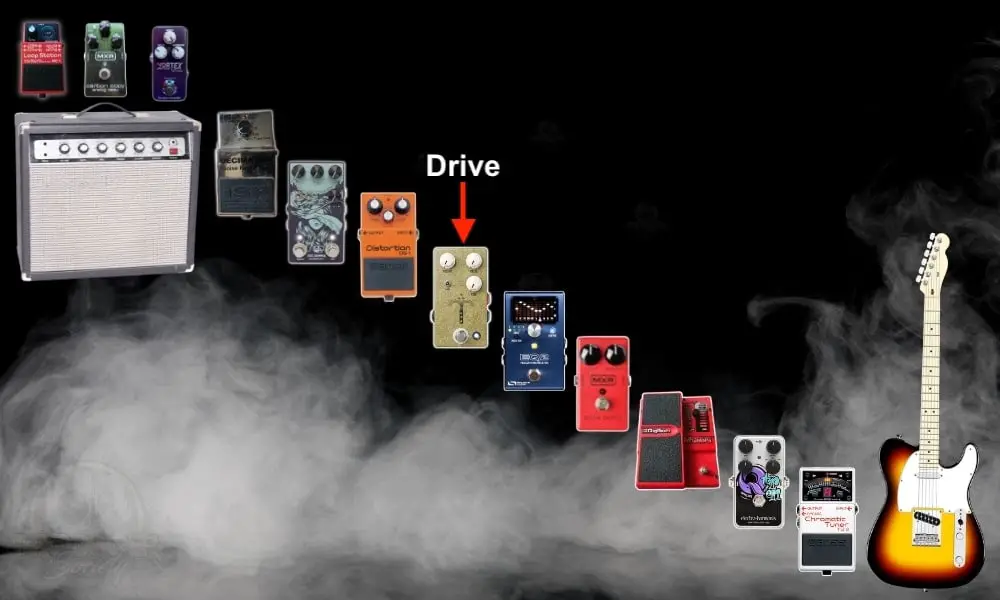
B) Placing Overdrive Before EQ
Putting things the other way around, with the overdrive before the EQ in the chain, lets you adjust the frequencies of the already overdriven signal.
This can help you emphasize certain frequencies in a more dramatic way. These days, I’ve been doing it this way although it really depends on how I’m feeling.
I’m constantly changing things around on my board because it’s always a work in progress. We’ve talked enough about this though. Let’s discuss how to get some great sounds out of this thing.
5 Cool Ways to Use the JHS Morning Glory V4
1) Compression & Drive
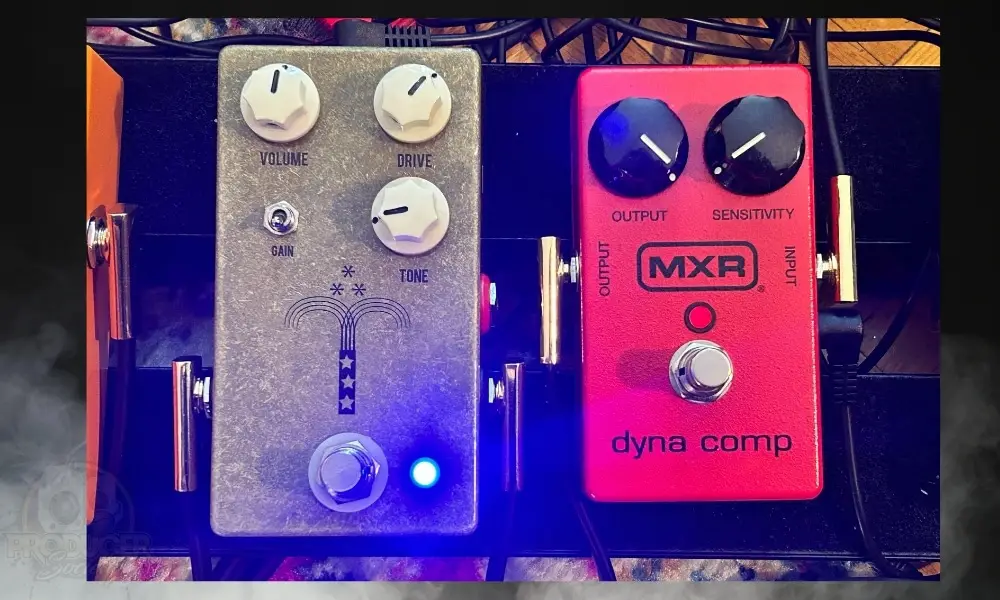
One of my personal favourite ways of using the Morning Glory is with a compression pedal, with the drive coming after compression in the chain.
This is my absolute favourite tone to play with, in fact. Here’s what the beginning of my board looks like now as of now:
Guitar > Tuner > Envelope Filter > Compression > Drive > Distortion > EQ
I find this gives a lot of good punch and sustain, with the compressor balancing out the dynamic range, making shredding with a slightly dirty tone super easy and fun.
The secret to this vibe, in my view, is to match the drive and compression output levels so activating them doesn’t lead to a volume increase, but to have just enough sensitivity on the Dyna-Comp that it makes playing a bit easier.
It’s important to note that the Dyna-Comp also adds a touch of dirt to your tone so there’s no need to go over the top with the Morning Glory.
2) Clean Boost
For my favourite boosted clean tone, great for pristine lead playing, keep the Volume high and the Drive and Tone to around 10 o’clock. Set the Gain Switch to low gain and the Bright Cut set to ‘off.’
For extra definition and punch, try out this setting after a compressor pedal, like I just mentioned above. Note that this will reduce the dynamic range of your playing, though, so it depends on what you’re going for.
The Morning Glory gives a really great clean boost on low-gain settings. I always have it on when playing and recording clean tones, as it gives a nice lift and body to the signal.
This makes the Morning Glory a great choice for all kinds of players, even jazz or R&B guitarists who use little to no breakup but enjoy clear, well-rounded clean tones.
3) Bluesbreaking Crunch
Since it is after all modelled on the Marshall Bluesbreaker, the Morning Glory is suitable for a variety of fantastic blues sounds, letting you add natural and subtle breakup to a boosted clean tone like the one described above.
A) Low Gain Blues
Turn the Bright Cut on for extra warmth. Add some reverb and you can get a tone really close to Stevie Ray Vaughan’s sound on the classic ‘Lenny’.
I would emphasize turning on the Bright Cut for this particular setting because otherwise, the treble frequencies could be a bit over the top. Do that, and you’ve got a solid clean tone with just a touch of drive. This is a great vibe. Sounds dope.
B) Higher Gain
Dialling things up a notch, flip the Gain Switch to high and crank the Drive up to around 3 o’clock to get a dirty, bluesy tone, great for soloing in particular.
Turn the Bright Cut Off, but use the Tone knob to roll off the higher frequencies to avoid tinniness, keeping it at around 10 o’clock. In general, I would argue that the Tone knob and Bright Cut should always be working in concert with one another.
This is quite a bit of gain, and frankly, I’ve grown to dislike this particular style of tone over the last few years. But I’ll give you another one just to cover all bases.
4) Full Gain
Turning up the Drive all the way on high gain mode takes you into full-blown hard rock and metal territory. Keep the volume up and the tone high (between 2 & 3 o’clock) for a gnarly, Angus Young-style tone.
This gives you plenty of dirt and is really fun for both lead and rhythm playing, as the definition remains really crisp.
In this case, I’d recommend engaging the Bright Cut, to enjoy the harmonics and saturation provided by having the Tone and Drive high, while avoiding the risk of any screeching high frequencies ruining the fun.
5) Try Out Different Guitars & Pickups

Since the Morning Glory is such a transparent overdrive unit, the sound you get will vary drastically depending on the guitar or amp you’re using it with.
Because of this, I really recommend trying out different guitars (if you have more than one), amp settings, and pedal combinations.
Single coils are a lot more responsive, for example, so they’ll pick up the overdrive from the Morning Glory in a different way from humbuckers.
These are all things to consider when crafting your tone. Not just guitars, pedals and amps, but how all these things work together to get the sound you love.
3 Solid Features of the JHS Morning Glory V4
Here are 3 of the things I like most about the JHS Morning Glory V4, followed by 3 things that I’m not so keen on.
1) The Morning Glory V4 Sounds Really Good
First of all, the Morning Glory simply sounds great. It’s a true transparent overdrive sound which is fresh and bright while also offering plenty of dirt.
The built-in controls for mitigating brightness and controlling the gain level help you get some really top-notch tones.
It works as much as a clean boost and tone shaper as it does as an overdrive unit, letting me beef up and shape my signal before sending it to other effects. It also sounds great on its own for a really tasty classic rock crunch (think early AC/DC).
2) Plentiful Control Over The Drive Without Complication
Despite this level of control, the Morning Glory has a super simple layout. It almost looks minimalist in its design, which is deceptive considering how versatile it is.
With just three knobs and two switches, the pedal is generally really intuitive to use, and packs in a lot of nuance and variety in a small amount of parameters.
3) Extra Gain Boost and Bright Switch
These two features are what really set the V4 apart from previous versions of the Morning Glory. The Gain Switch basically gives you a whole extra range of overdrive settings, almost like giving you an extra pedal for free.
What I love in particular about the Gain boost is that it still keeps things transparent, and doesn’t alter your original signal too much, instead adding to it an extra layer of natural-sounding gain with an impressive amount of nuance.
The Bright Switch also opens up a whole new range of tonal options, letting you control the highest frequencies when using high Gain and Tone settings, and resulting in some really nice sounding warm tones.
3 Things I Don’t Like About the JHS Morning Glory
1) It’s A Little Big
The Morning Glory is slightly bigger than a standard-sized stompbox like an EHX or BOSS pedal. While this is far from the end of the world, it does seem kind of unnecessary and takes up extra room on my pedalboard.
Likewise, the fact that the Gain Toggle switch can only be adjusted on the fly through an external switch like the Red Remote also takes up what for me seems to be more unnecessary space.
2) The Bright Cut Is Too Hard To Access
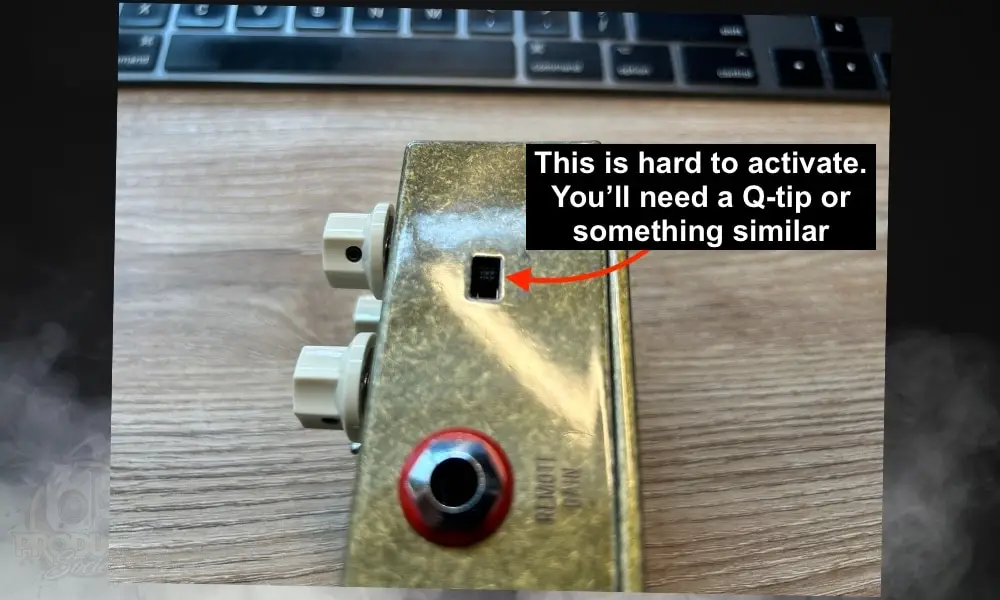
The Bright Cut switch, while a cool and useful feature, is annoyingly difficult to actually get to. You need a pen or a similarly small and thin stick to be able to flip it.
While this was probably designed this way on purpose, it seems unnecessary to me, as it makes activating or deactivating the Bright Cut much harder.
A standard switch would have been fine and more user-friendly. But there must be something I’m missing because they designed it this way on purpose.
This is the 4th version of the Morning Glory, so clearly they made it like this for reasons I’m unaware of. So take this small criticism for what it is – small.
3) The Footswitch Doesn’t Have The Satisfying Click

This one is really grasping for straws as well, to be frank. Sure, it doesn’t have that nice click sound like BOSS and EHX pedals, but it works perfectly as it is and it’s not hard to activate or disengage.
Additionally, the LED comes alive and it’s not hard to figure out whether it’s on. Initially, I wasn’t a big fan of this type of footswitch but I grew to like it a lot. BOSS and EHX footswitches seem really hard to activate now that I’ve grown to like this one.
My Walrus Audio Julia pedal has the same type of switch, so I’m thinking it must be a boutique pedal vibe. That’s a great pedal as well. Anyway, here is some more content you might be interested in.
Other Articles You May Be Interested In
- How to Use the Ibanez TS9 Tube Screamer (+ 5 Cool Settings)
- How to Connect FX Pedals to Your Guitar & Amp (EASY Guide)
- How to Use the Boss DS-1 Pedal (11 Tips)
- What Is A Guitar Overdrive Pedal?
- What’s the Difference Between Gain & Drive? [ANSWERED]