Truss rod adjustments are one of those things guitarists tend to worry about when they want to set up their guitar for the first time. If you’ve spent a lot of time on forums, you’ve probably seen this sentiment before, but it’s not that big of a deal. So how straight should your neck be?
Guitar necks are supposed to be as straight as possible. However, not every guitar can achieve this without intonation issues, fret buzz, or unwanted noises. Most guitarists prefer a small amount of relief – which refers to the degree of curvature in a guitar neck (concave vs convex).
Companies like Suhr, for instance, are known for having some of the best fret-work in the game which means the guitar can be set up in such a way where the neck is dead straight and there isn’t any fret buzz or intonation problems. Let’s talk a bit more about this now.
Guitar Necks – Straight, Convex, and Concave Curves

Explained in another way, there is a lot of fear spread around the internet over the idea of adjusting the truss rod even though the chance of breaking the guitar’s rod in the middle of a truss rod adjustment is extremely, extremely low.
As long as you use 1/4 turn adjustments at a time on the truss rod and then let it sit for a few hours, you should be just fine. It’s good practice to wait for at least a few hours, however, some people argue you should wait an entire day.
Additionally, it’s best to loosen the truss rod nut (turn it counter-clockwise) by just a tiny bit before you move on to tighten it (clockwise). This will give you an idea of how tight it is already, that way you don’t over-tighten it – I talked about this in my guide to setting up PRS guitars.
I’ll touch on how to adjust your truss rod briefly in this article, but mostly for the purpose of explaining how to determine just how straight your neck is.
I’ll explore how to adjust your truss rod down to the minute detail some other day, but for now, I’ll just briefly talk about the differences between a straight neck, a back-bowed neck, and a neck with too much relief.
Adjusting Your Truss Rod
There are some useful guidelines out there for adjusting your truss rod, but you do need a few different tools in your toolbox, including feeler gauges, an Allen wrench, and a capo.
Frankly, I find that using feeler gauges is a lot easier said than done. It certainly doesn’t seem like the best way to measure the distance between the string and the fretboard.
With that said, I still haven’t found a better way of determining the curvature of the neck other than the three main strategies I’m about to explain to you now.
How To Determine The Straightness Of The Guitar Neck
1) Eye-Balling The Neck
The first tactic we’re going to explore is the “eyeball” version, to put it in simple terms.
a) What you want to do, is you want to set your guitar’s body on the ground, with the neck facing up toward the ceiling, and you simply look down the neck and observe the curvature.
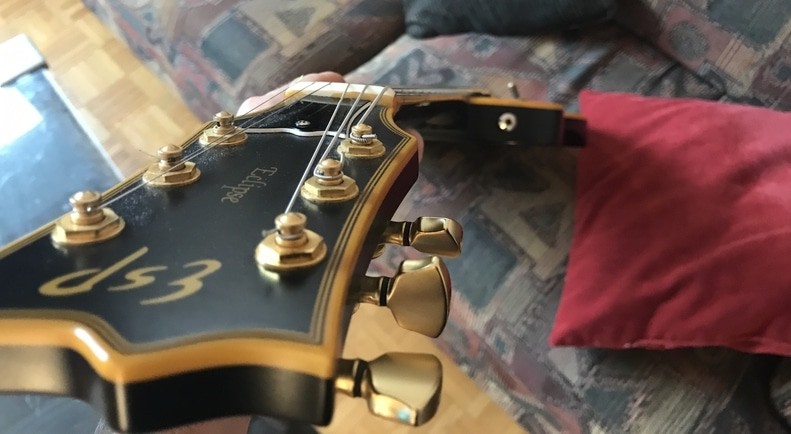
If you don’t know what you’re doing, it’s hard to determine whether it’s properly set up or not.
b) From this angle, if you pay particular attention to the area between the 3rd and 10th fret, you can see whether it’s back bowed or there is too much relief.
A back-bowed neck will look as if the top of the neck is pushing upward to the ceiling.
The range between the 15th fret and the 22nd fret is too close to the body to really gauge anything about the curvature of the neck.
Back Bowing
Dan Erlewine talks about this in his Guitar Player Repair Guide, but basically, back-bowing means that the guitar’s truss rod is too tight, which pushes the fretboard toward the strings.
As I mentioned above, this will look like the area between the 3rd and 10th fret is protruding upward, so that the fretboard is either extremely close to the strings or pressed right up against them.
In other words, the guitar will become a lot easier to play with a tightened truss rod, but if it’s too tight, there will be buzzing all over the neck, especially between the 7th and 15th frets.
In the following images, I’ve used a red line to illustrate the degree of curvature in the neck.
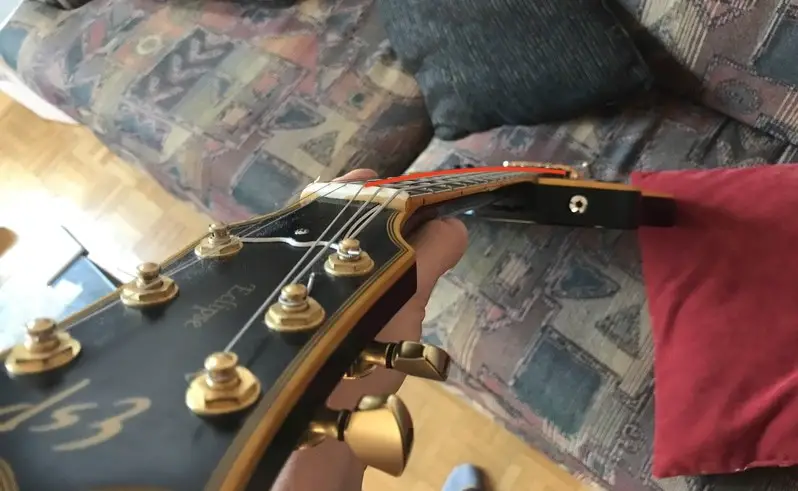
If a neck is back-bowed, this means that you want to turn the truss rod counterclockwise.
Relief
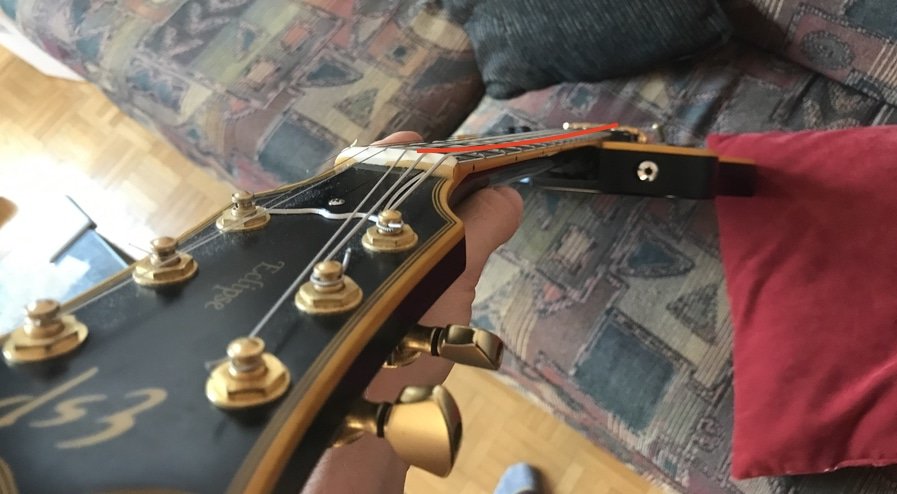
Excessive relief, on the other hand, means that the guitar’s truss rod is too loose.
A consequence of this is that the fretboard will be further away from the strings between the 7th and 15th frets.
A guitar with too much relief will make it much harder to play, but it will also eliminate nearly all of the string buzzing.
In my personal opinion, a guitar with a lot of relief tends to eliminate all of the buzzing, although, if you look at other articles on the internet about this topic, people will say that too much relief will cause buzzing from the lower frets (1st to 7th) and close to the pickups (15th to the 22nd).
This isn’t my experience (unless I just haven’t set it up so there is an incredible amount of relief), but it certainly makes sense if you think about it.
If there is too much relief in the neck, you want to turn the adjustment nut to the right or clockwise.
Some people describe a neck with a lot of relief as having a “mushy” quality because there is so much distance between the strings and the fret.
2) Using Feeler Gauges
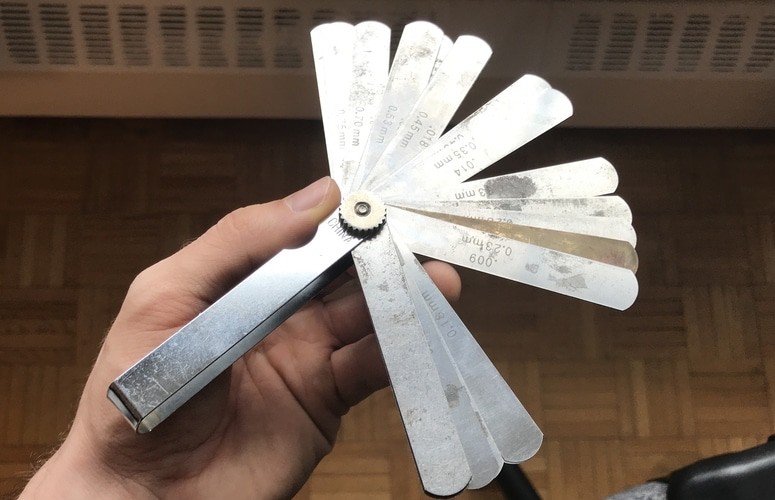
Feeler gauges (on my Product Page) are small, flat pieces of steel that you slide underneath a tight space to measure the distance between two surfaces. The piece of steel is constructed at a carefully defined thickness to measure the space between the string and the fret.
From what I understand, feeler gauges are commonly used by auto-mechanics, although, I’m not sure what for.
For instance, if a feeler gauge is measured at 0.008 (0.2032), it will be incredibly thin. This particular gauge measures a very tight space.

Typically, the most common standard for adjusting a truss rod is the following: 0.005 to 0.020 inch (or 0.015 to 0.05 centimetre).
How To Use Feeler Gauges To Determine The Neck’s Straightness
As I just mentioned, feeler gauges are made at a particular thickness which has been carefully calculated.
When purchasing feeler gauges, they typically come in a format that looks a lot like a swiss-army knife, but rather than each tool being different from each other, all of the components are a sheet of steel with different thicknesses.
a) What you want to do, is you grab a capo, assuming you own one, and then you clasp it onto the first fret of the guitar neck.
b) From there, you set the guitar’s body on the ground or on your couch.
c) Use your left hand to hold down the 17th fret.
d) Slip the feeler gauge underneath the 7th fret to measure the distance between the string and the 7th fret.
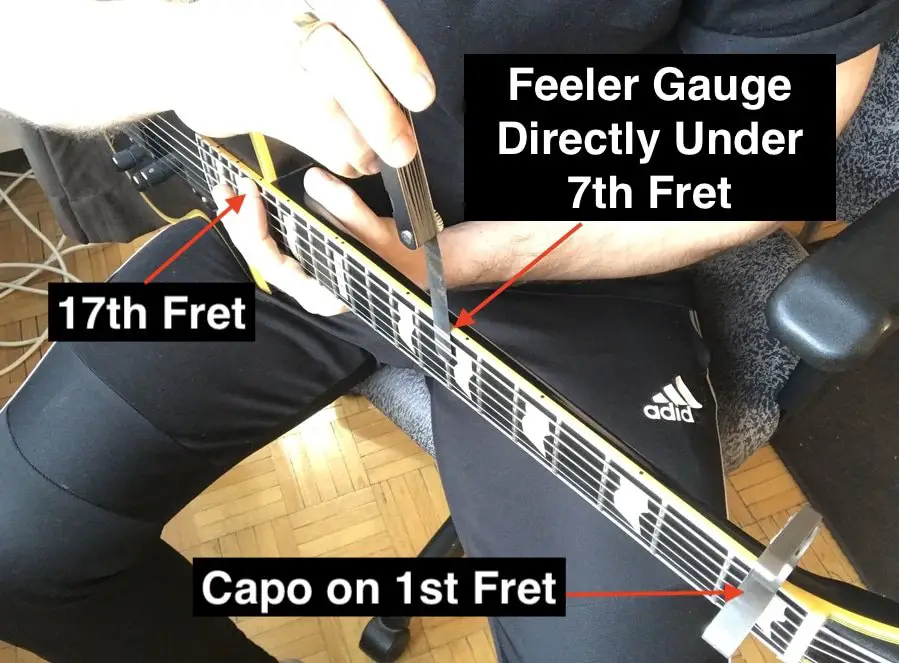
e) If there is too much space between the piece of steel, the fret, and the string, you go up one measurement on the feeler gauges, and you keep doing this until you finally find the one where the gauge slips under the string perfectly without causing the string to push up.
Like I mentioned above, this all sounds well and dandy, but I find it’s actually kind of difficult to use feeler gauges, so I tend to just eyeball it.
Furthermore, I find that just by using a capo on the first fret and fretting the 17th fret with my left hand, just looking at the distance between the 7th fret and the fretboard is usually enough to determine how much relief there is in the neck.
If you notice there is a lot of space between the fret and the string, you could probably tighten the truss rod by just a little bit. 1/4 turns are the perfect amount.
There is another method you can use to determine the straightness of the neck as well, which some people call the “touch method.”
3) How To Use The Tap Test
It’s quite similar to the first “eye-ball” method, in the sense that all you need is a capo and a finger and you’re good to go.
a) What you want to do is grab your capo, and then set it up on the 1st fret.
b) From here, you hold down the 17th fret with your finger, and then use your other hand’s finger to press down on the 7th fret.
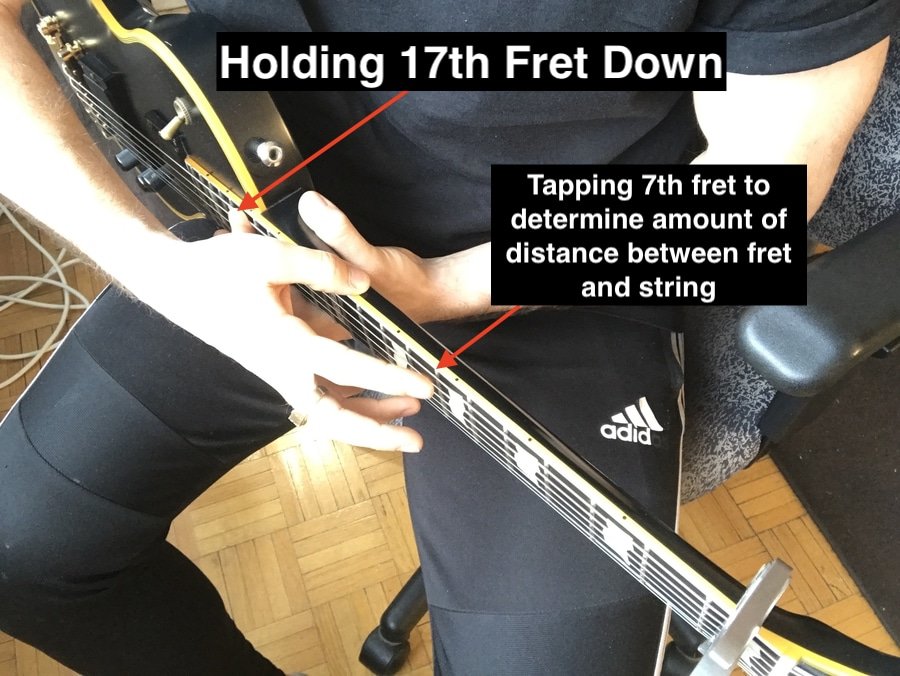
Alternatively, you can go without the use of a capo, and just hold down the 1st fret with one finger and then the 17th fret with your pinky finger. Use your right hand’s pointer finger to press down on the 9th fret.
The measurement at the 9th fret is going to be a bit different, but it should be fine.
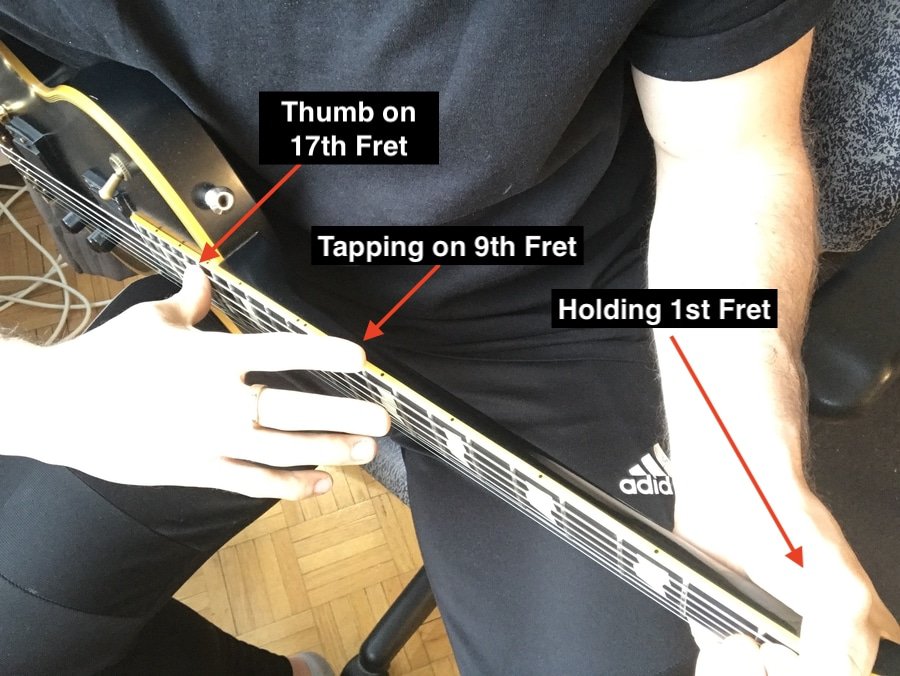
If your press on the 7th fret and there is no room at all between the fret and the string, the neck is too tight (back-bowed), but if there is a huge distance between the fret and the string that means there is too much relief (up-bowed/too much relief)
Image
Guitars Use Different Truss Rod Nut Sizes
Typically, when you purchase a guitar, you should get a truss rod tool that comes with it. For instance, the truss rod tool that comes with my Epiphone Les Paul Custom is different from the truss rod tool that comes with my PRS.
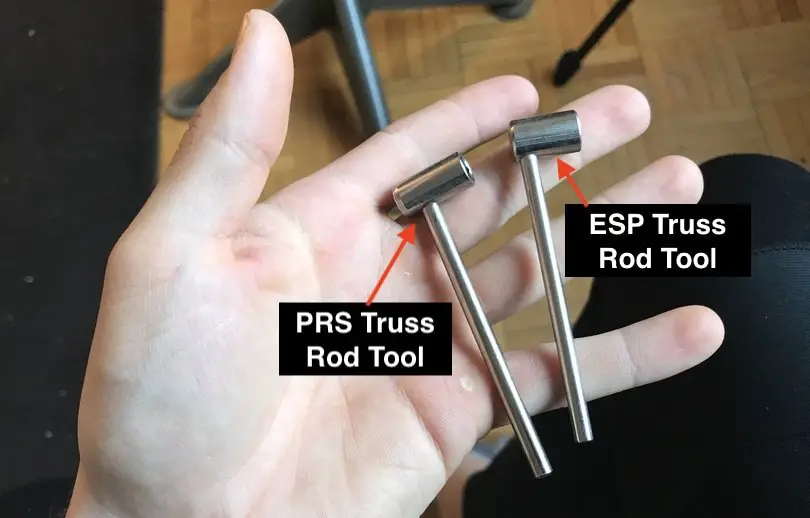
The PRS has a truss rod tool that is specific to it, and I have to use the one that came in the gig bag or it simply won’t work.
So don’t lose your truss rod tool. Keep it in a safe place.
Different Playing Styles Use Different Degrees of Curvature
As the sub-title suggests, different musical genres have different ways of setting up the truss rod, which in turn, determines how straight or curved the neck is.
For instance, in metal and “shredding,” if you want to call it that, it’s more common to have a straighter neck because it makes playing faster a lot easier.
“Shredders” like to have the neck as straight as possible because it increases playability.
If you’ve ever tried fast sweep-picking with a guitar that has very high action, you know that it’s extremely difficult to execute. The lower the action the easier it is to play.
Just think about how difficult it is to play extremely fast licks on the acoustic guitar in comparison to the electric guitar. Acoustic guitars almost always have much higher actions (more about guitar setups in my guide).
However, in other genres such as Jazz, it might be more common for the neck to have additional relief, usually because jazz players have a clean guitar tone and they don’t want any string buzz coming through their amplifier – at all.
Jazz players usually like their tone to be as clean, smooth, and as warm as possible, in contrast to metal players.
To boil it all down, a straighter neck increases playability with some compromises in buzzing and string noises, and a neck that has more curvature is harder to play but has fewer unwanted sounds and extraneous noises.
Important Points To Remember
1) Loosen the truss rod nut a tiny bit before tightening.
2) Watch for excessive resistance when tightening the truss rod. It may be too tight already.
3) Tune the guitar to standard tuning after you’ve made an adjustment.
4) Buzzing between the 5th and 12th fret can mean that you have too much back bow (truss rod too tight).
5) Buzzing between the 1st and 5th fret and the 15th and 22nd fret can mean there is too much relief (the truss rod is too loose).
6) Use the tap-test, the eye-ball method, or feeler gauges to determine relief and back bow.
In summary, I would argue that guitar players like to have their necks as straight as possible without causing any extraneous noises. Some even like a scalloped neck which I’ve talked about here.
How straight the neck is depends on a number of different factors, including what genre of music you play and the accompanying techniques that go with it.
Additionally, don’t worry too much about breaking the guitar when making adjustments because it’s not likely to happen.


 Written By :
